Sunday, January 29, 2012

365 Cards Guest Designer: Final Week


This is my final week being the guest designer at 365 Cards. It has been a lot of fun and I hope you have enjoyed my creations using Pam's sketches.


This is my interpretation of sketch #54, this week's Super Sketchy Sunday sketch. As soon as I saw the sketch I knew that I wanted to create a tri-fold card. The card is 4 1/2"x6 1/4" when it is all folded up. The smaller fold (on the left) is 2 1/2" wide and the larger flap (on the right) is 4" wide. I covered both flaps with the glittery pink cardstock, which is by Recollections. The pieces are cut 1/4" smaller than the flaps they are on. For the larger flap I also added some flocked zebra stripe paper. It is cut 1/4" smaller than the pink cardstock. The labels were cut using Elegant Edges. The three on the flap are cut at 2" and I used the regular and shadow features for them. The label that is coming off the lower right portion of the small flap is also from Elegant Edges. It is the "book" feature. It is the same label as the other ones and is cut at 2 1/4 (white layer) and 2 1/2" (black layer). I stamped my sentiment, which is from Scrappy Mom Stamps on the label and adhered it to the back of the flap. I then added some magenta Stickles around the edge of the white part of the label. I used Birthday Bash to cut out the "3" and "0" at 1 1/2." I then flocked them with some black flocking powder. The martini glass is from Cuttin' Up and cut at 2." I used pop-dots to adhere it to the card.

I am also entering this card in this week's Cupcake Inspirations challenge.

Saturday, January 28, 2012

Valentine's Wall Hanging

I have a small piece of wall space between my front door and the window next to it. I like having something hanging there and have for fall and winter. I haven't liked anything for Valentine's Day, so I decided to make my own decor.

I used Ribbons & Rosettes for the rosettes. The pieces were cut at 2," so the rosettes are about 4" tall. I used two different shades of pink to create my rosette. Once those were all assembled I cut the scalloped circle from Lacy Labels at 2 1/4." I used white for that piece and the inner ring is the same darker pink I used on the rosettes. I used Martha Stewart Elegant Cake Art for the letters. I cut them at 1 3/4" and use a glittery dark pink cardstock. The heart at the bottom is cut from Cricut American Alphabet, one of the pre-loaded cartridges that came with the E2. It is cut at 2." I used some magenta Stickles on the swirl and star dust Stickles for the white shadow layer. I covered the light pink part of the heart with glossy accents and finished it off with some pink bling. The angel is a Peachy Keen Stamp. I colored her with my Prismacolor pencils, then cut her out. I gave her a little piece of bling for her hair, and used some yellow Stickles on her halo and star dust Stickles on her wings. The cloud is cut using Graphically Speaking, at 2" (real dial size), and I covered it with a cotton ball that I tore apart. I attached all the rosettes to a piece of ribbon, which I looped at the top so that I could hang it on my wall. I have close-up picutres of each individual rosette below.


I made this for the following challenges:

Sunday, January 22, 2012

365 Cards Guest Designer: Week 2

This is my second week being a guest designer for 365 Cards. This is this week's sketch, and below is my take on the sketch.

I made a 4 1/4"x5 1/2" card, using dark red cardstock. I cut some glittery black cardstock 1/4" smaller, then embossed it with the Diamond Plate embossing folder and my Cuttlebug, although it doesn't show well in the photos. I adhered it down and added four silver brads to the corners. I used Indie Art to cut the shadow version of the heart out of the dark red cardstock. It is cut at 3 1/2." I then added some silver craft metal across the card. I cut some glittery black cardstock using the shadow heart again, this time cut at 3." I cut the regular heart with the dark red cardstock, again at 3." I pop-dotted the 3" hearts and covered the red one in crackle accents.

Saturday, January 21, 2012

Belize Wedding Layout

I think this layout turned out beautifully! I might be a little biased though. :)

The couple in the photo are two of my closest friends. They had a destination wedding in Belize (if you couldn't guess) in June and my husband and I were able to go down and share their special day with them. Well, now I am working on the scrapbook of their wedding. It is a slow process since I am way more of a card maker, but I also love to do layouts, so it is enjoyable when I do work on one of the pages for the scrapbook. I have already gotten a couple of two-page layouts done for them. This is my most recent one and will be the first page. I was inspired to do this one when I saw the current sketch challenge at Stuck On U Sketches, and I will be entering this layout for the challenge.

It is 12"x12" and I used a glittery teal cardstock for the base of the page. I covered it with 2"x2" squares. There are five colors/patterns. I used a shimmery coral cardstock, an ivory cardstock, a beachy striped cardstock, a sand patterned cardstock and a lacy floral patterned cardstock. Since it is a wedding I want there to be some formal elements to the pages, but it was a destination beach wedding, so it also has to be fun. The solid colored cardstocks (shimmery coral, glittery teal and ivory) are all from the Mediterranean Stack by DCWV. The striped and sand patterned cardstocks are from the Tahiti Beach Stack and the lacy floral cardstock is from the Formal Affair Stack, both are by DCWV. The photo is 5"x7" and is matted with the ivory and shimmery coral cardstocks. Both mats are 1/8" larger than the previous layer. I used my Gypsy and Don Juan to create the title. Both the font and the swirl are from the Don Juan cartridge. I welded the shadow font and the swirl together and cut them from the glittery teal cardstock. I then cut the regular font from the shimmery coral cardstock. The title is adhered down and I added glossy accents to the coral part of the title. I also handwrote in the date, following the curve of the swirl. The largest white flower is cut using Mother's Day Boquet. I cut the largest flower at 3," the next one at 2 1/2," the next smaller one at 2" and the final flower at 1 1/2." I embossed them all with the Victoria embossing folder, sprayed them with shimmer mist, then attached them together with a teal pearl brad. I curled the petals of the bottom two layers under and curled the top two up. The flower is adhered with three pop-dots. The rest of the flowers are all Prima flowers that I sprayed with bahama blue and coral reef Glimmer Mist, by Tattered Angels. I put two or three of them together, using either teal or white pearl brads to attach them. They are adhered either with glue dots or pop-dots.

Thursday, January 19, 2012

Martini Birthday

This card is 4 1/2"x6 1/4." I used black cardstock for the base of the card. I then cut a piece of white cardstock at 4 1/4"x6." I stamped the martini glass image on it multiple times, then heat embossed it with clear embossing poweder. I used a sponge applicator to ink the cardstock with pearlescent orchid ink, by Tsukineko. I wrapped it with some polka dotted ribbon and adhered it to the card base. The martini glass is cut at 3 1/4" from Cuttin' Up. I cut the shadow piece in black, then the regular part in a pearlescent white cardstock. I cut the regular piece again in a pearlescent pink cardstock but just cut out the "drink" part of the glass. I embossed it with the Cuttlebug and the D'vine Swirls embossing folder. I used pop-dots to adhere it to the card. I tied a bow using some more polka dotted ribbon and adhered it to the stem of the martini glass. I used Cuttin' Up for the numbers as well. They are cut at 2," using black for the shadow and the pearlescent white for the regular cut. I then covered the white portion with star dust Stickles. I adhered it to the base of the card so that part of the numbers were under the martini glass. I stamped my sentiment in black ink on white cardstock. I then matted it with the pearlescent pink and black cardstocks. I used pop-dots to adhere it over the bottom of the martini glass.

I also finished the inside of the card. I cut some pearlescent pink cardstock at 4 1/4"x6" and some white cardstock at 4"x5 3/4." I stamped the martini glasses in the same pearlescent orchid ink that I used on the front.


I made this card for the following challenges:


BBTB2: numbers challenge


Celebrate the Occasion: any occasion, use polka dots


Whimsical Designs: anything goes


Perfect Sentiments: birthday, emboss resist technique

Sunday, January 15, 2012

365 Cards Guest Designer

I was asked to be a guest designer for the month of January at 365 Cards. Of course I accepted. This means that on Sundays, when they do their Super Sketchy Sunday challenge I will be participating as a Guest Designer. This is my first week, I will be participating in two more, and this is the sketch. 
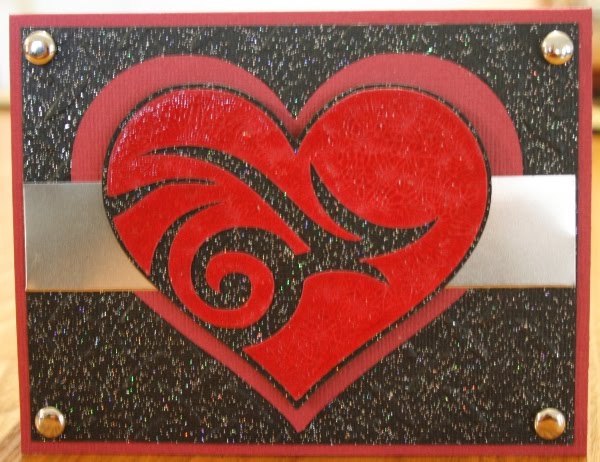
Here is the card I made following the sketch.
This card is 4 1/2"x6 1/4." I used a shimmery pink cardstock for the base. I cut a piece of glittery pinkish-purple cardstock at 4 1/4"x3 1/4." I rounded the corners on the tops of the card and the glittery pinkish-purple rectangle. I wrapped the card with some pink organdy ribbon. I cut the striped pink cardstock using Ribbons & Rosettes. It is one of the border features on the cartridge. I cut it at 4 1/4" using the cut to length feature, this makes it about 2 3/4" tall. I also cut the heart using Ribbons & Rosettes. It is cut at 1 3/4." I used pop-dots to adhere it to the card and covered it with glossy accents. My sentiment is stamped in pearlescent puple ink, by Tsukineko, using a Scrappy Moms Stamp. I stamped it on pink paper, matted it with the glittery pinkish-purple cardstock and also rounded the top corners.

Friday, January 13, 2012

One Year Older...

I am really loving how this card turned out! I had an idea in mind and it actually looks quite like what I had pictured...love it when that happens! :)
The card is 6"x6." I used black cardstock for the base. I then cut some gear patterned cardstock 1/8" smaller and adhered it to the card base. The gear cardstock is from the Tattered Time Stack by DCWV. I used a Tim Holtz die, called Weathered Clock, for the clock. Once it was cut I used it as a template to freehand cut the black "shadow" layer, which I distressed the edges of. I inked the clock with Tim Holtz weathered wood ink. I used a silver brad to attach the hands of the clock together and I then covered the brad with tarnished brass Stickles. I cut a strip of the grayish cardstock at 2 1/2"x5" and embossed it with a Tim Holtz embossing folder called Steampunk. I then sanded it down to give it a more distressed look. I matted it with some black cardstock 1/8" larger and distressed the edges of it as well. I used Celebrate with Flourish to cut the clock and hat. I used pop-dots to adhere it to the card. I used a Fiskars stamp for my sentiment and stamped it with the weathered wood ink, then used some foam adhesive to adhere it to my card.
I made this card for the following challenges:
365 Cards: "Day 314" - sketch
Birthday Sundaes: birthday card
Fantabulous Cricut: masculine project
My Sheri Crafts: clock

Saturday, January 07, 2012

Owl

Today is the final of the "Pretty Pairs" challenges at 365 Cards. Today is "Day 313" and the challenge is paisley & yellow. My card for this challenge is 4 1/2"x6 1/4." I used yellow cardstock for the card base. I trimmed some shimmery purple cardstock to 4 1/4"x6" and then some paisley cardstock 1/8" smaller than that. The paisley cardstock is from the Rustic Stack by DCWV. I cut a strip of the shimmery purple cardstock at 4 1/8"x2" and used a Martha Stewart border punch on the bottom edge of it. I wrapped it with some yellow ribbon and adhered it to the card. The stylized owl is from Cindy Loo. It is cut at 2 1/2." I used some yellow Stickles on its eyes, beak and feathers. I used pop-dots to adhere it to the card. The tag is a pre-made one I found in my stash. The sentiment is a clear stamp by My Pink Stamper. I adhered the tag down with pop-dots on the left hand side and regular adhesive on the right hand side, so it angles down. The flowers are two Prima flowers that I sprayed with Tattered Angels Glimmer Mist. I used a shimmery purple brad to attach them together and put it on the middle of the ribbon.

Cool Cat

This fun card is 4 1/4"x5 1/2." I used a pre-made glittery black card by DCWV for the card base. I cut a piece of white cardstock at 3 1/2"x4" and used 1/2" black squares to create my checkerboard pattern. I matted it with some teal cardstock that is 1/8" larger. I cut a strip of teal cardstock the same width as the teal mat and 1/8" larger than the ribbon. I adhered it to the rectangle and wrapped it with the polka dotted ribbon. I used Nifty Fifties for the cat. It is cut at 3 1/4." I added some star dust Stickles to the collar and star and lagoon Stickles around the edge of the teal shape behind the cat. The piece is pop-dotted to the card. I used a Scrappy Moms stamp for the sentiment. The polka dotted circles at the bottom are metal brad tops, which I got at JoAnns, when I was still in Alaska, when they were on clearance. For the inside I used Nifty Fifties again to cut the "cool cat" part of the phrase. It is cut at 3/4." I used gunmetal Stickles on it to mimic the look of the card base. I handwrote the "to one" part of the phrase using a shimmery gel pen.

I made this card for the following challenges:


Thursday, January 05, 2012

Dragonfly Note Cards

I got a third project in for the day! This is unheard of, but I am trying to make the most of my last week of freedom before I go back to school. This is going to be a tough semester. It may only be two classes, but they are pretty intense ones. I will be taking Anatomy & Physiology and my EMT-B class. In addition to school I work full time and go to the gym three days a week. I'm not sure how often I will be able to get in crafting. I hope to be able to do something at least once a week, but only time will tell.

This little project I did today is a set of three notecards. The notecards are 3 1/2"x3 1/2." I used white cardstock for the base. I then cut some shimmery dark green cardstock at 3 1/4"x3 1/4." Finally, I cut some green striped paper at 3"x3." I used Pagoda to cut the dragonflies. They are cut at 4." This makes them about 2 1/2 to 2 3/4" each. I put one on each card. The main part of the dragonfly is the same shimmery dark green cardstock I used for the mat. I then cut a lighter green cardstock for the wings and added some firefly Stickles to give it some shimmer.


I made this card for 365 Cards' "Day 309" Pretty Pairs challenge. The pretty pairs for this day is green and stripes.


Dancing Pair

I got another card made today! This one is for "Day 311" at 365 Cards. It is for their damask & pink "Pretty Pairs" challenge. I used black cardstock for the card base, it is 4 1/2"x6 1/4." I then cut some ivory & black damask cardstock 1/8" smaller. I cut some striped pink cardstock at 2"x4 3/8" and adhered it to the bottom of the damask piece. I that with some black ribbon, aligning the top of the ribbon with the top of the pink cardstock. I used Shall We Dance? for the medallion of the dancing pair. I used my Gypsy to hide the cuts so I could cut a solid cream piece, then cut the regular one in black. I then sprayed the black medallion in sparkle Shimmer Mist. I used pop-dots to adhere the medallion to the card. I then added some dark pink pearls to the edges. I used a Scrappy Moms stamp for the sentiment. It is stamped in black ink on cream cardstock and matted 1/8" larger with black cardstock.

Paper Lace Valentine

I've got a Valentine's shaped card for you today. It was made using Paper Lace 2. I welded two of the shadow images together using my Gypsy. The card is about 4 1/2x4 1/2." I then cut the inner layer twice, once in white cardstock and again in red vellum. I wanted the red vellum to be bright and vibrant, which I didn't get when it was laid on the glittery black cardstock of the card base. It looked really nice that way, just not what I was going for. I then used two Fiskars punches for the hearts. I punched the large ones from a red gingham paper and the small ones from the same glittery black cardstock as the card base. I used foam adhesive to adhere them to the card for some added dimension.

I made this card for the following challenges:

Monday, January 02, 2012

Ice Skate Card

Here is a fun shaped card for you today! I used the ice skate from Winter Woodland to create the shape. I welded two shadow images, using my Gypsy, to create the card base. The skates are 5.556" tall. The ice skater is also from Winter Woodland. She is cut at 4." I embossed her dress with my Cuttlebug and the Swiss Dots embossing folder. I added some glossy accents to her ice skates and flocking to the white trim of her dress. I used pop-dots to adhere her to the card. My sentiment is a Fiskars stamp that I stamped using blue iris ink by ColorBox. I trimmed the white paper down and matted it with some pink cardstock cut 1/8" larger. I then adhered the ends down, curving it over her leg. I finished it off with two pink pearls.

I made this card for the following challenges:


Sunday, January 01, 2012

Blue Snowflakes

This wintery card is 4 1/4"x5 1/2." I used a pre-made shimmery white card, by DCWV, for the card base. I then cut some blue snowflake patterned cardstock at 4"x5 1/4." The snowflake cardstock is from the Winter Magic Stack by DCWV. I cut some shimmery white cardstock at 4 1/4"x3" and then used a Martha Stewart border punch along the right edge. The snowflakes are from A Child's Year. The two dark blue ones are cut at 1 3/4" and the light blue one is 2 1/4." I adhered the two smaller ones to the card then covered them in dark blue Stickles. The larger one is adhered with pop-dots and I added some clear bling to the ends of the snowflake. I finished off the card with some dark blue bling in the corners of the shimmery white piece. A nice and simple one, but perfect for the current weather. We finally got our snow here in central Minnesota. We didn't have anything for Christmas, but now we do...now when I want it to start going away! Oh well, what can you do?

I made this card for the following challenges: