Sunday, August 23, 2015

Huckleberry Hound

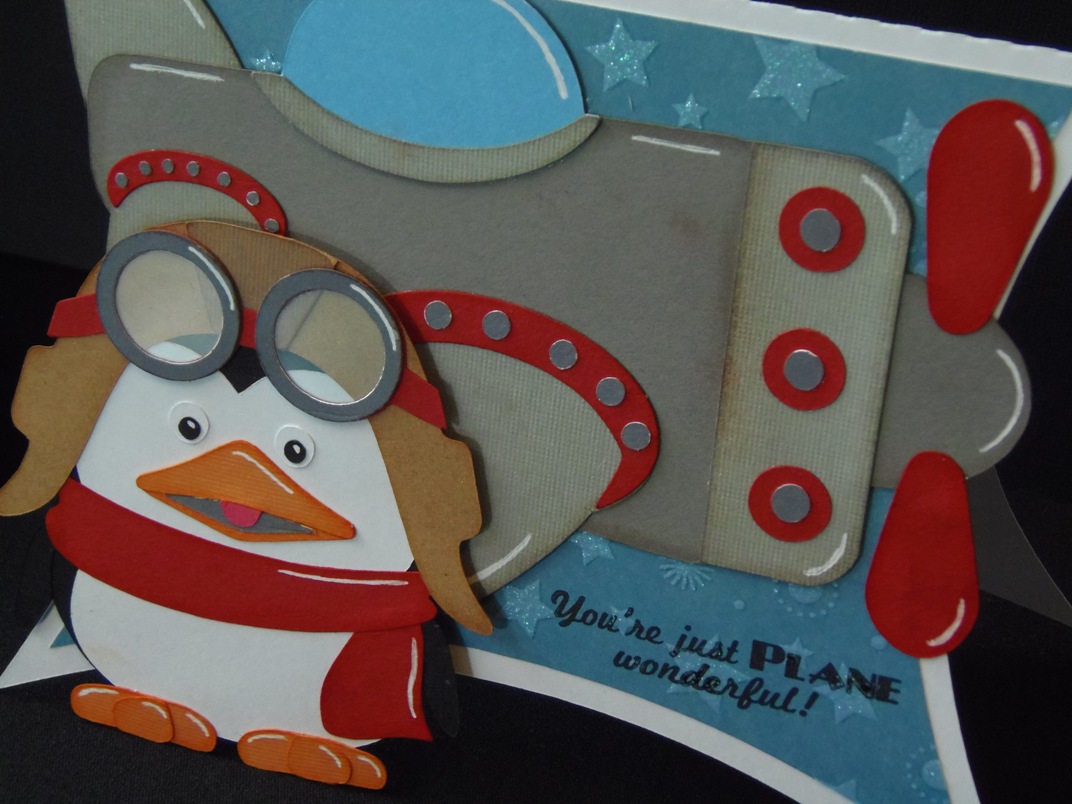
I start a new semester tomorrow, so I don't know how consistently I will be able to craft.  So, I had to make sure I got some crafting time in today.  I made a cute shaped card:  


I used a cut file from SVG Cutting Files to create the shape of the card.  The Huckleberry Hound file is from a past blog hop and was only available during the hop.  I used the Silhouette's offset feature to make an outline, which I cut twice, to create the card base.  It is about 4 1/4"x8 1/2."


I inked around the edges of most of the pieces to give a little of dimension.  The blue pieces were inked with salty ocean Distress Ink.  The banjo and the tan piece of his muzzle were inked with tea dye Distress Ink.  The light grey part of the canoe was inked with weathered wood Distress Ink.


The sentiment is from Jaded Blossom, the The Great Outdoors set.


I made this for the following challenges:
My Sheri Crafts: thinking of you, hello, miss you, etc. theme
SVG Cutting Files: thinking of you

Thursday, August 20, 2015

Bookworm

The card I made today features a cute little bookworm:


The card base was made with a cut file from SVG Cutting Files.  It is called Trapezoid Card Base.  I cut two of the layers, one larger than the other to create two mats.

The bookworm is from My Scrap Chick.  I got it as part of a file called Bugs & Things, but you can now purchase it individually as a file called Bookworm.  I inked up the edges of his nose with peeled paint Distress Ink and the edges of his body with crushed olive Distress Ink.  I did not cut his eyes, instead I used stamps from a Peachy Keen face.  The eyes are from one of the largest face stamp of the Cornies Assortment.  I used foam tape to adhere the top part of the book to the worm.

The stack of books is also from SVG Cutting Files.  It is part of a cut file called Pebbles the Cat.  I used foam tape to adhere the whole piece, worm and books, to the card.

The sentiment is from Scrappy Moms Stamps, the Catch the Reading Bug set.  Once the sentiment was stamped I used my Cuttlebug and the Seeing Spots folder to emboss the white mat.


Wednesday, August 19, 2015

Flying Penguin

I am, apparently, on a penguin kick.  Here is another card featuring a penguin:


The card base is from SVG Cutting Files.  It is called Curved Card Base.  It is about 5 1/4"x6 7/8" when folded.


Both the airplane and penguin are svgs from Kadoodle Bug Designs.  They were in a set called Air Force Penguin, but it has retired, and is no longer available.  The airplane is a little shorter than 6" wide.  The penguin is 3 5/8" tall.  I pieced them all together, then used a white gel pen to add a little detail.  I also used acetate to cut the inner part of his aviator goggles.  The penguin is mounted to the card with foam tape.

The sentiment is from Scrappy Moms Stamps.  It is from the Ready, Set, Go! set.

Tuesday, August 18, 2015

Cool Penguin

I start school next week, so I am trying to get in all the crafting I can this week.  Here is a card I made today:

The card is 5 1/2"x4 1/4" and I used white card stock for the base.  I cut some black card stock at 5 1/4"x4."  The teal polka dot mat is 5"x3 3/4."  The next black mat is 4 3/4"x3 1/2."  The grey snow mat is 4 5/8"x3 3/8."  I then put a strip of white card stock at the bottom to look like a field of snow.  It was cut at 1 1/2"x3 3/8."

The penguin is an svg from Treasure Box Designs.  It is called Tiny Treasures Penguin, I cut it so that it is about 4" when assembled.  I used foam tape to adhere the feet, beak, and head.  I also inked the edges of the beak and feet with spiced marmalade Distress Ink.

I used a face from Peachy Keen Stamps instead of the eyes that come with the cut.  I only used the eyes from one of the faces on the Sweet on You set.  I then added a little color to the eyes and also added a little blush to the cheeks.

The sentiment is from Jaded Blossom.  It actually comes from the Ice Cream Kit set.

Monday, August 17, 2015

Bad Ass Birthday Card

I made the coolest card today!!
Daryl Dixon, from "The Walking Dead," one of the biggest badasses on the show!


The card base and Daryl are from SVG Cutting Files.  The card base is called Wave Card Base.  I cut it so that, when folded, it is about 4 1/8"x5 1/2."  I inked around the edges of the card base with tea dye Distress Ink.  The strips were cut using a rectangle in Cricut Design Space.  I stretched it to be slightly longer than the card base, then cut it to follow the curve.  I distressed the edges of the blue strip and inked the edges of the white strip with tea dye Distress Ink.

Daryl is also from SVG Cutting Files.  He is a cut file you can get if you are a member of the SVG Cutting Files Galleria on Facebook.  I cut him at about 3 3/8" tall.  I used the offset feature in Silhouette to create a shadow, the offset was .15."  I distressed his jeans and the shirt.  I also added a little white ink around the vest.  I also used a white gel pen to add some detail to his eyes.  Finally, I strung the crossbow using some black thread.

The sentiments are from Jaded Blossom.  The "happy birthday" is from So Many Birthdays and "bad ass" is from Sassy Pants.


Friday, August 14, 2015

Mushroom Gift Set

Today's post is a coordinated box and card gift set:

The box is from SVG Cutting Files.  It is called Mushroom Box.  I did not change any sizes before cutting and when it is all assembled it stands a little less than 5" tall.  I inked up the edges of the door and windows with tea dye Distress Ink and used a red brad for the door handle.


The card is 5 1/2"x4 1/4" and made with white card stock.  I cut a woodgrain mat at 5 3/8"x4 1/8".  The blue patterned mat is 4 1/4"x3."  The mushroom strip is 1 3/4"x5 1/2" and I topped it with a strip of red card stock 1/4" wide.  The gnome and sentiment are both from Jaded Blossom.  They are from the Gnomies Forever set.  I used the file provided by Jaded Blossom to cut the gnome image before stamping it.  I then colored it in and adhered it to the card with foam tape.


Thursday, August 13, 2015

Yellow Brick Road

I have a friend who loves the "Wizard of Oz."  She sent me a little note a few months ago and I have been terrible about responding to it.  I hope this cute little card will make up for the fact that I took far too long to respond.


The card base and images are from SVG Cutting Files.  The card base and yellow brick road are a cut file called Dorothy Shoe Card Kit.  I only used the card base and the road.  I also stretched the road to fit the entire length of the card.  It was cut to be a 5 1/2"x4 1/4" sized card.


Dorothy and Toto are from the Chibi Kid Oz - Set 1 file.  I hid the contours on Dorothy's face and used Peachy Keen Stamps instead.  Her face is from the Wide Eyed Kids Face Assortment.  The eyes and nose are from one of the largest faces, and the mouth is from the next size down.  I used a white gel pen and some markers to give a little detail to her eyes and mouth.  I covered her shoes with red glitter then glossy accents.  I also used glossy accents on Toto's nose and eyes.  Toto is adhered with foam tape.


The sentiment is from Jaded Blossom, the Yellow Brick Road set.

Castle

My husband and I have become friends with one of the guys in his office, and his wife.  This guy paints models for the game Warhammer, and he is quite good.  He offered me a deal one day, probably over a year ago now, where he would paint me a dragon (since I love them and have a huge collection) if I would make him a castle.  I agreed and have now, finally, came through on my end of the deal.


I found this castle cut file on Pinterest and went to the site to download the file.  It was free and came with very good directions.  There were a lot of pieces, but it went together quite easily, it was just time consuming.  Once all the pieces were cut it took me about 3 1/2 hours to get it all put together.  Once it is all assembled it stands about 10 1/2" high, from the base to tip of the spires.


And, to show just how nerdy I am, I took some pictures of the castle with my Lego Bilbo Baggins and Smaug figures.