Thursday, August 29, 2013

Campin' Critters - Creation #3

For today's "Campin' Critters" creation I made a shaped card, with the help of Cricut Craft Room, of course.
 
I welded two shadows of the lake scene together in Cricut Craft Room to create my card base.  The lake scene is found on page 64.  I cut it at 4."  I layered all my pieces together, embossing the lake with the D'vine Swirls embossing folder.
 
The little tubing duckie can be found on page 49.  I cut it at 2."  I adhered the duckie with some foam tape.  I also covered the bill and tube with glossy accents.
 
The sentiment is from Scrappy Moms Stamps.
 
I made this for the following challenges:
365 Cards: "Day 240" - trigger word "cool"
BBTB2: water project
Fantabulous Cricut: summer heat

Campin' Critters - Creation #2

Here is the card I created for my second creation using the "Campin' Critters" cartridge:
 
I used the cute little reading squirrel found on page 31 of the handbook.  I cut him at 2 1/2."
 

The card is 4 1/2"x6 1/4."  I cut a strip of shimmery green cardstock at 2"x4" and adhered it down.  I cut a square of kraft cardstock at 3"x3" and a square of ivory cardstock at 2 7/8"x2 7/8."  I adhered my squirrel to the squares and then adhered that to the card with foam tape.  I finished it off with a sentiment from Paper Smooches, stamped in rich cocoa ink by Tsukineko.
 
I made this card for the book challenge at CASology.

Wednesday, August 28, 2013

Campin' Critters - Creation #1

So, now that I have played with the "Groovy Times" cartridge, and showed you a bunch of fun projects to make with it, I am moving on to my next cartridge to explore: "Campin' Critters."  This is such a fun cartridge with some really cute images.  If you like to camp or just be outdoors, then this is a great cartridge for you to own.  Here is the first project I have made with this cartridge:
 
I created a clock for our camper!
 
I bought a cheap clock at Walmart and then fixed it up using the "Campin' Critters cartridge and some fun cardstock.  I measured the clock face and cut two circles, one for the actual face and one for the hole for the clock hands, using the "Cricut Craft Room Basics" digital cartridge.  It was really easy to line up using the Cricut Craft Room.  I am so glad to have the program when making things like this.  I used some patterned cardstock from The Paper Studio's Great Outdoors paper stack for my background.
 
I sized everything in Cricut Craft Room to make sure it would fit on my clock face.  The car and the camper are the cuts I used from "Campin' Critters."  The car is found on page 55 and I cut it at 3."  The camper is on page 54 and I cut it at 2 1/4."  I welded the black layers together to really give the car the appearance that it was pulling the camper.  I then adhered it to the clock face.  I covered the white part of the camper with glossy accents and the lights of the card with some paprika Stickles.
 
All the numbers are from the digital cartridge "Cricut Craft Room Basics."  The 12 and 6 were cut at 1" and the rest of the numbers at 3/4."  I left off the 3 and 9 because of my image.  I also adhered the 12 and 6 with some thin foam tape for a little dimension, but not thick enough to get in the way of the hands of the clock.
 
I am entering this in the current challenge at Exploring Cricut, which is to create a project using any Cricut cartridge and at least two cuts.

Sunday, August 25, 2013

Groovy Times - Creation #6

Here is a fun masculine birthday card for my sixth creation using "Groovy Times."
 
 
The card is 5 1/2"x4 1/4."  I used dark brown cardstock for the card base.  I cut some red patterned paper at 5 3/8"x4 1/8" and some mushroom patterned paper at 5 1/4"x4."  I then cut a square of brown cardstock at 2 3/8"x2 3/8," some red patterned paper at 2 1/4"x2 1/4" and finally, some tan patterned paper at 2 1/8"x2 1/8."  All the patterned paper is from Colorbok, their Woodland paper stack.
 
The mushroom is cut at 3 1/2" from "Groovy Times."  It can be found on page 36 of the handbook.  I used my computer to generate my sentiment and printed it out on the tan patterned paper and cut it into a banner shape.  I matted it with some blue patterned paper.
 
The mushroom is adhered with pop-dots.  I also adhered the middle of the sentiment banner with some pop-dots for more dimension.  I finished off the card with some pale blue pearls.
 
I used the sketch from "Day 237" at 365 Cards for the layout of my card.

Silhouette Sunday - Autumn Greetings

For today's Silhouette Sunday I decided to create an autumn card.  It has been so hot here lately that I thought I would think of cooler temperatures and autumn is my favorite season.
 
The card is 5"x7" and the card base is made from orange cardstock.  I cut a piece of brown cardstock at 4 7/8"x6 7/8" and a piece of wheat patterned cardstock at 4 3/4"x6 3/4."  The wheat cardstock is from Debbie Mumm.
 
My Silhouette cut is the wagon load of pumpkins.  It is #47520 and is designed by Miss Kate Cuttables.  I didn't use the shadow beneath the wagon or the corn.  When it is all assembled it is about 3" tall and 6" long.  I popped up part of the wagon and the small pumpkin in the wagon.  I also cut a piece of yellow cardstock and punched it with a Fiskars grass edge punch.
 
The sentiment is from Peachy Keen and is stamped in dark cocoa ink by Tsukineko.  I trimmed the cardstock into a banner shape.  I adhered it down with a pop-dot in the middle to give it a wavy look.  I then finished off the card with a brown button at the edge of the sentiment.
 
I made this for the "Day 234" challenge at 365 Cards, which is to make a card 5"x7" or larger.

Wednesday, August 21, 2013

Groovy Times - Creation #5

I created a Christmas card for my 5th creation using the "Groovy Times" cartridge.
 
The card is 4 1/2"x6 1/4."  The burgundy mat is 4 1/4"x6" and the white mat is 4 1/8"x5 7/8."  The green circle is 3," the green banner is 3"x3/4" and the red banner is 2 1/2"x1/2."
 
I used the "peace" image found on page 50 for the image of this card.  I cut it at 1 1/2".  The two smaller doves are cut smaller, but I don't remember the size.  I used foam tape to adhere the word peace and the dove on the circle.  The dove on the banners is just adhered down, it is also flipped from the regular image.
 
For the inside I matted it with the burgundy and white again, in the same sizes as the outside.  I used a stamp from My Craft Spot's "Joy to the World" stamp set for the sentiment.  It is stamped in pearlescent ivy ink by Tsukineko.  I then matted it with burgundy and green.  I cut two more doves from "Groovy Times" and adhered them around the sentiment.
 
I chose to use much more traditional Christmas colors for this card since the image I used was quite non-traditional.  It is much more of a hippie peace than the typical Christmas one, but I think it works quite well with the red, green, and gold colors.
 
I made this for the following challenges:
365 Cards: "Day 230" - sketch
BBTB2: use a bird image
Christmas Card Challenges: non-traditional Christmas image

Sunday, August 18, 2013

Silhouette Sunday - Sharpest Tool

For this Sunday Silhouette project I made a masculine card using some tool shapes I cut with my Silhouette Cameo.
 
The card is 5 1/2"x4 1/4."  I used dark brown cardstock for the card base.  The blue mat is 5 3/8"x4 1/8" and is from The Guy Stack by DCWV.  I cut a measuring tape border using some paper from the My Sunshine Stack by DCWV.
 
All the tools were from the Silhouette store.  The pliers are #18204 , the hammer is #18200, the wrench is #18203 , the handsaw is #18201 , and the screwdriver is #18202.  They are all from Hero Arts.  I cut just their silhouettes from dark brown cardstock.  I mounted them on some kraft cardstock that was embossed with the wood grain folder by Darice.  They are all then matted with more dark brown cardstock.
 
The sentiment is from Scrappy Moms Stamps.  It is off their "For the Boys" set.  I stamped it in rich cocoa ink by Tsukineko on some kraft cardstock.  It was also then matted in dark brown.

Wednesday, August 14, 2013

Groovy Times - Creation #4

I had to most amazing weekend this past weekend!!  I was able to attend Irish Fair down in St. Paul, Minnesota.  I made it on Friday night and again on Sunday night.  I had to work both mornings, but went down after work.  On Friday night I got to see two great bands: Boiled in Lead and The Tossers.  On Sunday night I was able to see Gaelic Storm.  I didn't see much else at Irish Fair because of my work schedule, but now that I finally know about it I will be able to take the time off next year.
Gaelic Storm performing on Sunday, August 11th.
 
 
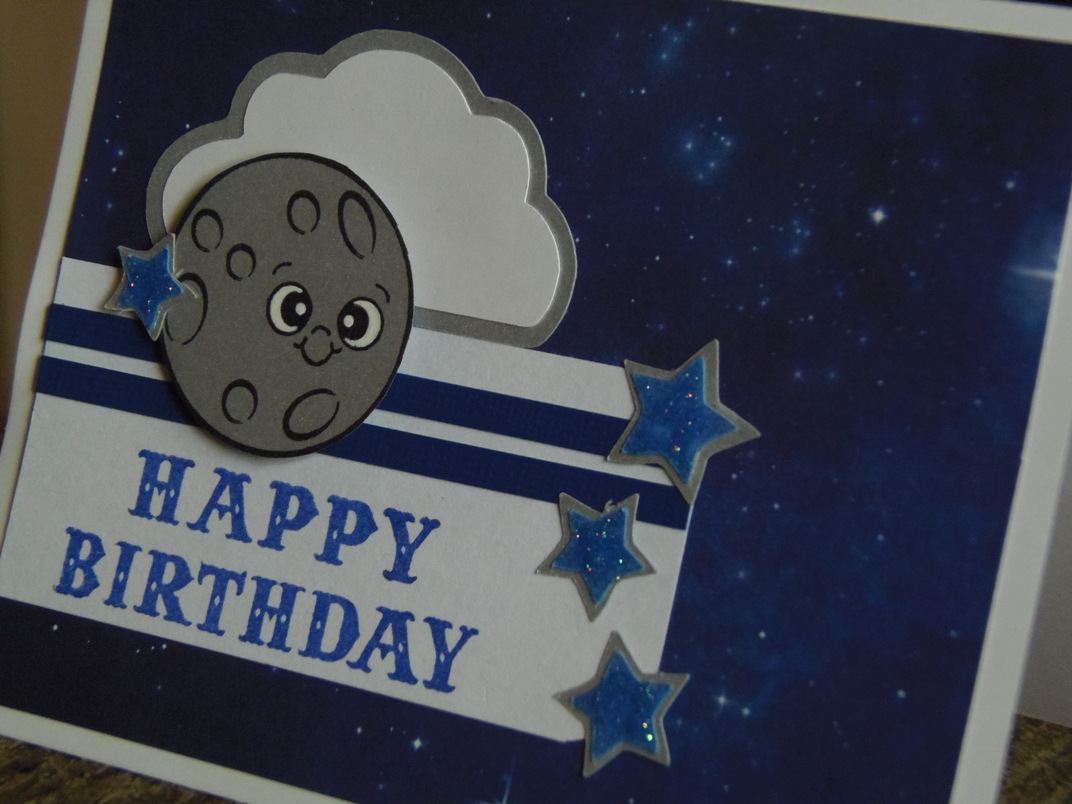
Because of Irish Fair I didn't do any crafting over the weekend and this weekend I will be out of town again, this time for a family reunion.  So here is a quick project to tide you all over until I get a little more time off:
The card is 5 1/2"x4 1/4."  I used white cardstock for the card base.  The starry sky mat is cut at 5 1/4"x4" and is from the Stardust Stack by DCWV.  I cut a piece of white cardstock at 3 3/4"x1 3/4," then rounded its corners and added two strips of blue cardstock.
 
The cloud and stars are from the "Groovy Times" cartridge, found on page 45.  The cloud was cut at 2 1/4," which makes it about 1 3/8" tall by itself.  The stars were cut at 1 1/2" and 2."  I covered the stars with waterfall Stickles for just a touch of glitter.
 
The moon is a Peachy Keen stamp, from the February 2013 Stamp of the Month kit.  I stamped it on silver cardstock, then cut it out.  The face is also from the same kit.  I used a white gel pen to add some detail to his eyes.  The sentiment is from Fiskars and is stamped in Mediterranean blue ink by Tsukineko.
 
I made this card for the following challenges:
Peachy Keen: sketch
BBTB2: moon and/or stars


Sunday, August 11, 2013

Silhouette Sunday - CAS Card with Bow

Welcome to another Silhouette Sunday!
 
Today's card is really clean and simple, but I love how it turned out.  Here it is:

The whole card was cut with the Silhouette.  The file is called "a2 card with bow" (#44685), by Rivka Wilkins.  I cut it without changing the sizing at all and when the card is folded, it is 5 1/2"x4 1/4."

The bow was adhered to the card with foam tape for a little extra dimension.  The sentiment is from Paper Smooches and is stamped in grape jelly ink by Tsukineko.  I finished off the card with a big purple gem.  

Thursday, August 08, 2013

Groovy Times - Creation #3

I used the rocket ship found on page 28 for my third "Groovy Times" project.
The card is 4 1/2"x6 1/4."  I used red cardstock for the card base, then cut a white mat at 4 3/8"x6 1/8."  The star cardstock is cut at 4 1/4"x6" and is from the Stardust Stack by DCWV.
 
The rocket was cut at 5 1/2."  I adhered it to the card with foam tape.  The sentiment is from Scrappy Moms Stamps, their "Kids Incorporated" set.  I stamped it on some white cardstock and added red strips to them to bring in more of the red.


Wednesday, August 07, 2013

Groovy Times - Creation #2

For my second project using the "Groovy Times" cartridge I used the ray gun found on page 51.
 
The card is 5 1/2"x4 1/4."  I used dark blue cardstock for the card base, then cut a tan mat at 5 3/8"x4 1/8" and a blue polka dot mat at 5 1/8"x3 7/8."  I used an EK Success punch for the zigzag border.
 
The ray gun is cut at 2 1/2."  The yellow blast coming from the ray gun is from the Cricut Craft Room exclusive called "Crash! Boom! Pow!"  It was cut at 1 1/2."  I outlined the blast with yellow Stickles and covered the green parts of the ray gun with glossy accents.
 
The sentiment is from Scrappy Moms Stamps and stamped in dune ink by ColorBox.  I stamped it on a piece of white cardstock that I hid behind the ray gun, which is adhered to the card with foam tape.
 
For the inside of the card I cut a tan mat at 5 3/8"x4 1/8" and a blue polka dot mat at 5 1/8"x3 7/8."  The white mat is 4 1/8"x2 7/8."  I used the same Fiskars zigzag border punch for the yellow border and lined it up with the edge of the mat.
 
 
I made this card for the following challenges:
365 Cards: "Day 216" - sketch
Color Throwdown: brilliant blue, crumb cake, pool party, daffodil delight, kiwi kiss
My Craft Spot: clean and simple
Friday Mashup: polka dots and the word happy


Tuesday, August 06, 2013

Groovy Times - Creation #1

I've pretty much covered the "Mickey and Friends" and "Mickey Font" cartridges in making all the party supplies.  I am not quite finished with everything, but I am done with everything that requires the Cricut (or so I hope).  I will post pictures of everything once it is all complete.
 
Anyway, now that I have finished showcasing the Mickey cartridges, I had to pick a new cartridge to explore.  I couldn't decide so I had my husband help me out.  He suggested a cartridge that started with the letter "g."  I counted how many of them I had and then he picked a number and that is how I wound up "deciding" to showcase "Groovy Times."
 
Here is my first project:
 
I used the smiley face to create a shaped card with the help of Cricut Craft Room.  I welded two of the smiley face shadows together (page 43), after flipping one of them.  They are 4 1/2" tall.  The yellow layer of the smiley face is adhered with foam tape.
The sentiment is the phrase feature that goes with the yin-yang (page 45).  It is 1" tall.  I covered the phrase with turquoise Stickles and added some gems to give it a little bling.
 
I think it could work for multiple occasions, it all depends on the sentiment I add to the inside.

Monday, August 05, 2013

Mickey Cartridges - Creation #9

I have the final two centerpieces for you today!  I have finally finished the Donald and Daisy centerpieces.


And just like all the others, I used "Mickey Font" for the mouse ears and "Mickey and Friends" for the names and characters.  The mouse ears are cut at 5."  The name Donald is cut at 1" and the name Daisy is cut at  1 1/4."  The larger characters on both centerpieces are cut at 5" and the smaller of them are cut at 3."