Showing posts with label Joys of the Season. Show all posts

Thursday, January 31, 2013

Christmas Wreath

I think this card is perfect for today since our temperatures are well below zero and the wind chill is making it even colder!  So, I made another Christmas card.
The card is 5 1/2"x4 1/4" and made from red cardstock.  I also cut two red mats, one at 4 3/4"x3 1/2" and the second one at 4"x2 3/4."  I cut three white mats.  The first one at 5 3/8"x4 1/8," the second one at 4 5/8"x3 3/8," and the third one at 3 7/8"x2 5/8."  I temorarily adhered the three white pieces togethter and stamped some snowflakes on them, with some of the snowflakes overlapping all three layers.  It is a technique that I learned called Triple Time Stamping.  You can see a video tutorial here.

After stamping all my images I heat embossed them with a glittery white embossing powder.  I then adhered my white layers to the red mats and adhered them all to the card base.  I used Joys of the Season to cut my wreath.  I cut three of the same wreath in three different sizes.  The largest size is 4," the middle size is 3 1/2" and the smallest one is 3 1/4."  I layered them together and covered their berries with x-mas red Stickles.  I ran some brown and white twine through three buttons and used it to tie a bow in the fourth.  I then adhered the buttons to the corners of the middle mat.  The sentiment is stamped in jumbo java ink on a banner that was die cut from a Spellbinders die called "Ribbon Banners."  I adhered the banner with two different thicknesses of foam tape so that it was lower on the sides and higher in the middle.
 
I made this card for the following challenges:
Tuesday, December 20, 2011

Christmas Horse

I can't believe how long it has been since I posted something. And that is actually how long it has been since I have crafted as well. I got so busy with school. Both of my finals were last Friday and I spent so much time studying and preparing for them. I got only one wrong on my Medical Terminology final and 100% on my Biology final! How awesome is that?!! :)
This is some wall decor I made for my dad and his wife for Christmas. They have three horses and the horse on here looks a little like one of them. It is 12"x12." I used some snowflake patterned cardstock for the base of the decor, it came from the Winter Magic Stack by DCWV. I cut the hills and sun from Country Life. I used my Gypsy to make it as large as possible. All the hills are covered with different types of white glitter, which is hard to tell unless you see it in the light. The hills are all pop-dotted. The horse and fence are also cut from Country Life at 5 3/4." I pop-dotted the fence and the horse. I used some white ink on his leg and the stripe on his nose and gave him a black pearl for the eye. The Christmas lights are from Create a Critter, cut at 1." I used some x-mas red, green and gold Stickles on the lights. The wreath around the horse's neck is from Joys of the Season. I cut it twice, once with a dark green and once in a lighter green. I use glossy accents on the berries on the wreath. The "Merry Christmas" is from Blackletter. I used my Gypsy to weld and cut the letters. I also used glossy accents on the title.


I am entering this in the Die Cuttin' Divas "Holiday Decor" challenge.

Thursday, November 03, 2011

Gingerbread Kisses

This is a 4 1/2"x6 1/4" card. I used some striped cardstock for the card base. I wrapped it with some green glitter ribbon. The double matted label is from Elegant Edges. I used the oblong feature and my Gyspy to make it taller without going wider. It measures 5 1/4"x3 1/2" (the green layer) and 5"x3 1/4" (the white layer). The stocking is cut at 5." I flocked and embossed the white layer with the D'vine Swirls folder. The green layers are embossed with the Swiss Dots folder. I used glossy accents on the nail. The gingerbread man is cut at 2 3/4" from "Just Because" Cards. I used my white gel pen to draw on his icing stripes and some white pearls for his eyes, smile and buttons. I only adhered down the bottom part of the stocking so that I could create a pocket at the top part for the gingerbread man. I pop-dotted the top part of the stocking and put my little gingerbread guy inside. For the inside I cut more of the striped cardstock 1/8" smaller than the card base. I then cut some green cardstock 1" smaller than the striped cardstock and the white cardstock is 1/4" smaller than the green. I used a Scrappy Moms Stamp for the senitment and stamped it in jumbo java ink, by Tsukineko.

I made this card for the following challenges:

Wednesday, July 13, 2011

More Christmas in July

Here is another Christmas in July card, this time a shaped card. I used Preserves for the card base, it is the label for the loquat cut. I used two of the labels, at 5 1/2" wide and welded them together on my Gypsy to create the card base. I then cut a smaller version in white as my next layer. I embossed the white layer with my Cuttlebug and the Sizzix snowflake embossing folder. I wrapped the top and bottom with some red mini rick-rack. I then ran some red and white twine around it to "hang" my mittens on. The mittens are cut from Joys of the Season at 2 1/2." The red cuff on the mitten is flocked with some red flocking powder. I added two white buttons to the top and bottom, over the rick-rack. I added some white pearls to the curves of the card and finished it off with some doodling on the mittens.
For the inside of the card I cut a red label at 5 1/2" wide, the same as the card base. I then cut a white label slightly smaller. I left it on the mat and used my Cricut markers to add the sentiment. I used my Gypy again to line it all up. The sentiment is from Jasmine, and is 2 1/2." A nice wintery card in the middle of July! Enjoy!! I made this card for the following challenges:
365 Cards: "Day 134" - buttons, rick-rack, pearls
BBTB2: Joys of the Season - mittens
Celebrate the Occasion: shaped Christmas card
Cooking with Cricut: Cricut markers or pens
Scrappy Moms Stamps: Preserves cartridge

Tuesday, January 18, 2011

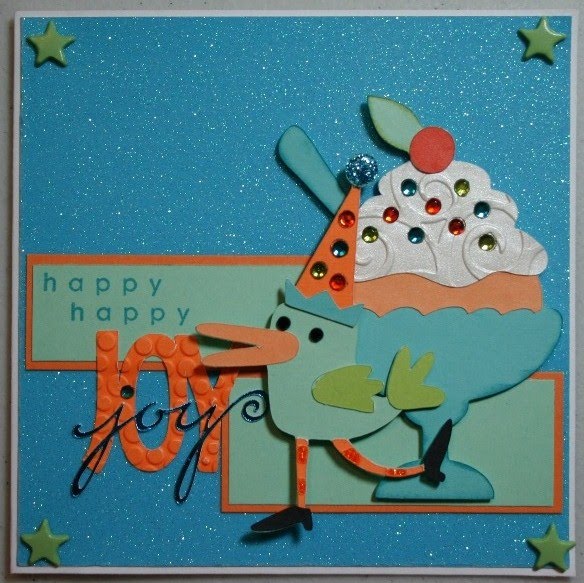
Happy Happy Joy Joy

This card is 5"x5." I used white cardstock and then cut some glittery blue paper to 4 7/8" square and mounted it on the card base. I cut some pale orange cardstock at 1"x3 1/4" and at 1 1/4"x3." The pale green cardstock on both of those strips are cut 1/8" smaller than the orange. They were then mounted near the bottom of the card. I used Birthday Bash for the ice cream sundae and the bird. The sundae is cut at 3 1/2." I embossed the shimmery white cardstock with the D'vine Swirls folder. I inked the edge of the dish and spoon and the leaf of the cherry. I then used my iRock to add bling to the sundae as sprinkles. The bird is cut at 2" and I added bling to the hat and Stickles to the hat and legs. I used two different thicknesses of pop-dots to mount the sundae and the bird. I used a stamp and some turquoise gem ink to stamp the "happy happy" sentiment. I used Opposites Attract to cut the orange "joy" at 1 1/4" and then embossed with the Tiny Bubbles embossing folder. The second "joy" is cut from Joys of the Season out of a blue foiled cardstock. I used a gem for the dot on the j. I then finished it all off with four pale green star shaped brads in the corners of the card.

I made this card for the following challenges:

Monday, December 20, 2010

Christmas Candle Card

I think this card turned out simply gorgeous! Of course I am a little biased, but I really do like this one a lot. :) I turned on some Trans-Siberian Orchestra music this morning and was very much inspired by their music when I was making this card. Trans-Siberian Orchestra is my absolute favorite music to listen to at Christmastime.
The card is 5"x7." I cut it out of white cardstock and cut the red patterned paper to the same size, since the paper was too flimsy to make a card by itself. The candle was cut from Joys of the Season at 4 1/2." I inked the edges of the candle with a peach pastel ink by Colorbox. I embossed the silver tray with the Distressed Stripes embossing folder and then inked it with starlite black ink from Tsukineko. I added some yellow Stickles to the flame of the candle and doodled on the holly and berries. I used the wavy music stamp from Stampendous and stamped it in pearlescent beige ink by Tsukineko onto the candle. I cut a piece of glittery white paper at 4 3/4"x4." I then embossed it with the Script Texture embossing folder and then inked it with the same peach pastel ink for a subtle effect. I cut some gold cardstock at 5"x4 1/4," and mounted the embossed white piece on it. I then adhered the candle to the white piece. I adhered all of that to the card base, near the top. I wrapped some gold ribbon around the card and strung a pre-made tag on it. I stamped the tag with the sentiment in pheasant gold ink by Colorbox and also inked the edges with the peach pastel, then I used a pop-dot to keep it adhered to the front of the card. I tied a bow with the same gold ribbon and attached it onto the piece of ribbon already on the card.
I made this card for the following challenges:

Tuesday, December 14, 2010

Wreath Tag


I made this tag following the sketch on 2S4Y. It is a tag shape and instead of making it into a tag shaped card, I decided to actually make it a tag. I also used the photo inspiration from Papercraft Star. The photo is of a Christmas tree, which is decorated with tags and snowflakes. I used the colors from it to inspire the traditional colors on the tag. Finally, I used BBTB2's challenge, which is to use the wreath cut from Joys of the Season. I love this wreath and knew it would work perfectly on this tag.


The tag was cut from Joys of the Season at 5 1/2" and the wreath is cut at 2 1/2." I inked the edges of the tag for some dimension. I used some ribbon that I had in my stash and wrapped it around the tag. The wreath was cut twice and the layers were also cut twice. I pop-dotted the top layer, in the darker green cardstock. I then used some gold Stickles to highlight the leaves. I used some flat-backed gems as berries and stamped "Merry Christmas" on the bottom. I used a glittery red ribbon for the top of the tag.

I really like how this one turned out and I think it looks like a very traditional Christmas tag. Now I just have to figure out who I am going to be giving it to. :)

Saturday, August 21, 2010

Follow Your Dreams

The theme for today's 365 Cards challenge is the song, "I Hope You Dance" by Lee Ann Womack. I made a this card based on the feel of that song.
The ballerina is cut at 4" and is from Joys of the Season. I did some doodling on her tutu and then pop dotted her on the card. The card and the embossed piece are both a light purple, which doesn't show up very well in the photo. The embossing is done in the Cuttlebug with the D'vine Swirls folder. I matted it with a dark brown piece of cardstock and stamped "follow your dreams" on the card with a stamp I found in my stash, didn't even know I had it. I love it when it works out like that. :)

Monday, August 16, 2010

Thinking of You

Here is a nice and elegant card for a few challenges. The layout is based on the sketch from Mojo Monday. This week's challenge at the Cuttlebug Spot is the create a Sympathy/Thinking of You card. I also incorporated the challenge from Bitten By the Bug 2, which is to use the cup cut from the Joys of the Season cartridge. Finally I also made this for Pile it On. Their challenge is: "get in shape," use more than five cut-out shapes on your card. I made this card at 5"x7" and layered all my pieces on. The top border on both the front and the inside is a Spellbinders die. I used the Polka Dots embossing folder on the black background. The ovals are cut at 5" and 4 3/4" from George and Basic Shapes and the cup is cut at 2 1/2." All the paper I used in this card is from DCWV, their new Black Currant stack.