Friday, June 27, 2014

Little Boy

I whipped up this card after a friend of mine from work texted me saying that she needed a baby shower card by Sunday.  We both work together tomorrow, so I got to crafting.


The card is 5 1/2"x4 1/4."  I used white card stock for the card base, then cut a brown mat at 5 3/8"x4 1/8," a brown polka dot mat at 5 1/4"x4," a blue mat at 4 1/2"x3 1/4," and finally a blue striped mat at 4 3/8"x3 1/8."


The lion is from the Silhouette Studio.  It is by Rivka Wilkins (#4227).  I cut it so that when it is all assembled it is just about 4" tall.  I inked around the edges of the body, face, and muzzle with tea dye Distress Ink by Tim Holtz.  I added brown flocking powder (by Martha Stewart) to the mane and tail.  He is adhered to the card with foam tape and there is diamond glaze over his eyes, nose, and the accent to his ears.


The sentiment is from Scrappy Moms Stamps.  It is from the Special Delivery set and stamped in cocoa brown ink by Tsukineko.  I trimmed the card stock it was stamped on into a banner and adhered it with foam tape in the middle and glue dots at either end for a little dimension.  I then added three buttons to finish off the front of the card.


The inside mats are all cut at the same dimensions as the front.  I then added a white mat at 4 1/8"x2 7/8."  The sentiment is, again, from Scrappy Moms Stamps.  This time from the Simple Sentiments set, and again, stamped in cocoa brown ink.  I then cut a button from the Crafty Mice
cutting file from SVG Cuts to embellish the inside.  I cut it at 1" and covered it in diamond glaze.

Thursday, June 26, 2014

Hip-Hippo Hooray!

How cute is this hippo though?!  I love how it turned out!


The card is about 8 1/2"x4 3/4" (just a little bit smaller).  I used Cricut Craft Room to design this using "Wild Card" for the shaped base, "ZooBalloo" for the hippo, "George and Basic Shapes" for the stars, and "Just a Note" for the sentiment.

The card base, is on page 53 of the "Wild Card" handbook.  I cut it from the light purple card stock, then cut a piece of white card stock at 8"x3" to put behind the open space of the word bubble.  I rounded the corners of the white piece and embossed it with the a Darice Embossing folder called Assorted Stars.  

The stars are all from "George and Basic Shapes," page 115 of the handbook.  The three largest are 2," 1 1/2," & 1 1/4."  The smallest one is 3/8," sized that way so that it would fit in the letter "a" of the sentiment.  The sentiment can be found on page 58 of the "Just a Note" handbook.  It was cut at 2."  

The stars and sentiment were adhered right to the card base.  Since I adhered everything down before remembering that I wanted to stamp a sentiment around the edge I masked off the stars, then did my stamping.  The stamp is from Scrappy Moms Stamps, the Furry Friends set.


The hippo is on page 89 of the "ZooBalloo" handbook.  It was cut at 3 1/2."  I used the hide contour feature in Cricut Craft Room to hide the eyes and stamped on some Peachy Keen ones.  They are from the Sweet and Silly Face Assortment.  I used a white gel pen to accent the eyes and grey gel pen to add a little detail to the hippo's chin.  I adhered the hippo with foam tape.  I used yellow Stickles on the edges of the stars (and the whole star for the smallest one) and covered the hippo's eyes and nostrils with diamond glaze.

I made this for the following challenges:
Fantabulous Cricut: use the colors purple, yellow, & grey
My Sheri Crafts: use at least two stars
My Craft Spot: shaped cards

Wednesday, June 25, 2014

Why Did the Chicken Cross the Road?

So, why DID the chicken cross the road?  Here's a card that hopes to explain why!


The card is 5 1/2"x4 1/4" with the fold at the top.  The card base is white card stock.  The red mat is 5 3/8"x4 1/8" and the red gingham mat is 5 1/4"x4."  The red strip is 1 7/8"x4" and the striped strip is 1 3/4"x4."  The mat is from the "Elegant Edges" cartridge.  It is on page 38 of the handbook.  I used the shadow (shift) and oblong (shift) features and cut it at 3 3/4."  I embossed the white layer with the Cuttlebug embossing folder called "Chicken Wire."  I adhered the mat with foam tape.


The chicken, face, and sentiment are all stamps from Peachy Keen.  The chicken is from a set called Faceless Chickens; the face is from the Chickie Faces 1 1/8" set, designed specifically for the faceless chickens; and the sentiment is from a set called Clucks Sentiments.  I paper pieced the chicken, flocking the red piece.  I also added some diamond glaze to the eyes, beak, and feet; after I colored them in with some markers and a white gel pen.  I finished the front of the card with some red gems.


The inside of the card is also finished, because I couldn't leave you hanging now could I?  The inside answers the question of why the chicken did cross the road.  The gingham mat is 5"x3 3/4," and the mat is the same size as the front, using the same image from "Elegant Edges."  The sentiment is also from the Clucks Sentiments set.

Monday, June 23, 2014

Ni

I was sitting on my couch today really wanting to make something, but I just didn't have any inspiration.  I have been wanting to add some vinyl to my phone case and my iPad for a while now, but haven't come up with the perfect idea yet, so I started browsing my Cricut cartridges to see if something jumped out.  Well, something jumped out all right, but not for either of those things...it just screamed, "put me on a shirt!"  I couldn't argue, so here it is.


My father introduced me to Monty Python and I have loved it ever since.  I own the whole "Flying Circus" and of course "Monty Python and the Holy Grail," and have watched them numerous times.  I came across the chessmen in "Brooklyn Iron-On" and that is what spurred this idea onward.  I did not actually use the knight from "Brooklyn Iron-On," I actually liked the one on "Chess Set" better ("Chess Set" is a digital cartridge).


The knight is just over 4" tall.  The word bubble is from "George and Basic Shapes," and is 2."  I used "Base Camp" for the word "NI," and sized it to fit in the bubble.  When it is all put together it is a little short of being 6" tall and 4" wide.

Thursday, June 19, 2014

Jumping Fish

Today I have made a fish-shaped card.  I quite like how it turned out.


I used my Silhouette Cameo to create this card.  It is a little over 4 1/2" wide and a little over 5 1/2" tall, but of course I didn't write down the exact sizes.


The fish is a SVG from SVG Cuts.  It is one of the images on a set called Forest County.  I used this fish image with a piece of water to create my shape card.  The water if from an image I found in the Silhouette Store called "Bear in a Canoe," by Michelle Renee (#57750).  I sized the water, then the fish to fit and welded them together to create the card base.  I cut that twice and adhered them together at the top.

All the pieces of the fish have been inked with Distress Ink by Tim Holtz.  The brown part of the fish is inked with Walnut Stain, the green part with Peeled Paint, the fins with Peacock Feathers, and the water with Tumbled Glass.  I also covered the eye with glossy accents.  It turns out that glossy accents make Distress Ink run a little, but I rather like how it looks for the fish eye.


The sentiment is from Scrappy Moms Stamps, the For the Boys set.  I stamped it in Walnut Stain Distress Ink.

Wednesday, June 18, 2014

Celebrate with Balloons

I made another card tonight, this one is super simple though.


The card is 5 1/2"x4 1/4" and folded at the top.  I used grey card stock for the card base, then rounded its corners with a 1/2" corner rounder.  The yellow card stock is 5 3/8"x4" and the white card stock is 5 1/2"x3 7/8."  I rounded their corners as well.  Both the sentiment and the balloons are stamps from Paper Smooches.  The sentiment is from the Pretty Phrases set and the balloons are from the Birthday Sampler set.  I drew in the strings for the balloons with a grey marker.


I made this card for the following challenges:

Paper Smooches: anything goes

CASology: cue word - celebrate

Color Throwdown: color challenge


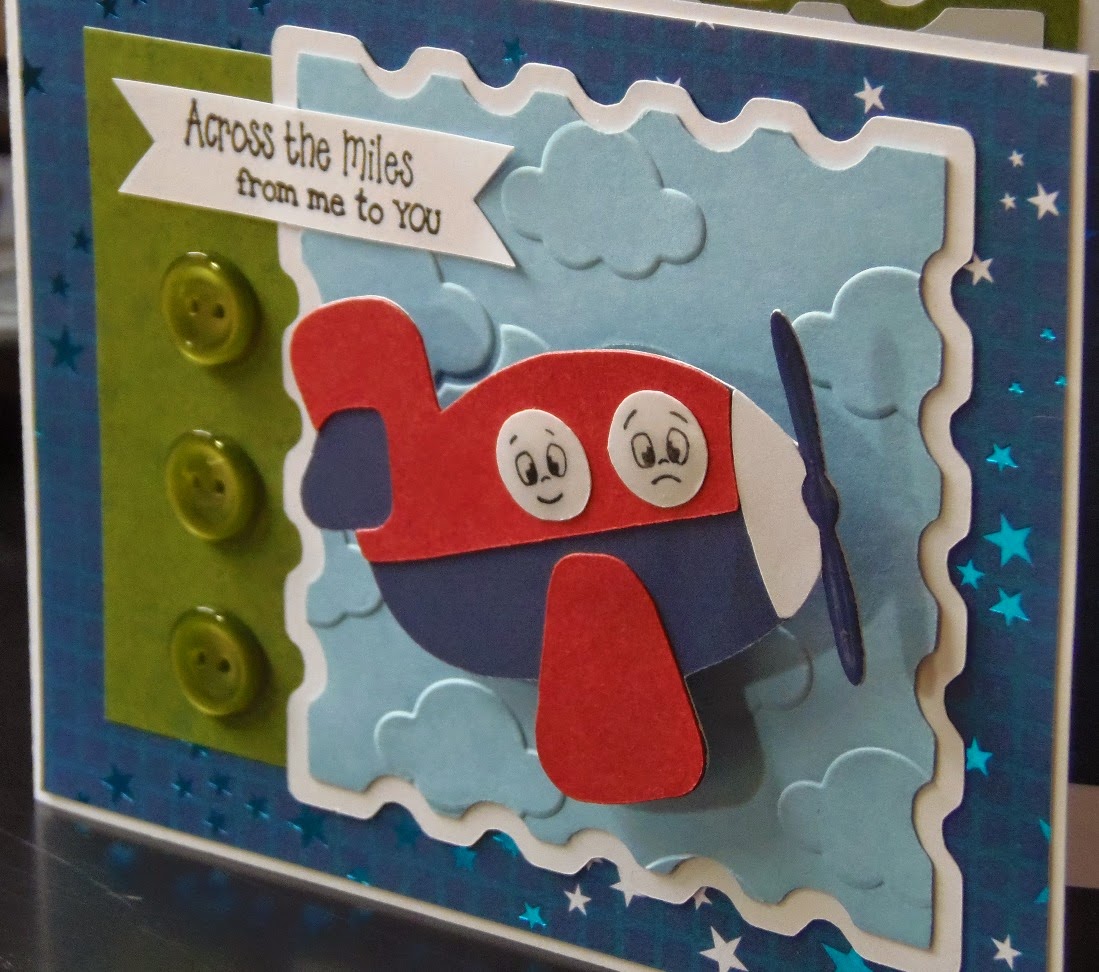
Airplane!

Here is a fun card for you today!


The card is 4 1/4"5 1/2" and I folded it at the side instead of top, which is usually how it is folded.  The card base is white card stock.  The gridded star paper is from the Cosmic Whammy Stack by The Paper Studio.  It was cut at 4 1/8"x5 3/8."  The green paper is 3 1/4"x4."  The stamp shape is from the "Elegant Edges" cartridge (page 37).  I cut the shadow at 3 1/2" from white card stock.  The regular stamp shape was cut at 3 1/4" from a pale blue card stock.  I then embossed it with the Clouds embossing folder by Darice.


The airplane is from the "B is for Boy" cartridge (page 72).  I cut it at 2 1/4."  I then added a couple of faces in the plane's windows.  They are from The Cornies Face Assortment by Peachy Keen.  I covered the windows and plane prop with diamond glaze for a little shine, then adhered the plane with an action wobble.


The sentiment is also from Peachy Keen.  This one is from the February 2014 Stamp of the Month kit.  I stamped it on some white card stock that I had trimmed into a banner shape.  I then finished off the front of the card with some green buttons.


For the inside of the card I cut a strip of the star card stock at 3 1/4"x5 1/4."  I then cut the stamp shape again.  This time the shadow was cut out of the green paper at 4" and the regular shape was cut at 3 3/4" from white card stock.  I used two different stamps to create the sentiment.  The "sending" is from the February 2014 Stamp of the Month kit and "birthday wishes" is from the Birthday Sampler set by Paper Smooches.

I made this for the following challenges:

Cupcake Inspirations: for the boys


My Craft Spot: fancy edges (stamp edge)

Die Cuttin' Divas: things with wings

Peachy Keen: photo/color inspiration (colors-all but the pink)

Saturday, June 14, 2014

I'm Not Lion

I have been so busy lately.  I have gotten all the blocks for my quilt cut out and I laid them all out so that I could see how it would look.  I quite like it and can't wait until I get it all pieced together and finished.  We also finished remodeling the room in our basement that has now become my new craft room.  I even get a window now!  It was carpeted last Friday and I spent this past week moving my stuff in to the room.  This is the first chance I have had to actually use it since I moved the last of my stuff in on Thursday night.  So, this is the first card I have made in my new room.


This is a shaped card that is about 5 1/2"x4" when folded.  I used "Wild Card 2" to create this card.  This particular card can be found on page 48 of the handbook.  I added flocking to the mane and tail for a little texture.


The font is from "Carousel."  It was cut at 1."  I used foam tape to adhere it to the card.  I also used Cricut Craft Room to hide the inner contours of the orange layer so that it would cut as one solid piece.


I used a stamp from Scrappy Moms Stamps for the sentiment.  It is from the "Little Critters" set.

I made this for the following challenges:
BBTB2: Father's Day
Fantabulous Cricut: Father's Day
The Friday Mashup: Father's Day project, or for a special guy
{PIN}spirational Challenges: photo inspiration (I was inspired by the theme, so I made a Father's Day card)
Stuck On U Sketches: any animal

Thursday, June 05, 2014

Bundles of Joy

I have two cards today, they use the same sketch, same image, and same sentiment; however they are different colors.  One is meant for a baby boy and one is meant for a baby girl.


The cards are 6 1/4"x4 1/2."  I used an ivory colored card stock for the card base.  The green plaid and pink polka dot mats are 6 1/8"x4 3/8."  The bird patterned card stock is 6 1/8"x3 1/2."  The cloudy blue card stock strip is 6 1/8"x1 3/4."  The cloudy blue card stock is from K&Company and the other patterned card stocks are from DCWV, the Nana's Nursery Baby Boy stack and Nana's Nursery Baby Girl stack.


The bird/baby images are from "3 Birds on Parade," they are on page 70 of the handbook.  I cut them at 3," but I hid the eyes on both the birds and the baby so that I could give them Peachy Keen faces.  The faces for the babies are from The Cornies Face Assortment and the eyes for the birds are from the Everyday Character Face Parts set.  The bird/baby images are adhered to the card with foam tape.


The sentiment is from Scrappy Moms Stamps, the "Special Delivery" set.  I stamped it on an ivory piece of card stock, cut at 2 3/8"x1 3/8."  I matted it with the green plaid and pink polka dot card stocks, cut at 2 1/2"x1 1/2."  I finished off both cards with some enamel dots, green for the boy card and pink for the girl card.

I made this for the current sketch challenge at Peachy Keen.

Wednesday, June 04, 2014

Shell-ebrate with Squirt


This card is 5"x7."  I used black card stock for the card base, then cut a white mat at 4 7/8"x6 7/8" and the patterned mat at 4 3/4"x6 3/4."


The bubble in the background is from the "Best of Pixar" cartridge.  It is cut at 4" (real dial size) and can be found on page 24 of the handbook, using the icon layer feature.  I sprayed the bubble with some sparkle shimmer mist before adhering it to the card.  The sentiment is from Paper Smooches, the "Party Posse" set.  I stamped it on white card stock, then cut it in a banner shape.  I then adhered it to some black card stock and cut that to outline the banner.


My sea turtle is Squirt from "Finding Nemo."  I used the "Best of Pixar" cartridge for him as well.  He is on page 32 of the handbook and I cut him at 3."  I covered his eyes and tongue in glossy accents, his shell in crackle accents and the flower of his shell have orange glitter on them.  I adhered him to the card with some foam tape.  I finished off the front of the card with three glittery teal brads in the upper corner.


The white mat on the inside of the card is 4 7/8"x6 7/8" and the patterned mat is 4 3/4"x6 3/4."  I then cut two more bubbles (page 24 of the "Best of Pixar" handbook) but this time just the solid part.  The black one is 4 1/2" and the white one is 4 1/4."  I then used some stamps from the "Birthday Sampler" set by Paper Smooches for the sentiment.

I made this card for the following challenges:
BBTB2: alter a Cricut cut (glossy & crackle accents, glitter, & shimmer mist)
Fantabulous Cricut: make a card for your stash (because you can never have enough birthday cards)
Scrappy Moms Stamps: animal project

Paper Smooches Sparks: anything goes