Showing posts with label Tags Bags Boxes and More. Show all posts

Wednesday, December 23, 2015

Gift Bag

Here is a gift bag I made this year.  It's actually the only actual bag I made this year, the others are pre-made ones that I simply embellished.


The bag is from the Cricut cartridge "Tags, Bags, Boxes & More."  I just hid the window that is supposed to be in the front of the bag.  When assembled the bag is 6 1/2" tall.


I cut a white panel at 5 1/2"x3 3/4" and a snowy sky patterned panel at 5 3/8"x3 5/8."  I then used the insert shapes feature (circle) in Cricut Design Space to make my moon, it is 3 1/4."  I embossed it with the Spots and Dots Cuttlebug embossing folder.  I inked up the edges and lightly over the surface of my embossing with pumice stone Distress Ink by Tim Holtz.  The Santa and reindeer stamp is from Jaded Blossom, the Christmas Panels set.  I also used the coordinating svg to cut the outline.  I used foam tape to adhere it to my moon.  I used a stamp from My Craft Spot for the sentiment.  It is heat embossed with silver embossing powder.

Friday, December 13, 2013

25 Days of Christmas - Penguin Gift Box

Today's project is a cute little gift box.  It is perfect for a gift card or even just a small present.


The box was cut using the "Tags, Bags, Boxes, & More" Cricut cartridge.  It can be found on page   of the handbook, and I cut it at 4."  When it is all folded, it comes to about 3 1/4"x3."


I found the penguin in the Silhouette Store.  It is called "arctic penguin" and is by Sarah Bailey (#23641).  When it is all assembled it as about 3" tall.  I cut the tag from the Silhouette as well.  This cut is part of a cut file called "tags" and is by Michelle Renee (#43062). The "to" and "from" on the tag are stamps from My Craft Spot, the "Merry Christmas" set.  I adhered the penguin with foam tape.

Saturday, June 02, 2012

American Pride

I decided to make a layout using a picture that was taken of my husband and me at the airport when he got home from Kuwait. I actually got to meet him at the gate, which was so great! He was the first one off the plane, which surpised those of us waiting for him. I noticed him first, jumped up and ran to hug him. This picture was taken seconds after that. However, due to my continuing computer problems the picture was printed on the printer we have attached to our desktop and is not meant for photos. My photo printer is in my craft room and I use it with my laptop, which is still out of commission. So, the photo is not the greatest due to the printer, but when I get my computer figured out I will print out a better copy. The photo in there now at least gives you an idea of what I wanted to do with this layout. I adhered it with removable adhesive so that I can take it out when I get the better picture printed.
This layout was made following the current sketch at Stuck On U Sketches. As soon as I saw the sketch I started getting ideas about what I wanted to do with it! :) I am pleased with how it all turned out. It is a 12"x12" layout, that I am actually going to put in a shadowbox and hang on my wall. I used Elegant Edges to create the label in the background. The shimmery blue layer was cut using the shadow feature at 10." The white layer was also cut using the shadow feature, but at 9 1/2." The glittery red layer was cut regularly at 9 1/2." I then placed it where I wanted it on the left hand side of the page and trimmed it along the edge of the page. The smaller, trimmed-off piece was placed on the right hand side of the page. The photo is 4"x6" and I matted it with three layers that are all 1/4" larger than the previous layer. I used Ribbons and Rosettes to create my three rosettes. The two smaller ones were cut at 1 1/2" and the larger one was cut at 2." The title was cut using Stand and Salute, as were all three stars that are in the center of the rosettes. I added faded jeans Stickles to the title and all the blue pieces on my project (except the title) were inked with faded jeans Distress Ink. I used three layers of pop-dots to raise up my blue rosette and one layer of pop-dots for the smaller striped rosette. I cut a tag from Tags, Bags, Boxes and More, using my Gypsy to size it to fit the stamp, from some white cardstock and cut one that was 1/4" larger from blue cardstock. I then used some pearlescent poppy ink by Tsukineko to stamp my sentiment, which is from Scrappy Moms Stamps. My shimmery blue paper is from DCWV, the glittery red paper is from Core'dinations, the white paper is from The Paper Company and all the patterned papers are from Paper Pizzazz.
I made this for the following challenges:

Friday, March 23, 2012

Friday Mashup Challenge #51

It is time for another Friday Mashup challenge! This week is challenge #51 and here it is:
1. Make a project using the "Quilted Cards Technique"
2. Or make a project using something that's been forgotten (sitting in your stash forever)
3. Or mash it up and create a quilted card with something you've forgotten about.
I mashed it up again this week and created a quilted card using some papers that I have had basically since I started crafting. In fact, I have never used these papers ever. Here is a link for the quilted cards technique that I used to create my card. My quilt block is 4"x4" and the whole card is 5"x5." The largest middle block is 2"x2" and the outside corners are 1"x1," so that gives you an idea the size of the quilted part. I used Tags, Bags, Boxes, & More to cut my tag. The sentiment is from My Pink Stamper and I finished it off with a bow made of a greyish-blue sheer ribbon.
I hope you enjoyed my project and I hope you decide to play along at The Friday Mashup!

Sunday, March 04, 2012

Lucky Shamrock

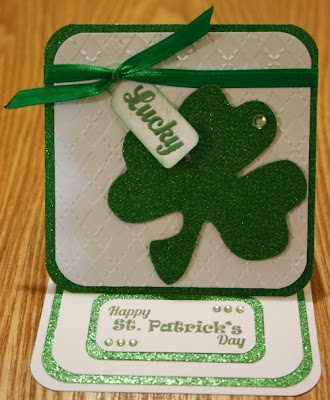
I have a nice and simple St. Patrick's Day card for you today. I created a 4"x4" easel card. I embossed the white layer with the Argyle embossing folder. I wrapped it with some green ribbon and tied it off in a knot. I used Tags, Bags, Boxes, & More for the tag. I used my Gypsy to size it for the stamp, it came out to 0.8"x1 3/4." The stamp is from Scrappy Moms Stamps and I heat embossed it with some shimmery green embossing powder. I also inked the edge of the tag with some green ink. I used another Scrappy Moms Stamp for the inside sentiment. I finished off the card with a little bit of bling on both the senitment and the shamrock.
I made this card for the following challenges:

Sunday, December 25, 2011

Christmas Boxes

I had to wait to post these since they are gifts for my mom and brother. My mom checks my blog almost daily and didn't want to ruin the surprise. I used my Gypsy to size everything and all the patterned paper is from the Merry Christmas Stack by DCWV. The solid papers came from my stash.

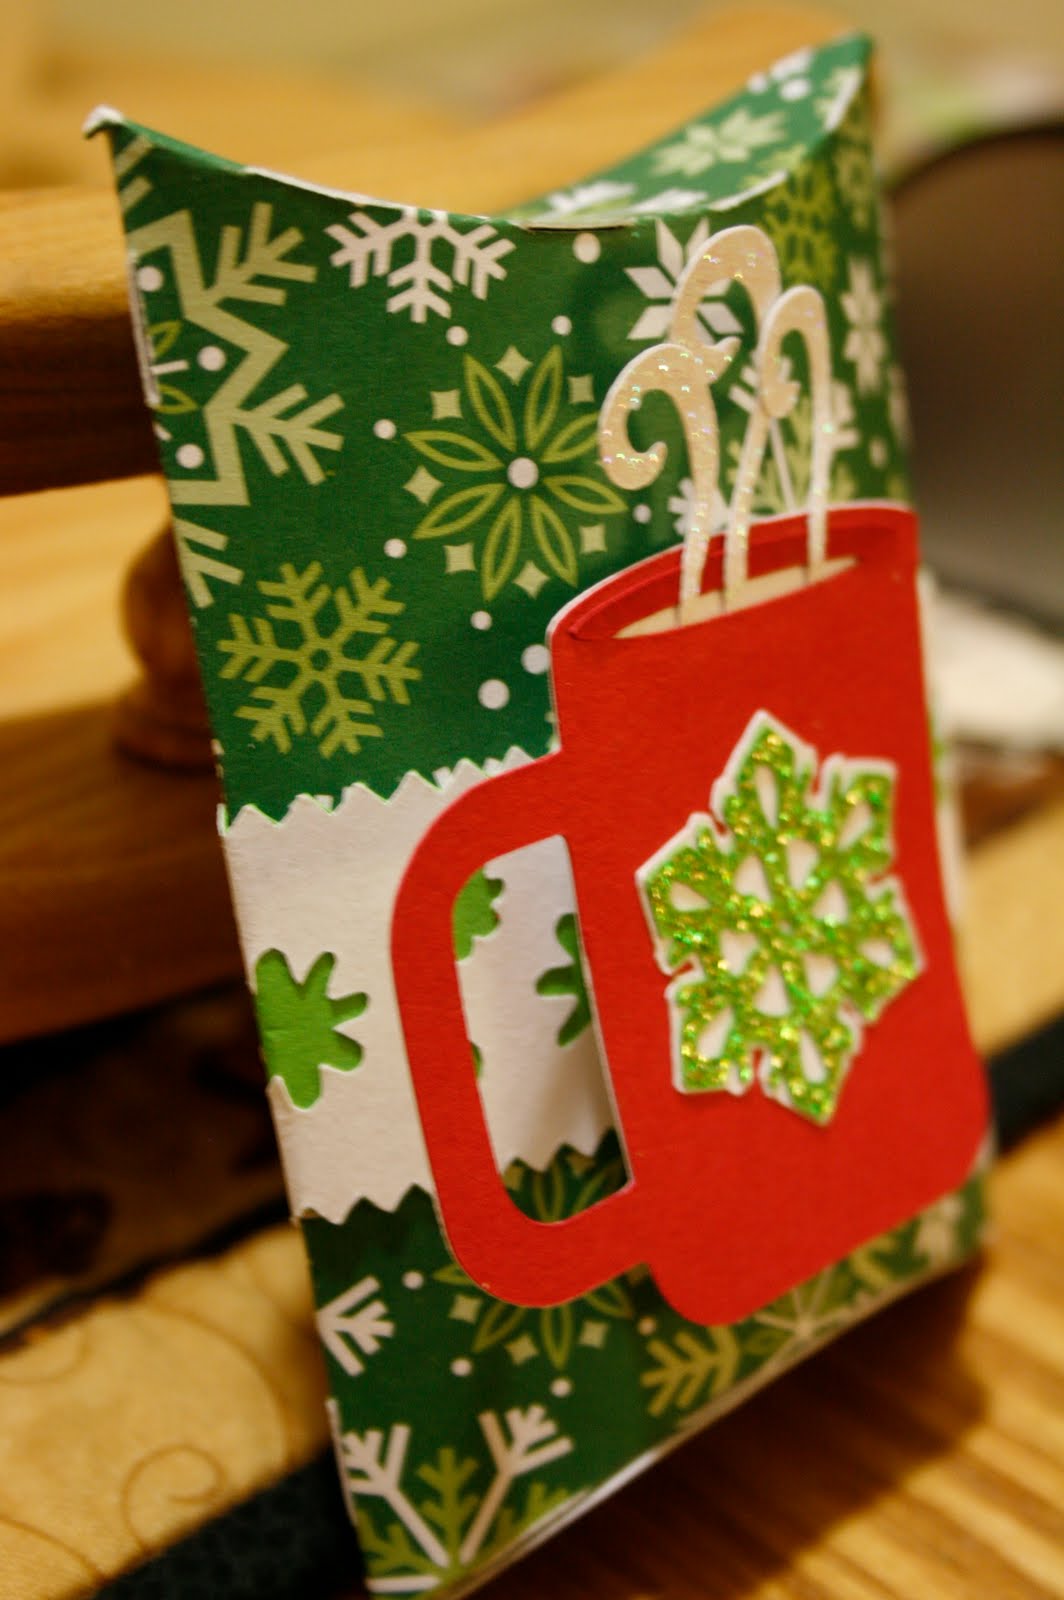
These are three gift boxes I made for some small gifts that I gave to my mom and my brother. The pillow box is for a coffee gift card for my mom, as is the armadillo tree box. Inside, there is a small carved armadillo that I got her when I went to Belize, hence the armadillo on the front. The pillow box was cut from Wrap It Up at 6." I created a band to go around the box using a border from the Martha Stewart Seasonal Cake Art cartridge. It is cut at 1 1/4" and then wrapped around the box. My mug is cut from Everday Pop Up Cards at 3 1/2." The snowflake on the mug is from Winter Lace, cut at 1 1/4." I added some star dust Stickles on the steam and some lime green Stickles to the snowflake.


For the armadillo box I used the tree-shaped box on Tags, Bags, Boxes & More. The armadillo is from Birthday Bash, cut at 2." His eyes and nose are black pearls and I used a candy cane sticker to give him a little Christmas treat. I finished off the box with a shimmery red bow.

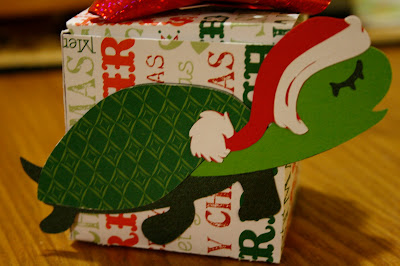
This little box is a gift for my brother. I got him a carved turtle when I was in Belize and this is the box I created for it. The box is from Wrap It Up. I cut the turtle at 2" from Four Legged Friends and his Santa hat is from Pooh and Friends, cut at 1."


Sunday, September 18, 2011

A Fat-Free Treat

Here is a fat-free treat for you. A great little paper cake! I used Tags, Bags, Boxes & More for the cake boxes. I cut them at 7" from a brown cardstock to seem like a chocolate cake. I pieced the boxes together then wrapped them with a white ribbon to make it seem like a vanilla filling. I used part of the box to create the fondant style "frosting." I then cut them out and used the Textile embossing folder. I used a scalloped border punch along the edge for an added effect. I used Mother's Day Boquet to create my flowers. They were cut at 1 1/2," 1 1/4," 1" and 3/4." I curled each piece and sprayed it with some shimmer mist. I also added a pearl into the center of each flower. I also added a butterfly to the center of my cake. I used Everyday Pop-Up Cards to cut the butterfly at 3." I cut two white layers for some stability, then sprayed it with some shimmer mist as well. I then cut out two of the pink layers. I then used some tutti fruity Glimmer Mist to spray the pink layers. I adhered one of the layers to the white part and I adhered only part of the second one and popped the wings up.
I made this cake for the following challenges:


BBTB2: Tags, Bags, Boxes & More - 3d box

Papercraft Star: anything goes

Cupcake Inspirations: cupcake photo (see below)

Friday, February 25, 2011

Flaunt It Fridays Challenge #13

It is Friday and that means it is time for another challenge at Flaunt It Fridays!! This week the challenge is to use the match box cut on Tags, Bags, Boxes & More. This cut can be found on page 124 of the booklet and page 65 on the online manual. The specific cut they asked for was just the bottom portion of the box (the inside). I used both that cut and the top (or outside) of the box, which is the previous cut.
I cut the inside of the box at 4" and the outside of the box was cut slightly larger, I think 4.10" or 4.20." I used my Gypsy to size everything, I made this box to fit a gift card. I used a green cardstock for the box. Once they were cut, I embossed the top part of the gift box with the Polka Dots embossing folder. I then assembled the boxes and cut a piece of floral paper to fit inside the bottom portion of the box. I think the inside should be pretty too! :) The flowers are from Mother's Day Boquet. I cut four flowers in various sizes, two in pinks and two in yellows. I inked the edges of the flowers and curled up their petals. I cut the middles from the cartridge as well and then inked the edges and stmped Peachy Keen faces on them. I used pop-dots to adhere the middles to the flowers. The leaves are also from Mother's Day Boquet. I used a paper crimper on them and then inked them. Nice and simple....and perfect for a springtime birthday or thank you!!

That's all for my project....now it is your turn. Head on over to Flaunt It Fridays and join in our challenge! I can't wait to see what you all come up with. :)

Sunday, January 23, 2011

Word of the Day Cards Part 2

I got my final three word of the day cards done for last week's 365 Cards challenge. So, without further ado here they are:


Thursday's word was "Peace." I used sketch #202 from CPS for the layout of this card. I also used the challenge at Paper Sundaes, which was "distressing." I also used the photo inspiration from Crafty Hos for the idea of this card. The card is 3 3/4"x9." I sanded the edges and inked the edges for the distressing. I also used some alcohol ink and rubbed it on the card to add to the look. I cut some blue patterned paper at 4"x3 3/4" and adhered it to the card. I then edged the paper with some dark blue ribbon and layered that with the patterned blue ribbon. I cut the three peace symbols from Cars. The largest is cut at 2" and the smaller two are cut at 1 1/2." The sentiments are from a stamp in my stash.


Friday's word was "Love." For this challenge I made a matching card and treat box set. I used Laura's sketch at 2S4Y for the card and I also made this for the 3-D/template challenge at Just Us Girls. I used Tags, Bags, Boxes & More for the heart box. I then wrapped a ribbon around the box. I cut the cupid from Sweethearts at 2 1/4." I embossed the white layer with Swiss Dots. The "for you" is also from Sweethearts, cut at 1 3/4." I used some xmas red Stickles around the heart at the top of the box. The card is 5 1/2"x4 1/4" and I used the same paper that I used for the box. I cut some shimmery red cardstock at 5 1/2"x2 1/2." I then cut some white cardstock 1/4" smaller and embossed it with the Swiss Dots folder. The cupid is cut at 2 1/2" and the "love" is cut at 1 3/4."
Saturday's word was "Happiness." I used the sketch by Kazan on 2S4Y for this card. The card is 5 1/2"x4 1/4" and made of white cardstock. I cut some floral patterned paper at 5 1/4"x4" and adhered it to the card base. I wrapped some blue ribbon around the card and tied it off. I then stamped the sentiment on some white cardstock and then trimmed it to fit. I cut some glittery blue cardstock 1/4" larger and adhered it all to the card. The vase and flowers is from Country Life and cut 2." I finished it off with some flat-backed pearls in the center of the flowers.

Tuesday, September 14, 2010

Back to School Thank You Cards

Fantabulous Cricut is having a "Button Up for School" blog crawl and challenge this week. The challenge is to make a back to school project and inclue a button on it. The crawl has all the design team members and their wonderful inspiration. There are also some great prizes to win if you visit each DT member's blog, so be sure to check it out. I thought this challenge went very well with the challenge this week at Bitten By the Bug 2, which is to use the crayon box cut from Tags, Bags, Boxes & More. I also used the sketch and color challenge (primary colors) from Jitterbuggin' for the layout of my cards and the box. Finally, I am entering this in Crafing with Christina's "back to school" challenge.

The box is from Tags, Bags, Boxes & More and cut as large as I could on a 12"x12" piece of cardstock. The box, when assembled, is 4 3/4"x6." The box was cut with some red polka dotted cardstock I found in my stash. It matches the apple I cut for the cards. I made the front of the box match my cards. I just left off the sentiment on the box. I used two buttons to create the closure for the box. I ran some twine through a blue button and tied it in a bow, leaving a loop on the bottom end. I then used an adhesive dot to glue it on the crayon box flap. I used a pop-dot to lift up the yellow button, this way the loop of twine can loop around the yellow button and keep the box closed. The cards are 5 1/2"x4 1/4." I used yellow cardstock and inked the edges for the base. I cut a blue strip at 4 1/4"x2" and embossed it with Swiss Dots. I cut a piece of black at 4 1/2"x3 1/4" and embossed it with Argyle. The apple is from Doodlecharms and cut at 3." I used the shadow feature for the white cardstock and the red polka dotted paper for the layer. The printed green cardstock for the leaf and I embossed the brown stem with the Distressed Stripes folder. The "thanks" is a Cuttlebug die, it is part of an alphabet set. I cut it with the same printed green cardstock that I used for the leaf. I added some Stickles in the "shine" of the apple. I finished off the card with some bling, because I love my bling! ;)I made this card set thinking that it would be perfect to give to a teacher to use as thank you cards. I thought the apple and the primary colors were perfect for a teacher. I know just the teacher to give them to as well, I hope they will be well received. :) Enjoy!!