Friday, November 29, 2013

Countdown to Baby - No Wake Zone

I am not the one having the baby, but it will probably be as close as I come.  My best friend and her husband (who is actually a friend of mine - I introduced them) are expecting their first baby.  They have already found out that it will be a boy and I get the privilege of creating a lot of the art and decor for the baby's room, plus some onesies and shirts.  :)  I am actually quite excited about it since I will basically be an honorary aunt!  They are going with an ocean themed room, a kind of "under the sea" thing, so this is my first project for their room, it will probably be on the door or just outside the room.


I started with a piece of 10"x10" canvas.  I then painted it with navy blue paint.  The main color they chose is a teal/turquoise color and their accent is navy blue.  I used my Silhouette Cameo to cut all my elements for the canvas and cut all but the stroller from vinyl.  The waves are from a set called "nautical objects" by Sophie Gallo (#47440).  I cut the two at the top left side at 0.6"x5.63" and the two at the bottom right at  0.75"x7.09."  The words are all cut in a white vinyl using a font called "sail" that I found online.  All the words are about 3 1/2" tall (approximately).  The stroller is called "echo park stroller" by Echo Park (#26751).  I cut it at 2.99"x3.25" and cut it out of card stock.  I adhered the stroller with some foam tape for a little dimension.


This was a pretty simple one, but I absolutely love how it turned out.  I am pretty sure they will as well.

This project was based on something I found on Pinterest.  You can see the original pin here.

Monday, November 25, 2013

Elegant Edges - Creation #7

I made a Christmas banner for my most recent creation using "Elegant Edges."


The base of my banner is from "Elegant Edges."  I used the image on page 69, both the oblong and shift-shadow feature.  I cut it at 5."  I used "Ribbons & Rosettes" for the rosettes, it is on page 66.  They were cut at 1 1/2" and I cut six parts for each rosette.  The letters are from "Storybook."  They were cut with both the shadow and regular features, using the same card stock for both layers, and they were cut at 2."  Finally, I used the digital cartridge "3-D Bows" for the bows at the top.  This is the first bow and just a single layer.  The bows were cut at a 4" length.  To hang the banner I ran some ivory colored ribbon through some holes I punched on each side of the banner pieces.  All the papers are from the Christmas Memories Stack by DCWV.


Sunday, November 24, 2013

Silhouette Sunday - Turkey in a Hat

Today's Silhouette Sunday project is an adorable Thanksgiving turkey card.


The card is 5 1/2"x4 1/4."  The card base is made from white card stock.  I cut a brown mat, from K&Company card stock, at 5 3/8"x4 1/8."  The green leaf background is from The Fall and Halloween Stack by DCWV and is 5 1/4"x4."  I cut another piece of the same brown card stock at 2 1/2"x4" and topped it off with two border punched pieces of card stock.  I used the apron lace punch by Fiskars.


I used the "turkey in  pilgrim hat" cut for my image.  This cut is by Michelle Renee and is #50200.  When it is all assembled it measures about 4" tall and 3" wide.  I adhered the pilgrim hat with foam tape just around the edges.  The turkey is loose inside so that it can be pulled out.  I added a piece of white card stock to the bottom of the turkey and stamped a Peachy Keen sentiment to it, the sentiment is from the October 2013 Stamp of the Month kit.


I cut a piece of white card stock into a banner and stamped my sentiment on it.  The sentiment is from Scrappy Moms Stamps, the "A Holiday to Remember" set.  I added yellow glitter and glossy accents to the buckle on the hat, glossy accents to the turkey's beak, and candy cane glitter to the turkey's wattle.  I finished off the front of the card with some gems.  I took some clear gems and colored them orange to fit with my color scheme.


I also finished the inside of this card.  I cut a brown mat at 5 3/8"x4 1/8" and a green leafy mat at 5 1/8"x3 7/8."  The orange mat is 3 3/4"x3," the brown mat is 3 5/8"x2 7/8," and the white mat is 3 1/2"x2 3/4."  I used a stamp from Fiskars for my sentiment.

I made this card following the sketch at My Craft Spot and using the current color combo at Color Throwdown.  I also made this for the Thanksgiving theme challenge at Die Cuttin' Divas.

Thursday, November 21, 2013

Elegant Edges - Creation #6

Today's creation using the "Elegant Edges" cartridge is pretty simple.  I really wasn't going for the wreath look, but it turns out looking like one anyways and I do rather like it in the end.


The image I used from "Elegant Edges" is on page 45.  I cut two of the shadow features at 4 1/2," then scored the back one about 1" from the top and adhered them together at the top to create my card base.  I cut the basic image at 4 1/2" out of a green patterned card stock which came from the Christmas Memories Stack by DCWV.  I cut another piece using the shadow feature, this time at 2."  I then used some shiny red card stock to cut my next piece using the frame feature.  The stamp is one that I had in my stash.  I colored it and added some red gems to the sides of the stamped image.  I finished off the card with some large red gems in every other scallop of my image, thus completing my wreath look.


Wednesday, November 20, 2013

Elegant Edges - Creation #5

One of the girls I work with requested a Christmas card.  Her only real requirement was that it included Winnie the Pooh and Piglet.  Here is what I came up with using the "Elegant Edges" cartridge:


I used the the shape on page 29 of "Elegant Edges" to create my card base.  I opened the shadow image up in Cricut Craft Room and sized it to 4"x8."  I turned off the aspect ratio in order to be able to make it this size.  I then used the oblong frame feature for the blue layer, making sure it fit into the shadow.  I added some white pearls to the curved sides.


Winnie the Pooh and Piglet are both from the "Pooh and Friends" cartridge.  Pooh can be found on page 18, Piglet can be found on page 38, the Santa hat is on page 60, and the winter hat is on page 58.  Both the Santa hat and the winter hat are the icon feature.  I added some red flocking powder to the Santa hat.  

The sentiment is from My Craft Spot.  I trimmed the card stock I stamped it on into a banner and used a pop-dot in the middle and glue dots on the sides to create a wave in the banner.

Sunday, November 17, 2013

Silhouette Sunday - Purple Flower

Here is today's Silhouette Sunday creation:


The card is 5"x5."  I used purple card stock for the card base.  I cut another piece of purple card stock at 4 3/4"x4 3/4" and a piece of black card stock at 4 1/2"x4 1/2."  I then cut four pieces of black/white/grey patterned papers at 2 3/16x2 3/16."  The sentiment in the bottom left corner is from Scrappy Moms Stamps, the "Mini Messages" set.

The purple flower is from the Silhouette Studio, called "winter flower" by We R Memory Keepers (#38814).  I filled in all the petals with two shades of purple, the middle of the flower is filled with a third shade of purple, finally, the dots int he middle of the flower were filled with grey.  I used the print feature to print it out first, then cut it all out and adhered it to the card with foam tape.

The black mat on the inside is 4 3/4"x4 3/4" and the white mat is 4 5/8"x4 5/8."  The sentiment on the inside is also from Scrappy Moms Stamps.  This one is from the "Hooray for Birthdays" set.

Friday, November 15, 2013

Elegant Edges - Creation #4

I said I would make something other than a Christmas card soon and I finally did!


I used the book feature and the regular and shifted images on page 48 for my card.  I welded the two pieces in Cricut Craft Room to create my card base from white card stock, when folded the card is 5 1/2"x4 1/4."  I then cut another piece, using the shifted image, from some pink card stock and adhered it to the inside to fill in the scallops.  I cut a piece of pink card stock at 5 3/8"x3 7/8," then a piece of white card stock at 5 1/4"x3 3/4."  I embossed the white piece with a Darice embossing folder called Flower Frenzy.


My image is a stamp by Whipper Snapper.  I colored it with some PrismaColor colored pencils.  The white layer on which she is stamped is 3 1/4"x3 1/4."  The pink layer is 3 3/8"x3 3/8."  I adhered it to the card with foam tape.  My sentiment is stamped on piece of white card stock that I cut into a banner.  I then finished off the card with some bright pink gems.

Thursday, November 14, 2013

Elegant Edges - Creation #3

It seems like all I am making is Christmas cards lately.  I swear I will make something else one of these days, but I got this idea for a Christmas card and just had to make it.


The card is 5 1/2"x4 1/4."  I used black card stock for the base, then cut some red patterned card stock at 5 3/8"x4 1/8" for Santa's suit.

I used "Elegant Edges" to create the white ruff of Santa's suit.  I used the border feature, on shift, and the image on page 26.  I welded two of them together in Cricut Craft Room to create the ruff.  The belt is just a piece of black card stock, cut at 1 1/2"x4 1/8."  I used the image on page 25 to create the belt buckle.  The outer piece is 2" and the inner piece is 1 1/4."  I then covered it glossy accents.

The red card stock on the inside is also 5 3/8"x4 1/8."  I then used the same image as the buckle (page 25) to create my sentiment mat.  I also used the shadow feature, for the black piece.  Both pieces were cut at 3 1/4."  I used a stamp from My Craft Spot's "Tis the Season" set for my sentiment.

Wednesday, November 13, 2013

Elegant Edges - Creation #2

I made another Christmas card for today's creation with the "Elegant Edges" cartridge.


The card is 5 1/2"x4 1/4."  I used white card stock for the card base, then cut a piece of glittery white card stock at 5 1/4"x4."  I wrapped the glittery card stock with a piece of white lace, then adhered it to the card with some foam tape for dimension.


I used the oblong frame feature found on page 24 of the "Elegant Edges" handbook for my image.  I cut it at 3 1/2, using both the regular (silver) and shift (black) functions of the feature.  I also used the shift function of the shadow feature for the white layer.  I stamped my image on the white layer, then heat embossed it with some clear glittery embossing powder.  I colored in the star with star dust Stickles for a little shimmer.  I also added glossy accents to the black dots in the frame.  I finished off the card with some pearl/gem stickers from Martha Stewart.


For the inside of the card I cut a black mat at 5 1/4"x4," then a silver mat at 5 1/8"x3 7/8."  I cut another black mat at 4 1/2"x3 1/4" and a white mat at 4 3/8"x3 1/8."  The sentiment is by Fiskars.

I made this for the following challenges:
365 Cards: "Day 316" - highlight your sentiment
BBTB2: white on white Christmas
Perfect Sentiment: sketch with a sentiment on the front
52 {Christmas} Card Throwdown: black, white, grey

Tuesday, November 12, 2013

Elegant Edges - Creation #1

I thought I would now showcase the "Elegant Edges" Cricut cartridge.  This is such a versatile cartridge.  You can use it in Cricut Craft Room to create shaped cards, it makes great mats for your images or your sentiments, and even some pretty frames if you use that feature.  So, without further ado, here is my first creation:


The card is 5 1/2"x4 1/4."  I used white card stock for the card base.  I then cut a glittery teal mat at 5 3/8"x4 1/8" and a white mat at 5 1/4"x4."  I then used a Darice embossing folder called Buttons Background to emboss my white mat.


I used "Elegant Edges" to create my zigzag mat.  I thought it looked a little like it was cut with pinking shears, which went well with the feel of my card.  I used the shadow and oblong features for my mat, which is cut at 3."  I turned it sideways and adhered it to my mat.


The snowman dress form is a Peachy Keen stamp, from the November 2013 Stamp of the Month kit.  I used my Silhouette Cameo to cut the SVG that Peachy Keen offers to fit the stamp.  I colored it in with some teal and burgundy markers.  I also used a button stamp from the same kit to add some buttons to my snowman.  The sentiment is also from the November 2013 kit.  I cut the white card stock into a banner, then cut a burgundy one a little wider to mat behind it.  I then finished off the card with a ribbon bow and two burgundy buttons. 


For the inside of the card I cut a burgundy mat at 5 1/8"x3 7/8" and a white mat at 4 7/8"x3 5/8."  I used more stamps from the November 2013 Stamp of the Month kit to decorate the the white mat.  I used some teal ink for the buttons and teal and burgundy markers to color the snowman.  I then added some faux stitching to go with my whole card theme.

I made this card for the following challenges:
Peachy Keen: photo inspiration (I used the burgundy and teal colors from the photo)
Fantabulous Cricut: at least one ribbon and one button
365 Cards: "Day 314" - sketch

Sunday, November 10, 2013

Silhouette Sunday - Birthday Octopus

Here is the card I made for today's "Silhouette Sunday" feature:


The card is 4 1/2"x6 1/4."  The card base is made from white card stock.  I then cut two mats, a black one at 4 3/8"x6 1/8" and the blue watery patterned card stock at 4 1/4"x6."  


The octopus was cut using the Silhouette.  I it about 3 1/2" tall and just over 5 3/4" long.  It is called "octopus" and is by Miss Kate Cuttables (#42307). 


I used a stamp from Scrappy Moms Stamps for my sentiment and stamped it in the upper right corner.  I then used some liquid pearls in white and a baby blue to add a little texture and dimension to the card.

Monday, November 04, 2013

Create a Critter 2 - Creation #9

Here is today's card using the "Create a Critter 2" cartridge:


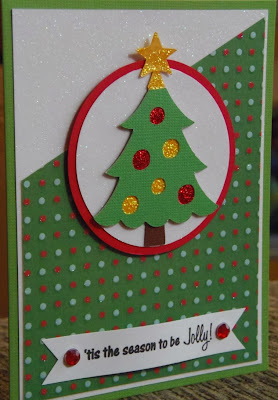
The card is 5 1/2"x4 1/4 and I used a pre-made card base from DCWV for it.  The glittery white layer is 5 1/4"x4."  The green polka dotted card stock is 5 1/8"x3 7/8" and cut at a slight diagonal at the top.  I cut a red circle at 2 3/4 and the glittery white circle is 2 1/2."  I adhered it to the card with foam tape for dimension.


The Christmas tree is cut at 3."  It is the icon feature on page 65.  I added yellow and x-mas red Stickles to the tree for some glitter.  The sentiment is from My Craft Spot.  I stamped it on a piece of white card stock that I trimmed into a banner.  I adhered the ends with glue dots and the center with a piece of foam tape for more dimension.  I then added a couple of red gems on the banner.

I made this for the following challenges:

Sunday, November 03, 2013

Silhouette Sunday - Monsterously Fun Bookmarks

I saw this adorable monster bookmark in the Silhouette online store and just had to make some bookmarks.

Aren't they so cute?


This particular cut is called "monster photo corner or bookmark" and is by Sarah Bailey (#40333).  I cut three of them from different patterned papers.  One of them is even a Christmas one!  The finished bookmarks are about 3 1/4" square.  I adhered the eyes with pop-dots for a little added dimension.