Friday, December 31, 2010

Luv U

This is a Valentine's Day card for my husband. It is hard enough to make masculine cards for most occasions, but I think it is even harder to make them for Valentine's or anniversaries. Anyways, I think this one turned out really well and is perfect for a masculine Valentine's Day card.

The card is 5 1/2"x4 1/4" and made out of black cardstock. I took a piece of a metal craft sheet and cut it to 5 1/4"x4." I then embossed it with the Diamond Plate embossing folder. I used Indie Art to cut the heart at 3." I used the blackout feature for the black heart and the regular cut for the red heart. I put two black brads through the top and used some black twine to hand the heart from a silver brad that I put at the top of the card. I used Stamped for the sentiment, using the rectangle feature. I cut the letters out at 1" and used the solid rectangle to place beneath the letters. I then used foam tape to adhere them to the card.

This is for 365 Cards, where today's "Flashback Friday" challenge is: Metal Mania-to use at least one piece of metal, in any shape or size, on your card.

Thursday, December 30, 2010

We've Moved

I made this card for the weekly challenge on the Cricut Circle blog. The challenge was to be inspired by the photo they had on the blog. This is the photo:

I liked the look of the houses and went with that for a shaped card. I used Handy Man for both the house cut and the sentiment. I used the shadow to make the base of the card, which is 5 1/2" tall. I used my Gypsy to weld it together and also to remove the top middle window on the light blue layer of the house. I used my Cuttlebug and the Mosaic Tiles embossing folder to emboss the roof. I used a flat-backed pearl for the door handle and I added some doodling around the door with a blue glaze pen by Sakura. The sentiment, "we've moved," is cut at 1" and then I used some foam tape to adhere it to the card. I finished it off with some black diamond Stickles.

Little Girls

The "Flashback Thursday" challenge at 365 Cards today is going back to Day 111: Stunning Silhouette...with a Twist. The challenge there being that you had to use a silhouette on your card (obviously) AND make the card in only black and white (the twist).
There are quite a few Cricut cartridges that have images that lend themselves nicely to silhouetting, even if that isn't a specific creative feature. I reached immediately to A Child's Year, because I just love the sweet images on there, and the bonus is that they are already silhouettes. I was paging through and getting some ideas for a bunch of different things I could do when I saw this image and knew I had to use it. The card is 5 1/2"x4 1/2, out of white cardstock. I used a patterned black cardstock for my next layer and cut it at 5 1/4"x4." I wrapped it with white ribbon and then adhered it on the card base. The image was cut at 2 1/2, from A Child's Year, out of black cardstock. The white cardstock that it is adhered to is 2 3/4"x3 1/4," and the black cardstock beneath that is cut at 3"x3 1/2." I used foam tape to mount the image on the card so that it was raised up. I then added some flat-backed pearls in each corner. The inside of the card has black (cut at 5 1/4"x4") and white (cut at 5"x3 3/4") cardstock layered on the card base. I used a Fiskars stamp and some black Colorbox ink to stamp the sentiment on the iniside of the card.
Nice and simple and very sweet. Enjoy!


Wednesday, December 29, 2010

Get Well

Today's "Flashback Wednesday" challenge at 365 Cards is Day 209: Keep it Simple. The challenge there is to use one image, one sentiment, one embellishment and to use about 1/3 of the card space. Simple, right?

The card I made is 5"x7." I used this cute little House Mouse stamps and then colored the image in with my Prismacolor colored pencils. I mounted the image on some dark red cardstock and then mounted that on the yellow card base. I stamped the sentiment on a scrap of white cardstock and trimmed it to size. I then cut scraps of the dark red cardstock and the yellow so they were 1/8" larger than the size on top of it. I mounted that on the card and added a button wrapped with twine right next to the sentiment.

Tuesday, December 28, 2010

Big Orange Flower

I like this card, but I'm not entirely pleased with it. I feel like it is missing something, maybe some embossing on the background or the largest part of the flower...just, something. But, it is all put together and I'm not going to redo it because I do like the look of it.

I made this 5 1/2"x4 1/4" card with dark brown cardstock. I then cut a piece of shimmery orange cardstock at 4"x2 1/2" and adhered it on the brown card. I wrapped metallic orange thread from Gutermann around the card a number of times. The flower is from Forever Young and cut at 4." I cut the base layer in a light orange cardstock, the middle layer is cut with the same shimmery orange as the layer on the base and the final layer is cut from the same brown cardstock as the card base. I inked the edges of the flower layers with galaxy gold ink, by Tsukineko, and also did the card base with the same ink. I folded up the petals of the inner layers for some dimension. I used some gold flat-backed pearls for the flower center and then used some golden rod Stickles around the edges of the largest flower. I stamped the sentiment in the same galaxy gold ink. The sentiment is hard to read in the photo, but says, "Thinking of You." It shows up better in person.

This card was made for the following challenges:
Cupcake Inspirations: orange and brown cupcake with a flower on it
Card Patterns: sketch #96

New Year's Shaker Card & Purple Snowflakes

I don't know about other places, but I know that in Alaska we had fireworks on New Year's Eve. I guess it was mostly because we didn't have them on the 4th of July...it was just too bright out at night to see them well. In that vein I wanted to make a fun New Year's card, one with fireworks and was bright and cheery. Most of the ones I have been making lately are dark colored. I used sketch #74 from Tuesday Morning Sketches and made it a shaker card. I had been wanting to make one for a while, and today's challenge at 365 Cards worked with that perfectly. Today's Flashback Tuesday is Day 20: "Let's Make Some Noise," which is to put something on your card that makes noise. Well, the shaker card definitely does that. The challenge at Paper Playtime is to make anything New Year's related, so it worked really well with my desire to make a fun New Year's card.

The card is 5 1/2"x4 1/4." I cut the multi-colored patterned paper at 4"x4" and adhered it on the card. I cut a white sqare at 2" and stamped my fireworks image, which is from Studio G, in rocket red gold ink from Tsukineko. The inside of my frame is 2" sqare and the outside of the frame is 2 1/4" square, I used a glittery red paper for that. The inside of the shaker card has red, orange, green and blue micro-beads. The inside of the card says, "Happy New Year!"

This second card isn't for any challenges, I just got inspired and had to make it. On Christmas day, my husband and I were driving home from my dad's house and we heard a song on the radio about "pretty purple snowflakes." I don't remember much else about it, but the minute I heard that line I knew I had to make a card about it. If ever there was a song just begging to be the inspiration to a card it would be that one.

The card is 5 1/2"x4 1/4" and made of white cardstock. I cut a piece of dark purple cardstock 1/4" smaller and then embossed it with the Large Snowflakes embossing folder. I then added some purple Stickles here and there on it. I ran a piece of white ribbon around the purple cardstock and then attached it to my card base. I tied the bow from another piece of the white ribbon and attached it. The snowflakes are from Christmas and Accent Essentials. The white one is cut at 2 1/4," the larger purple one is cut at 2" and the smallest one is cut at 1 3/4." I then added some gems and pearls and attached them on the card with glue or pop-dots. I think it turned out really pretty. Enjoy!!

Monday, December 27, 2010

Mother's & Father's Day Cards

I am already prepared for Mother's and Father's Day with these two cards I made today. The Father's Day card is for 365 Cards, it is "Flashback Monday" and we are challenged to create a card with an old challenge. In this case it is Day 18: Plentiful Patterns. The challenge is to use three of the following patterns: plaid, paisley, gingham, houndstooth or toile. I went with paisley, houndstooth and plaid. I also used sketch #119 from CPS. Their challenge this week is to make a card based on any sketch from earlier in the year.

The card is 3 3/4"x9." All the patterned papers came from DCWV's Guy Stack. The houndstooth paper at the bottom is cut at 3 3/4"x2 3/4." The small plaid squares are 3/4" with a white 1" square underneath. I pop-dotted the plaid squares. The houndstooth square at the top is a 3 1/2" square, the plaid one is a 3 1/4" square and the white one is a 2 7/8" square. The stamp is from Stampendous and stamped using cosmic copper ink from Tsukineko.

The Mother's Day card is using the sketch from Mojo Monday and the color combination from Picture Perfect Creations.

The card is 5"x5" square from the navy cardstock. I cut three circles and a square at 2 1/4" from the rose colored cardstock, I then embossed them with the Floral Fantasy folder. I adhered a pear green ribbon around the card. I stamped my image on the white square, which is 3." The stamp is Stampendous and stamped with pear tart ink from Tsukineko. I adhered that to the pear green square, cut at 3 1/4." I used foam adhesive to mount it to the card. I used a white gel pen to create my faux stitching and then used two pop-dots, one on top of the other, to pop up the flower, which is from K&Company.

These are both super simple cards, but I like the simplicity and am pleased with how they turned out. Enjoy!


Welcome Baby

I have been pretty much making cards lately, so making a gift bag was a fun little departure for me. :) The gift bag was made for the Flaunt it Fridays challenge, which was to use the turtle from Create a Critter, and to make something other than a card. That part was a challenge, not a requirement. I made it a baby gift bag for the challenge at Sentimental Sundays, which is "baby."
I used a bag that I already had on hand and just dressed it up. The turtle is from Create a Critter and cut at 2 1/4." For the grass I
just cut some Core'dinations cardstock to fit the size of the bag and tore the top. I cut the presents from Celebrations, using some cardstock from the Citrus stack by DCWV. I used some lime green Stickles for the bow/ribbon on the presents. I used pop-dots of different widths for the bottom two presents and
the top one is adhered to the bag directly. The "welcome" part of the sentiment is from ZooBalloo, cut at 1 1/2," and the "baby" is from Makin' the Grade, cut at 1," and adhered vertically. I finished it off by adding google eyes to the little turtle. Enjoy!

Sunday, December 26, 2010

Happy New Year Card

I hope everyone had a very good Christmas. I got to see my family, which is always nice. It was especially nice to be able to see my brother, I haven't seen him in three years. I did however, have a chaotic Christmas Eve day. I spent the morning in the emergency room, because my husband split his lip open and needed 14 stitches. He is doing good, other than a swollen lip, and the rest of the weekend went very well. But, on to the card!This is a 5"x7" card, made with white cardstock and a black piece cut 1/8" smaller. I then embossed the black cardstock with the Polka Dots embossing folder and adhered it to the card base. I sprayed that with a silver shimmer mist by Tsukineko. I stamped the gem flourish, from Inkadinkado, onto some black cardstock with starlite silver ink from Tsukineko. I then trimmed the cardstock to fit and cut some white cardstock 1/4" larger than the black. I sprayed that image with sparkle shimmer mist and adhered it onto the card. I then cut a white strip of cardstock at 7"x1" and a black piece 3/16" smaller. I adhered them down and stamped my sentiment in the same ink, using letter stamps. I finished it off with some gems.
I used the sketch from today's "Super Sketchy Sunday," at 365 Cards for the layout of my card. I was also inspired for the colors and the look of the card by this week's photo inspiration at Crafty Ho's. Finally, I also made this for My Sheri Crafts, where the challenge is "sprays/mists."

Thursday, December 23, 2010

Cheers

Here's a sparkly New Year's card for you! I made this one for today's 365 Cards challenge. The challenge today was, "thinking in threes." There needed to be three decorative elements and then you needed to have three of each of those elements. I used three eyelets, three pieces of ribbon and three flat-backed pearls.

The card is 4 1/4"x5 1/2." I used a dark blue cardstock for my card base and cut some silver cardstock 1/4" smaller, then embossed it with the Stars embossing folder. I wrapped two pieces of ribbon around the silver cardstock before adhering it to my card base. I cut a piece of shimmery dark blue cardstock at 2 3/4"x3 3/4," and a piece of silver cardstock 1/4" smaller. I then embossed the silver cardstock with a Sizzix embossing folder. I adhered them together and put three eyeles in three of the corners. I put a ribbon through two of the eyelets and tied it in a knot. I then adhered them to the card base with foam tape. I cut the cheers and glass from Designer's Calendar at 2 1/4" out of dark blue cardstock. I adhered it to the card and used some star dust Stickles on it to make it shimmery. I finished the card off with the three flat-backed pearls in three corners.

Wednesday, December 22, 2010

Adorable Angels

All right, I have one more card I made this morning. After I post this I need to start driving to Duluth. It is only about 3 hours, but that is with good weather and road conditions. We just got a lot of snow, so the roads are a little slick. I hope they aren't too bad and people are behaving out on the roads...at least the ones I will be on. :)
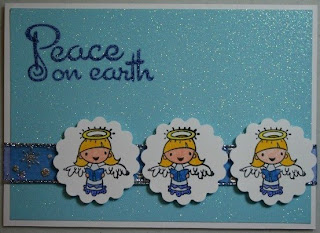
I made this card using sketch #198 from CPS. I also made it for Crafty Creations' angel challenge, and 365 Cards' challenge to make a cute card. How can you not look at those adorable little angels and not think they are cute?For this card I stamped the angel image three times. The stamp is one I found in the $1 bin at Michaels, it was too cute to pass up! I colored the angel with my Prismacolor pencils and then punched her out with a scalloped circle punch. I made the card 5"x7" and cut some glittery blue cardstock at 4 3/4"x6 3/4" and adhered that to the card base. I ran some blue and silver ribbon around the card and then pop-dotted my angels onto the ribbon. I stamped the sentiment with some blue iris ink from Colorbox. Another super simple card for today, but I really like that adorable angel image and didn't want to overwhelm it. Enjoy!

Mistletoe

I've got a quick and simple one for you today. This is a small card, 3 1/2"x5," but I think it really works. I used a pre-made card for the base and cut some patterned paper the same size. I cut a strip of red paper at 2"x3" and used a Martha Stewart border punch on the bottom. The cream strip is cut at 1 1/2"x2 7/8." I cut the mistletoe from the Christmas cartridge, at 1 1/2," out of a green glittery cardstock, then cut the ribbon out of a dark red cardstock. I used some flat-backed pearls as the berries and added burgundy Stickles to the ribbon. I stamped my sentiment in red brick ink, by Tsukineko. That's all there is to it...see, nice and simple. Enjoy!!

I made this for 365 Cards challenge to be inspired by mistletoe. I went very literally here, but I really like this mistletoe image and thought it worked really well. I used sketch #121 from Clean & Simple and also made this for the ABC Challenge Blog, where this week it is "K is for Keep it Simple."

Tuesday, December 21, 2010

Two Christmas Cards

Even though the coaster gift set took up most of my day I managed to make two cards today for some challenges. This first one is using the sketch challenge at Crafty Ho's, Santa cake inspiration at Cupcake Inspirations, and to hand cut an image for Paper Sundaes. I used a pre-made 5 1/2"x4 1/4" card from DCWV. I stamped my Santa image on white paper and embossed it with some silver embossing powder and then cut around the image. I cut some red paper at 2 1/2"x2 3/4," and some green paper at 2 3/4"x3." I then embossed both papers with the D'vine Swirls embossing folder. I layered them all together and adhered them on the card. I cut a strip of green paper at 1 1/4"x4 1/4" and also embossed it with D'vine Swirls. I adhered a piece of red ribbon in the middle of the green strip and embellished it with some holly buttons and red gems.

This second card was made using the sketch from Sunday's 365 Cards challenge. I also used the gingerbread man from Just Because Cards for BBTB2's challenge and embellished it for Tuesday Morning Sketches.

The card base is 4 1/2"x6 1/4," using a patterned red cardstock. I cut a strip of white paper and a strip of green paper at 2 1/4"x6 1/4." I then embossed the green paper with the Polka Dots embossing folder and cut the edge of the white paper with scalloped paper edgers. I adhered them to the card so you could see only the edge of the white paper from under the green. I wrapped some white and silver ribbon around the card. The gingerbread man was cut at 4" (real dial size used) out of brown cardstock. I then decorated him with some rick-rack "icing" on his arms and legs, some buttons for, well, buttons; and some flat-backed pearls for eyes and mouth. I then edged him in cinnamon Stickles and used some foam tape to mount him.
Both cards are pretty simple, but I am quite pleased with the results of both of them. I hope you enjoy!

Coaster Set

I made this coaster set today as a Christmas gift for my brother's girlfriend. I have never met her, so I don't really know her likes and dislikes, so I am really hoping that she will like it.

The coasters are a pre-made wooden set that I found at a Ben Franklin. I painted all the coasters in, what the bottle said was ivory, but I think looks more like a buttery yellow. I then cut some felt about 1/2" smaller than the coasters for the bottoms. I used George and Basic Shapes to cut circles out of the yellow floral patterned paper that were the same size as the coasters. I then decorated the coasters with flowers and birds from Lovely Floral. The only flower not from that cartridge is the one on the top left, it is from Cindy Loo. I added some grape Stickles to every coaster, somewhere and then sealed them all with satin ModPodge. I painted the base the same ivory/yellow color as the coasters, but I did the sides in a light purple. I then added some gingham ribbon around the sides of the base. The base looked really plain at that point so I added some purple and green gems to match the purple/green color scheme I did on the coasters. I finished it all off by tying the set together with the same gingham ribbon I used on the edge of the base.


Monday, December 20, 2010

Christmas Candle Card

I think this card turned out simply gorgeous! Of course I am a little biased, but I really do like this one a lot. :) I turned on some Trans-Siberian Orchestra music this morning and was very much inspired by their music when I was making this card. Trans-Siberian Orchestra is my absolute favorite music to listen to at Christmastime.
The card is 5"x7." I cut it out of white cardstock and cut the red patterned paper to the same size, since the paper was too flimsy to make a card by itself. The candle was cut from Joys of the Season at 4 1/2." I inked the edges of the candle with a peach pastel ink by Colorbox. I embossed the silver tray with the Distressed Stripes embossing folder and then inked it with starlite black ink from Tsukineko. I added some yellow Stickles to the flame of the candle and doodled on the holly and berries. I used the wavy music stamp from Stampendous and stamped it in pearlescent beige ink by Tsukineko onto the candle. I cut a piece of glittery white paper at 4 3/4"x4." I then embossed it with the Script Texture embossing folder and then inked it with the same peach pastel ink for a subtle effect. I cut some gold cardstock at 5"x4 1/4," and mounted the embossed white piece on it. I then adhered the candle to the white piece. I adhered all of that to the card base, near the top. I wrapped some gold ribbon around the card and strung a pre-made tag on it. I stamped the tag with the sentiment in pheasant gold ink by Colorbox and also inked the edges with the peach pastel, then I used a pop-dot to keep it adhered to the front of the card. I tied a bow with the same gold ribbon and attached it onto the piece of ribbon already on the card.
I made this card for the following challenges:

Saturday, December 18, 2010

Lemonade


Here is another card I made today. Basically the opposite of what I made earlier. That one was a nice wintery card and this one feels very summery. :)
This card is 5 1/2"x4 1/4." The yellow cardstock is cut 1/4" smaller and then embossed with one of the Preserves companion embossing folders. I tied some yellow ribbon near the bottom of the card and added three buttons tied with red twine. The sentiment is a stamp I had in my stash and I used Dandelion ink from Tsukineko. The cup is cut at 3," using th real dial size feature, the actual size is over 19" becasuse it is on the tabs creative feature. I welded a lemon from Preserves to the cup. I cut it in yellow, then cut it again in white and with a yellow vellum. I cut the straw off of the white piece and then drew on the red stripes. I cut the straw off of the vellum and used just the glass. I cut out another lemon in yellow and then heat embossed it with a yellow powder. I wasn't very careful about covering the whole thing because this way it looks a little more natural. I then pop-dotted the whole thing for dimension.


I made this for just two challenges. I used sketch #95 from Card Patterns for the layout of my card. I also did this for Flaunt it Fridays. The challenge was to use the cup with lemons from Simply Charmed. I don't have Simply Charmed, so I used From My Kitchen and Preserves. Enjoy!

Winter Hat

I made this card entirely out of scraps, except for the card base and envelope. I love being able to use up scraps, it makes me feel like I am getting closer to allowing myself to buy more paper. I just need to use up more before I will let myself do that, I have enough on hand as it is. :)

This card is 5 1/2"x4 1/4." The card base is from a mint green cardstock. I used some patterned paper scraps and some green and white scraps that I had in my stash. Even the piece of paper on the inside of the card is a scrap, it was almost the perfect size too...I just had to trim off about 1/4" on each side. The striped paper is cut at 5 1/4"x4." I layered on some green cardstock, which is cut 3 7/8"x2," and then embossed with the Snowflakes embossing folder. I used a corner rounder on two of the corners. I then inked it with some white ink. The small green circle is also the same color green cardstock and also inked with white ink. The blue and white paisley cardstock is cut at 4 1/2"x2 1/2." I layered it with a scrap of the mint green cardstock, which is cut at 4"x2." The white cardstock on it is 2"x1 3/4." I stamped the sentiment and then heat embossed it with a glittery blue embossing powder. The larger circle is some snowflake paper I had in my stash and cut at 2 1/2," with a circle punch. The green circle is 1 3/4," and also cut with a punch. I cut the hat from Winter Woodland at 1 3/4." I flocked the blue trim pieces and used some eucalyptus Stickles on the snowflake. I adhered it with a pop-dot for dimension. The inside of the card is a scrap of paper that is 1/4" smaller than the card and I used a Martha Stewart snowflake corner punch on each of the corners. I then made a matching envelope, using the dimensions given on the Martha Stewart score board.This card was made for the following challenges:

Friday, December 17, 2010

New Year's Card

The challenge at 365 Cards is to have at least two images of things you would find at a celebration on your card. This paired really well with the challenge at Paper Cutz Challenge, which is to make a New Year's project using a banner and any colors you like.

This card is 5 1/2"x4 1/4." I made it out of black cardstock and then trimmed a piece of white paper 1/8" smaller than the black. I stamped the white paper with a $1 stamp that I got at Michael's. I used some starlite silver ink by Tsukineko. I strung a piece of shiny red thread across the top for my banner. I cut the banner from Country Life at 1 1/2." The wine bottle and glasses are cut from silver cardstock at 2 3/4." The sentiment is cut at 1 1/2," I used black cardstock, silver cardstock and a foiled red cardstock. The wine bottle and the sentiment are cut from Celebrate with Flourish.

Thursday, December 16, 2010

Quilted Comfort

The card is 4 1/2"x6 1/4," made out of white cardstock. I cut a piece of dark pink cardstock 1/4" smaller and adhered it on the card. I then cut squares, 1 1/4"x1 1/4," out of white, patterned pink and blue floral. I embossed the white squares with the Swiss Dots Cuttlebug folder. I adhered them on the card, leaving space between them to see the dark pink. I cut a strip of patterned pink cardstock 3/4"x4 1/2." I adhered it on the card with the fabric brads. I then attached a flower sticker on the middle. The inside of the card is stamped with the sentiment, "May you find comfort in your loving memories."

This card was made for the Crafty Creations photo inspiration challenge. Here is the photo:

Penguin Ornament

The challenge over at 365 Cards is to make a card with a detachable ornament on it. To make the card I used sketch #197 from CPS.

The card is really simple, because I really wanted to showcase the penguin ornament. I used black chipboard to cut a 3" penguin from Create a Critter. I cut the layers out of cardstock. I cut two sets of feet and the scarf so that I could adhere some on the back and make it look like the back of the penguin. I punched a small hole near the top and ran some red twine through for hanging.

The card itself is 3 3/4"x9" and made of black cardstock. I layered on a white, cut 1/8" smaller than the black. The red piece is cut at 2 3/4"x8" and I used some white flat-backed pearls in the corners. I cut a small black strip 3 1/2"x1 1/2" and a small white strip 1/8" smaller than the black strip and layered it on the card near the bottom. I stamped the "you're too cool" sentiment on the front and used some removable adhesive to keep the penguin on the card, but then you could also take it off without ripping the back of it. The inside is stamped with the sentiment "have yourself a merry little christmas" and a penguin.

This one is going to my brother, who is a big fan of penguins. I know he will appreciate it. Enjoy!

Wednesday, December 15, 2010

Simple Sun Card

This is a super simple card I made for a couple of challenges. The card is 4"x5" and is a pre-made card that I had on hand. I cut two strips of dark green and two strips of dark gray at 4 7/8"x7/8" each. I used the birds and swirls embossing folder and placed the four strips side by side on it and then embossed them. Then I spaced them apart on the card the it gives a unique look to the image. I tied a yellow ribbon around the card in the middle and placed the sun on top. The sun was cut from Create a Critter, using the hide contour feature on my Gypsy to get rid of the face. I inked both layers of the sun and used pop-dots to adhere it to the card.

I made this card for two challenges. The first one was a color challenge from Picture Perfect Creations. Their colors this week are: basic gray, garden green, and daffodil delight. The other challenge this card is for is Made By Momo. Her challenge is to make something with a sun, cloud or rainbow.
I decided not to add a sentiment so that it could be used for just about anything. The inside is also blank, so I can add a stamped or written sentiment to the inside when I decide what, exactly, I am going to use it for. Enjoy!