Saturday, June 30, 2012

Chicken

Here is card #3 in my Block Party series and it is yet another ridiculous pun card! :) Hope you enjoy it!
The card is 4 1/4"x5 1/2." I used an ivory cardstock for the base. I cut some red cardstock at 4"x5 1/4" and the striped cardstock at 3 3/4"x5." I used Elegant Edges for the mat, it is cut at 3 1/4" and I used foam tape to pop it up on the card. The chicken is from Block Party, cut at 3." I used glossy accents on his feet and beak and x-mas red Stickles on his comb. The sentiment is from Scrappy Moms Stamps. I stamped it on the ivory cardstock and trimmed it down. The red cardstock is cut 1/8" larger. I adhered it down and added a large red gem on either side. And there you go, clean and simple.
I made this for the following challenge:
  • 365 Cards: "Day 120" - add sparkle and shine to your card in two ways

Friday, June 29, 2012

Patriotic Hat

The Cricut Circle blog challenge this week is to create something with at least three stars and stripes on it. I decided to use this challenge to create some 4th of July decor. This is also the first time I have used the Cricut Craft Room. I got the Independence Day 3D Projects digital cartridge because I wanted to create the large Uncle Sam hat and make that into a table centerpiece. I cut the hat at 5." The blue and red papers for this project are from the Summer Celebration Stack by DCWV. They are both shimmery. The white cardstock was just in my stash. I pieced the hat together and hot glued a styrofoam ball inside to give it some stability and as a place to stick in my embellishments. I cut out the fireworks from the Stand and Salute cartridge at 3." I cut each firework twice, once on flip, then glued them together around a piece of floral stem wire. I cut three white and two red fireworks. I covered all the white fireworks in star dust Stickles and the red fireworks in x-mas red Stickles. The four small blue stars are the cuts leftover from the hat, there were eight in all, but I glued two around each wire. The large blue star in the middle is cut from Stand and Salute at 2." Again, I cut it twice and glued it around the wire. I used Phrases to cut both the flag (it is the tag feature) and the "4th of July" phrase. The flag is cut at 3" and the phrase at 2 1/4." I popped up the "July" part of the phrase with some foam tape, then covered the white parts of the phrase in star dust Stickles and the red part in x-mas red Stickles. I used a dark blue marker to create some faux stitching around the edge of my flag. I did this twice, so each side of the flag is the same since this is a 3D project and will be seen from all sides. I then glued each flag around another piece of floral stem wire. I stuck each piece through the hat and into the styrofoam ball and added a little glue around the opening where it goes into the hat. It wasn't all the difficult to create, it just took a little while for all those Stickles to dry! I think it looks pretty awesome and I hope you do too! :) Enjoy!!
I also made this for the following challenges:

Lettuce

This is the second card I made in playing with the Block Party cartridge. I have to say that there are some cute images on here and those images are ripe for the picking (pun intended) for food pun sentiments. :) I LOVE ridiculous puns so it is perfect for me. And I have the perfect set of food related pun stamps with some Scrappy Moms Stamps. Here is what I came up with today:
This is a small little card, 3 1/2"x5." The green mat is 1/4" smaller than the card base. I used Block Party for all the cuts. The salad is cut at 3," the onion at 2," and the tomato at 1 1/2." I popped up the tomato and the onion. I used glossy accents on the tomato, crackle accents on the dark lettuce leaves and Goosebumps spray on the lighter lettuce leaves. I used a Scrappy Moms Stamp for the sentiment on the inside. Don't you just love it? :) Enjoy!
I made this for the following challenges:

Wednesday, June 27, 2012

Ketchup

I have decided to now play with the Block Party cartridge. I got this a few months ago, but haven't played with it yet, so I figured this was the perfect time to see what all was on this cartridge. This is what I came up with for my first card:
The card is 5 1/2"x4 1/4." I used white cardstock for the base, then cut some black cardstock 1/8" smaller. I then cut some red and white checked paper 1/4" smaller than the black. I love how it makes it look like a picnic table. I used Block Party for all the cuts. The hamburger is cut at 3" and the ketchup and mustard are cut at 3 1/2." I popped up the seeds on the bun and the hamburger to the card. I used glossy accents on the seeds and the ketchup bottle and mustard Distress Stickles on the mustard. I stamped and heat embossed my sentiment, which is from Scrappy Moms Stamps. I also finished the inside. I cut some black cardstock 1/8" smaller than the card base, then cut some white cardstock 1/4" smaller than the black. I trimmed a piece of black cardstock at 1 5/8"x3 7/8" and some more of the checked cardstock at 1 1/2"x3 3/4." I cut the ketchup bottle, again at 3 1/2." The inside sentiment is also from Scrappy Moms Stamps.
I made this for the following challenges:

Tuesday, June 26, 2012

Precious Blessing

This is #6 and the last of my series featuring the Wrap It Up cartridge. This time I decided to go a little more elegant, since my last ones were more whimsical. Here it is:
The card is 4 1/4"x5 1/2." I used gold cardstock for the card base, then cut white cardstock 1/4" smaller and embossed it with the Swiss Dots folder. I then wrapped it with a pale gold organza ribbon. I trimmed a piece of gold cardstock at 4"x3 3/8" and the crosshatched paper at 4"x 3 1/4." The baby buggy is cut at 3 1/4" from Wrap It Up. I cut a strip of white cardstock at 3 3/8"x1 3/4." I used an EK Success border punch, then stamped my sentiment on the strip. I used a Scrappy Moms Stamp, and stamped it in gold then heat embossed it. I added that to the card using pop-dots. I also added three gold brads to both sides of the buggy. I finished off the card with some baby blue Liquid Pearls on the wheels and trim of the buggy. All the paper is from Martha Stewart (except the plain white).
I also made this for the following challenges:
  • 365 Cards: "Day 118" - use three shades of a single color (I have three shades of gold with the ribbon, the papers and the brads)
  • Card Patterns: sketch 171

Monday, June 25, 2012

I Chews You!

Here is card #5 in my Wrap It Up cartridge series.
This time I created a circle shaped card. I used Wild Card for the card base. I then cut a 4" circle and embossed it with my Cuttlebug and the Seeing Spots embossing folder. I cut a strip of blue polka dotted cardstock at 1 1/4" wide and trimmed to fit the circle. I used Wrap It Up for the gumball machine. I cut it at 3 1/2." I added some crystal Stickles and glossy accents to the machine for some texture and dimension. I used a stamp from Scrappy Moms Stamps for my sentiment. I trimmed the white cardstock to fit the sentiment, then cut the blue cardstock 1/8" larger and the orange cardstock 1/4" larger. I finished off the card with some pale yellow pearls around the scallop of the circle and the corners of the sentiment mats.
I also made this for the following challenges:

Sunday, June 24, 2012

Birthday Candles

Here is the fourth card is my series from the Wrap It Up cartridge. I have been having a lot of fun playing with this cartridge and I think I might try to continue this idea, playing with a specific cartridge and make projects featuring images from that cartridge. We will see how that goes though.
This cartridge is 4 1/4"x5 1/2." I used white cardstock for the base, then trimmed some striped cardstock 1/8" smaller. The white mat is 3 1/2"x4 3/4" and embossed with the Happy Birthday embossing folder. The three candles are cut from Wrap It Up. The smallest one is 3 1/2," the middle one is 4" and the largest one is 4 1/2." The sentiment is from Scrappy Moms Stamps. I punched it using a 1 1/2" circle punch, then cut a 2 1 3/4" circle from blue cardstock. I then added a button, tied with an embroidery floss bow to the middle of the circle. I finished off the card with some glossy accents and yellow Stickles on the flames of the candles. All the patterned cardstock comes from The Celebration Stack by DCWV.
I made this for the following challenges:

A Sweet Hello

I have been having so much fun playing with the Wrap It Up cartridge! I decided to make another card using this cartridge. This time I used the lollipop image.
This card is 4 1/4"x5 1/2." The blue striped layer is 4"x5 1/4" and the candy patterned layer is 3 3/4"x5." I used Elegant Edges to cut the background mat. It is cut at 4," both the regular and shadow pieces. The lollipop is from Wrap It Up and cut at 4." I covered the pink and yellow layers with cotton candy and lemon drop glitter by Martha Stewart, then covered that whole piece in glossy accents. I just love how that turned out! I cut the flower/ribbon piece twice, once in blue and once in pink. On the pink one I cut off the ribbon portions so that I was left with the flower. I ran some pink embroidery floss through a yellow button and tied it in a bow and added that to the center of the flower. I adhered the lollipop to the mat, but used foam tape on the ribbon to give it a little lift and dimension. The banner is a Spellbinders Shapabilities die. I stamped my sentiment, which is from Scrappy Moms Stamps, on the banner then added it to the card with pop-dots. I finished off the card with some pale yellow pearls in the lower right hand corner of the mat. How cute did this one turn out? Enjoy!

Friday, June 22, 2012

It's Time...

I have another card for you today using Wrap It Up! I decided to use this cartridge again and Peachy Keen has an "Anything Goes" challenge; so, I started looking through the handbook for images that I could use with Peachy Keen Stamps. I decided on the clock image and here is the card that I came up with:
This card is 4"x9." The two matted layers are 1/8" smaller than the previous layer. The parquet wood cardstock is from DCWV. The clock image is cut at 8 1/2." I embossed the top wood layer with the Distressed Stripes folder and then heat embossed it with some clear embossing powder. i got this idea from Kim at My Craft Spot, and you can see the link where I found it here. I used Peachy Keen Stamps for all the stamps. I heat embossed the sentiment for a little pop. I also added some acetate behind the clock face and the clear part where you can see the chimes. It is really hard to see in the pictures, but it makes for a pretty neat effect. I adhered the clock to the card using some foam tape and finished it off with a little gold bow tie for the clock. Enjoy!
I also made this for the "Anything Goes" challenge at Cardz TV.

Thursday, June 21, 2012

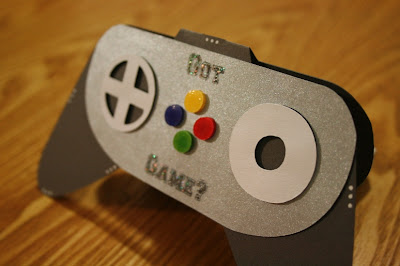
Got Game?

I thought I would play with the Wrap It Up cartridge tonight and I made a video game controller card using the card feature on this cartridge. It is cut at 4." I pop-dotted the colored buttons and covered them in glossy accents. I also pop-dotted the white buttons, just slightly lower than the colored buttons. I used a stamp from Scrappy Moms Stamps for the sentiment and heat embossed it with some glittery embossing powder. I finished off this card with some doodling using my white gel pen. A nice and simple one tonight, but I really like how this one turned out!

Here Comes the Bride

I got another double layout done for my friends' wedding album. Again, both of these are 12"x12" layouts. The background paper is from the Photo Real Stack by DCWV. All the photos are 3 1/2"x5." I used a 12"x5 1/4" strip of striped cardstock from DCWV to mat the three photos on left side of the left page. I matted that strip of cardstock with a piece of turquoise cardstock cut at 12"x5 1/2." The other photo on the left page (which is me, by the way) is matted with the turquoise cardstock. The labels below that photo are cut using the labels 4 die, a Nestabilities die by Spellbinders. I used two chipboard shells from Tattered Angels that I covered in crushed shells Tattered Angels Glimmer Mist. I then use Life is a Beach to cut the hibiscus flower, which is adhered with pop-dots. I sprayed some Prima flowers with coral reef Glimmer Mist and adhered a brad in the center that is covered with lagoon Stickles, I then adhered them to the spaces between the three photos. On the right page I matted the three top photos with a piece of 12"x5 1/4" piece of turquoise cardstock. I used more Prima flowers in between these three photos as well, two large ones sprayed with turquoise blue Glimmer Mist and two small ones sprayed with coral reef Glimmer Mist and a brad covered in lagoon Stickles. I matted the final photo a second time with glittery orange cardstock. I used my Gypsy to weld letters from Martha Stewart Seasonal Cake Art to create my "Here Comes the Bride" title. I used both the shadow and regular feature. It is adhered using pop-dots and covered with glossy accents. I finished off this page using more chipboard shells that are covered in sand Glimmer Mist. Slowly, but surely finishing this wedding album. I can't wait until my friends see it!

Wednesday, June 20, 2012

More Wedding Scrapbook Layouts

Now that I have my computer back I finally have access to all my stuff again. That includes the pictures of my friends' wedding in Belize. I have been slowly working on their wedding album, but with my computer problems it became even slower. Well, I decided that since I am now up and running again I would make the next double layout for the album. This layout is of the groom getting ready for the wedding.
Both pages are 12"x12" and I used some cardstock from the Formal Affair Stack by DCWV for the background. The three photos at the bottom of the left page are 3"x5" and the upper photo on that page is 3 1/2"x5." The two photos on the far side of the right page are 3 1/2"x5" and the large photo on the right page is 4"x6." I matted all the photos with coral cardstock, cut 1/4" larger than the photo, and matted the largest photo again with turquoise cardstock. I used Sweethearts for the "The Groom" part of the title and All Mixed Up for the "gets ready" part of the title. I also used my Gypsy to weld the letters of "gets ready" together. I used Formal Occasion for the two tuxes. I added turquoise pearls for the buttons on the tuxes. I finished off the layout with journaling space, which was created using Nestabilities.