Friday, March 23, 2012

Friday Mashup Challenge #51

It is time for another Friday Mashup challenge! This week is challenge #51 and here it is:
1. Make a project using the "Quilted Cards Technique"
2. Or make a project using something that's been forgotten (sitting in your stash forever)
3. Or mash it up and create a quilted card with something you've forgotten about.
I mashed it up again this week and created a quilted card using some papers that I have had basically since I started crafting. In fact, I have never used these papers ever. Here is a link for the quilted cards technique that I used to create my card. My quilt block is 4"x4" and the whole card is 5"x5." The largest middle block is 2"x2" and the outside corners are 1"x1," so that gives you an idea the size of the quilted part. I used Tags, Bags, Boxes, & More to cut my tag. The sentiment is from My Pink Stamper and I finished it off with a bow made of a greyish-blue sheer ribbon.
I hope you enjoyed my project and I hope you decide to play along at The Friday Mashup!

Monday, March 19, 2012

Welcome Home

I must say that the challenge at Bitten by the Bug 2 is perfectly timed! Their challenge is to use the word "welcome" on your project. Well, my husband has been deployed to Kuwait for the past six months and he comes home tomorrow (03/20). He called me today from Baltimore to say he was in the US, and that he would be flying in to Minneapolis on Tuesday. So, that is why the challenge at BBTB2 is perfect...I made him a "welcome home" card! :)
Three years ago I created a "welcome home" card for a friend's husband when he returned from Iraq. I really liked the look of that card and wanted to do something similar for my husband's card, but I didn't want to duplicate it. Also, I think my card making has evolved and looking back at that one makes me realize it looks rather plain. Anyways, you can see that inspiration card just below here. I used Jubilee to create the "home" part using the village feature on that cartridge. In the original card I used Cursive 101 for the "welcome."
For my current card I used Jubilee again, the houses were cut at 1 3/4." This time I used Phrases for the "welcome" part of the sentiment. It was cut at 2" using the real dial size feature since it is supposed to part of a phrase. The card itself is 4 1/2"x6 1/4," the white layer is 4 1/4"x6" and the blue polka dotted layer is 4 1/8"x5 7/8." I used a punch to create my grass trim, which I then wrapped with some polka dotted ribbon and then tied some hemp twine around it. I added it to the card, then layered my "home" on top. The heart is a piece of craft metal that I punched and embossed with the Diamond Plate embossing folder. I also added two silver brads to the top two corners to finish off my card.
I made this for the following challenges:
BBTB2: "welcome" using any cartridge
365 Cards: "Day 19" - three types of trim (grass punch, ribbong, hemp twine)

Friday, March 16, 2012

Friday Mashup Challenge #50

It is time for another Friday Mashup! This week is challenge #50 and here is the challenge:
1. Make a project using the sketch
2. Or make a project using the "faux mother of pearl technique"
3. Or "mash it up" and create a project using the faux mother of pearl technique and the sketch
I decided to mash it up for my project. I created a card using the sketch and used the faux mother of pearl technique for the background of my card. I found a tutorial for the faux mother of pearl technique here, if you want to see how I create my background. I used weathered wood Distress ink and white opal Liquid Pearls to create the faux mother of pearl background. My card is 4 1/2"x6 1/4." I cut a 2 3/4" circle from George and Basic Shapes, then a 3 3/4" scalloped circle from Mini Monograms. I stamped the swan image on the circle and heat embossed it. I stamped the sentiment on the small white rectangle using the same ink as I used for the swan. I wrapped the card with some sheer white ribbon and tied it off in a knot. I added my scalloped circle to the card with 1/8" thick foam adhesive. Once I had created my background everything fell into place. I knew it would make a perfect sympathy card since it looked so serene and peaceful. I hope you like my project and I hope you decide to play along with us this week at The Friday Mashup!

Monday, March 12, 2012

Boy Birthday Card

Here is a sweet and simple card for a little boy...or a boy at heart. :) The card is 5 1/2"x4 1/4." Both green patterned papers are from the Flower Shower Stack by DCWV. I used A Child's Year for the little boy on the scooter. It is cut at 2 1/2." The white label is a Nestabilities die. I wrapped the green mat with a black & white striped ribbon. I stamped my sentiment and finshed off the card with three buttons. I tied four pieces of black twine through the large green ribbon, one piece looked just too weird.
I made this card for the following challenges:

Friday, March 09, 2012

Friday Mashup Challenge #49

It is time for another Friday Mashup challenge. This week is challenge #49 and here it is:
1. Make a project using the colors green & yellow
2. Or make a 3D project that is a basket or treat pouch
3. Or "Mash it up" and create a treat basket/pouch using the colors green & yellow
I decided to "mash it up" and I created an Easter treat basket using green and yellow as my main colors. My basket is actually a wooden box that I found in my craft room when I was trying to decide what Cricut cartridge to use to cut my basket. Weird how things work like that huh? I covered it with some green and yellow patterned papers, all of which come from the Lemon Flower Stack by DCWV. The handle was created by cutting a strip of light-weight chipboard and covering it with some plaid ribbon. I used Holiday Cakes to cut the sentiment at 2 3/4." I then covered it with lime green Stickles. The flowers around it are from K&Company. I used A Child's Year for the boy and girl silhouettes. They are cut at 4 1/2" and I drew around the edges of them with yellow Stickles. The bunny medallion on the back is from Martha Stewart Seasonal Cake Art and it is cut at 4 1/2." I filled the basket with Easter grass and added my treats. They look good don't they? Actually, I created my treats as well! The eggs are wooden and I painted them with brown paints to make them look like chocolate, both milk and dark. I then "drizzled" them with white chocolate, which is actually white dimensional paint. I think they turned out quite well. I hope you enjoyed my project and I also hope you decide to join in the challenge at The Friday Mashup!

Wednesday, March 07, 2012

Baby Girl

My husband's cousin just recently had a baby girl. I just got her announcement in the mail today and thought I should make her a card. Better late than never right? :)
This card is 5"x7." The patterned paper I used is from the Flower Shower Spring Stack by DCWV. The little girl is from Baby Steps, cut at 2." I used the D'vine Swirls embossing folder for the mat that the little girl is on. I added flocking to the cloud and glossy accents to the moon. I put two different types of ribbon behind the mat, a pink satin ribbon and a yellow grosgrain ribbon. I stamped my sentiment in rich cocoa ink by Tsukineko. I finished off the card with a star shaped button that I covered in yellow Stickles.
I made this for following challenges:
  • Whimsical Designs: sketch
  • 365 Cards: "Day 6" - one piece of patterned paper, one stamp, and any three embellishments (two ribbons and star button)

Tuesday, March 06, 2012

Go Green

I have another St. Patrick's Day project. And, it using another leftover shamrock from my "Lucky Banner." It is the last one, so probably no more with this same shamrock...maybe. ;) I also used more of that glittery green paper. If you haven't guessed by now, I LOVE that stuff. I saw it when I was working one day, I work at JoAnns for those of you that don't know, and just adored it, so I picked up a bunch of it! I won't be running out for a while. :)
This card is 5 1/2"x4 1/4." I used the glittery green paper as my base. The next layer is white cardstock that I splattered with green paint. I just used a dry brush, dipped it in the paint and splattered it on. It was a lot of fun to just be messy! My three patterned papers are from the Flower Shower Spring Stack by DCWV. I cut them in different sized strips and used a scallop punch on the top one. The scalloped circles are Nestabilities dies. I embossed the smaller, white one with the Swiss Dots folder and my Cuttlebug. The shamrock is from Paper Doll Dress Up. I used 1/4" thick foam adhesive to adhere it to the card for more dimension. The sentiment is a stamp from Scrappy Moms Stamps. I stamped it with cottage ivy ink by Tsukineko. I also added a strip of green bling along the top of the polka dotted paper. My shamrock just looked like it need a little something extra, so I added the polka dotted bow and thought it was just the right touch. Enjoy!
I made this card for the following challenges:

Monday, March 05, 2012

It's Your Bird-Day!

Here is a cute little spring birthday card I made today. It is 4 1/2"x6 1/4." I used a polka-dotted cardstock for the card base. I trimmed some pink plaid cardstock at 3"x5 1/4" and gave it a yellow mat that is 1/8" larger. I adhered it all down and added some white ribbon with some yellow pearls. The bird is cut from Create a Critter at 3." I flocked its stomach for some texture. The nest is also from Create a Critter, cut at 1." I embossed it with the Forest Branches folder. The branch is cut from Hoot 'n' Holler. I used my Gypsy to size it to how I wanted. I turned off the aspect ratio and cut it at 4" long by just over 2" tall. I think it came to 2.02," but I am not 100% sure. I inked all my pieces, the bird was inked with tea dye Distress Ink and the nest and branches were inked with vintage photo Distress Ink. I used a Peachy Keen stamp for the face and the sentiment is a stamp from My Pink Stamper. Both of those were stamped with walnut stain Distress Ink. I used pop-dots to adhere the bird for some dimension.
I made this card for the following challenges:

Sunday, March 04, 2012

Lucky Shamrock

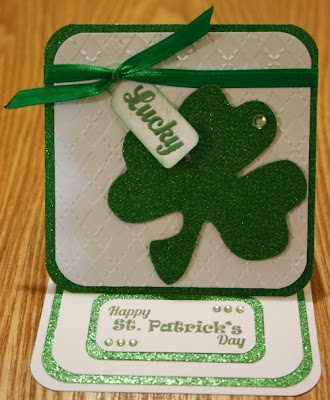
I have a nice and simple St. Patrick's Day card for you today. I created a 4"x4" easel card. I embossed the white layer with the Argyle embossing folder. I wrapped it with some green ribbon and tied it off in a knot. I used Tags, Bags, Boxes, & More for the tag. I used my Gypsy to size it for the stamp, it came out to 0.8"x1 3/4." The stamp is from Scrappy Moms Stamps and I heat embossed it with some shimmery green embossing powder. I also inked the edge of the tag with some green ink. I used another Scrappy Moms Stamp for the inside sentiment. I finished off the card with a little bit of bling on both the senitment and the shamrock.
I made this card for the following challenges:

Friday, March 02, 2012

Friday Mashup Guest Designer

I am so honored to have been asked to be a guest designer for the month of March at the Friday Mashup challenge blog. If you have never seen their challenge blog, check it out, they are always so fun! So, now onto the challenge:


Challenge #48

So here is the "Mashup" Challenge :

Make a project for "St. Patrick's Day".

Or Make a project using "at least 2 Punches".

Or "Mash it Up" and create a project for "St. Patrick's day using your Punches

This is the project that I made...a St. Patrick's Day banner! I think it turned out so cute!! I didn't have any punches that were just screaming to be used, so I just went with the St. Patrick's Day project. I started with the shamrocks, they are from Paper Doll Dress Up, cut at 3." The letters are cut from Art Nouveau at 2." The pots of gold are cut from Simply Charmed at 5." The leprechauns are also from Simply Charmed and also at 5." I cut all pieces from chipboard first, then layered my papers on. I used pop-dots to adhere both the letters to the shamrocks and the shamrocks to the pots of gold. I used glossy accents on the pots (it takes FOREVER for that much surface are to dry, by the way) and also on the buckles of the leprechauns' hats. I also used some bling for their buttons, yellow Stickles on the gold and gave the leprechauns some slightly rosy cheeks with chalk. I punched some holes on each side of each piece and added some eyelets, orange on the leprechauns and black for the pots. I linked them all together using jump rings, which are primarily used in jewelry-making. I used some green ribbon to tie off each end of the banner.

I hope you enjoyed my project and I hope that you decide to join along in this challenge!