Wednesday, October 09, 2013

Create a Critter 2 - Creation #3

Today's "Create a Critter 2" creation is a cute and coordinating Halloween card and treat bag.

The card is 4 1/2"x6 1/4."  I used orange card stock for the card base.  I cut the black/white patterned paper at 4 3/8"x6 1/8."  The patterned paper is from the Midnight Chic Stack by DCWV.  I used the "Elegant Edges" cartridge to create my mat.  The cut I used is found on page 51, I used the oblong and shadow features, both on shift.  I cut it at 4 1/2."  I then embossed the white mat with the Haunted Damask Cuttlebug embossing folder.

The witch turtle and cauldron are both from "Create a Critter 2" and are both found on page 56.  The turtle is the basic cut and the cauldron is the icon feature.  The turtle witch was cut at 3" and the cauldron was cut at 2."  I used Cricut Craft Room to hide the face on the turtle.  I then used a face stamp from Peachy Keen's In Stitches Face Assortment for the face.  I covered the cauldron with glossy accents.  The flames have orange peel Stickles on them, the bubbles are covered in firefly Stickles and the hat band has green Stickles covering it.  I also added some firefly and star dust Stickles to some of the patterned paper for even more glitter.  The sentiment is from Scrappy Moms Stamps, "A Haunting We Will Go."  I cut it into a banner and matted it with some orange card stock.  I added two black pearls on the ends and adhered it with some foam tape.  
The turtle witch was adhered with an action wobble for a little bit of fun.  

On the inside of the card I cut some black card stock at 4 3/8"x6 1/8 and some orange/black polka dot paper at 4 1/8"x5 7/8."  I cut some black card stock at 3"x4 3/4" and white card stock at 2 7/8"x4 5/8."  The spider is on page 53, the accessory feature, and cut at 1 3/4."  I used a white gel pen to give it two little eyes.  The sentiment and the frame around it are both from Peachy Keen, the September 2012 Stamp of the Month Kit.


The treat bag is actually a pre-made bag that I found in my craft room.  I just decorated it up!  I cut some black card stock at 4"x7," some orange card stock at 3 7/8"x6 7/8," and some more of the black/white patterned paper at 3 3/4"x6 3/4."  I tied off the top of the bag with three pieces each of mandarin and charcoal bakers twine from the Twinery.


All the images on here are also from "Create a Critter 2."  The haunted house is on page 55, the accessory feature, and is cut at 5."  I hand cut a piece of black card stock to create the "hill" that it is sitting on.  The ghost is also on page 55, the basic cut.  I used Cricut Craft Room to hide its face and gave it a Peachy Keen one.  The face is from the In Stitches Face Assortment.  I used a clear gel pen to give a little shine to its nose and tooth.  I also used a white gel pen to draw around the edge of the pirate hat to make the piping.


I used the witch turtle again, this time cut at 2 1/2."  For this one's face I used a Peachy Keen Stamp from the September 2012 Stamp of the Month Kit.  I also added a gravestone.  This is the accessory feature and the cut is found on page 54.  I sized it Cricut Craft Room to fit the stamp I was using so it was an odd size cut, but is just over 1 3/4" when assembled.  The sentiment on the gravestone is also from the September 2012 kit and is stamped in white ink.

I made this for the following challenges:
365 Cards: "Day 281" - have someone else pick a piece of patterned paper to use on your card (my husband picked the black/white background piece)
My Craft Spot: Trick or Treat
Stuck on U Sketches.: magic or witchcraft
Peachy Keen: October Release Party Challenge 2 - 3D project with Halloween theme 

Monday, October 07, 2013

A Bit of Randomness

As most of you know by now, I work at a JoAnn Fabric and Crafts store.  Well, JoAnns' stores host, what we call, "Make & Take" events.  This is where people can come in to their local JoAnn store and create a free craft to take home with them.  Lately these "Make & Takes" have been revolving around Disney.  We did a Tinkerbell one when one of her movies was being released on DVD.  Then we did one when "The Little Mermaid" got re-released.  For our next "Make & Take" we will be making a craft to go with the release of "Monsters University" on DVD.  My store manager wanted to try and get people interested in coming to this one since a lot of the "Make & Takes" we do seem to be sparsely attended.  In order to do this we made a little table display of the what the "Make & Take" will be with fliers on it for people to grab with the date and time.  She had me actually create the craft so we could actually display the finished product.  Well, this is it:
We will be making our very own Mike Wazowski!

Since it is on a stick it didn't display very nicely just laying on the table.  I thought it would be nice to stick it in some Styrofoam in a pretty container.  I covered a small round box with some white card stock, then used the "Best of Pixar" cartridge to create my images.


  The black monster silhouette is found on page 54, using the icon feature.  I cut it at 3 1/2" and wrapped it around the box.

I then cut the "Monsters Inc." logo.  It is cut at 2" (real dial size).  It is found on page 41 and is also the icon and icon layer features.

My paper Mike is found on page 46 and is cut at 3 1/2."

Sully is on page 42 and is cut at 5."

I also made a little table card to go with the display.  The card is 2"x5," when folded.  I made it from blue card stock, then cut a piece of white card stock at 1 7/8"x4 7/8."  I used my computer to generate the sentiment.  The Mike I used for the card is on page 45 and is 3" tall.

If you are interested in making your own little Mike Wazowski puppet, then stop on by your local JoAnn Fabric & Crafts store on October 20th (check your local store for times).

Sunday, October 06, 2013

Silhouette Sunday - Hoppy Birthday

Today's card for my Silhouette Sunday post is a pretty simple one, but I also think it turned out super cute...plus it moves!  It can't get much better than that.


The card is 6 1/4"x4 1/2" and the card base is made from white card stock.  I cut some dark brown card stock at 6"x4 1/4," then some yellow sun patterned paper at 5 7/8"x4 1/8."  I added a grass border at the bottom.  This was cut with the Silhouette Cameo.  The cut file is called "12x12 grassy page bottom" and it is by Sophie Gallo (#49184).  I sized it down to 6," adhered it to the yellow paper and trimmed it off at the ends.  The sentiment is from My Pink Stamper and stamped in rich cocoa ink by Tsukineko.  I trimmed the paper into a banner and added a piece of dark brown as a pole.  I then adhered it to the card so that it was partially covered by the grass.


The kangaroo is also from the Silhouette.  The cut file is called "kangaroo" and is by Jamie Koay (#5485).  It was cut at about 3 5/8" tall.  I used some brown polka dotted card stock from DCWV's Green Stack for the body.  I covered the nose and eyes with glossy accents, then adhered it to the card on an action wobble!

The kangaroo bounces!


Wednesday, October 02, 2013

Create a Critter 2 - Creation #2

Today's card using the "Create a Critter 2" cartridge is a clean and simple one.


The card is 5 1/2"x4 1/4."  I used white card stock for the base, then cut some red card stock at 5 3/8"x4 1/8" and another piece of white at 5 1/4"x4."  I used a Spellbinders die, from the Scalloped Ovals set, to cut a hole in the bottom corner of the white mat.  I then backed it with some yellow card stock from Core'dinations.

The ear of corn is from "Create a Critter 2."  It can be found on page 64, the icon feature, and was cut at 2 1/2."  I also cut its shadow at 2 1/2."  I gave it a Peachy Keen face, using one of the faces on The Cornies Face Assortment, and colored in the eyes and tooth with a white gel pen.  I adhered it over the scalloped oval with some foam tape.

The sentiment is from Scrappy Moms Stamps.  It is part of a stamp found on the "Spring Fair" set.  I masked off the second part of the stamp and stamped it in london fog ink by Tsukineko.  I then added three buttons from Favorite Findings under the sentiment.

For the inside I cut some red card stock at 5 1/8"x3 7/8," some yellow card stock at 5"x3 3/4" and some white card stock at 4 3/4"x3 1/2."  I layered them together and adhered them down.  The sentiment is the second part of the sentiment from the front.  This time I masked off the first part and stamped the second, again in london fog ink.

I made this for the following challenges:
365 Cards: "Day 272" - sketch
Color Throwdown: crushed curry, garden green, more mustard, riding hood red, smokey slate
{PIN}spirational Challenges: photo inspiration (veggies/corn)
CASology: harvest

Monday, September 30, 2013

Create a Critter 2 - Creation #1

I may not be showcasing the "Mini Monsters" cartridge anymore, but I just couldn't get monsters off the brain apparently.  This cute little guy comes from the "Create a Critter 2" cartridge.  If you liked the first "Create a Critter" cartridge then you will love the second one.  This one has all those adorable little critters, but this time geared more towards holidays.  This monster is with all the other Halloween critters, but I made it work for a birthday.

The card is 5 1/2"x4 1/4."  I used dark brown card stock for the card base.  The monster patterned paper is from the DCWV Prints for a Year Ultimate Stack.  It is cut at 5 1/4"x4."  I created the mats with the Labels Two die by Spellbinders.  I cut one with the dark brown card stock and the next size smaller out of white card stock.  I then embossed the white label with the Dot Background embossing folder by Darice.


The monster can be found on page 61 of the "Create a Critter 2" cartridge.  It was cut at 2 1/2" from a yellow polka dot card stock from the Lemon Flower Stack by DCWV.  I wrapped his hat with twine and gave it a little bow.  I also gave him some googly eyes and colored in his mouth with a clear gel pen.  I adhered him with foam tape, using two pieces on his hat.  I then finished off the front of the card by tracing around the hat and the brown label with a shimmery brown gel pen.


I left the outside plain and finished the inside, which is where I put my sentiment.  I cut another piece of the yellow polka dot card stock at 5 1/4"x4."  I then cut some dark brown card stock at 4 1/4"x3" and some white card stock at 4 1/8"x2 7/8."  The sentiment is actually two separate stamps that I used to create my own unique sentiment.  Both of the stamps are from My Pink Stamper and they are stamped in rich cocoa ink by Tsukineko.  Since the sentiment isn't actually that specific it would work well for a birthday, but could also work for Halloween or just for fun.

I am entering this card in the following challenges:
365 Cards: "Day 273" - Must Have (I had to have the "Create a Critter 2" cartridge when it first came out because I loved the first one so much and knew this one would be just as fun)
Fantabulous Cricut: fall colors (brown, red, yellow)
Die Cuttin' Divas: fall colors

Sunday, September 29, 2013

Silhouette Sunday - Floral Bouquet

For today's Silhouette Sunday I am featuring a birthday card that I made for my grandmother's birthday.


The card is 4"x9" and made from white card stock.  I cut a piece of dark pink card stock at 3 7/8"x8 7/8" and a piece of white card stock at 3 3/4"x8 3/4."  I embossed the white piece with a Cuttlebug embossing folder called "Sweet as Honey."


The floral bouquet is the cut file I used on my Silhouette Cameo.  It is called "triple flower flourish" and is by Jennifer Wambach (#42107).  I cut it at 3 1/4."  I also added some tropical punch Stickles to the pink dots at the center of the flowers.


The sentiment was also created on my Silhouette Cameo.  I typed out "happy birthday" using the Curlz MT font on my computer.  I then sized a banner to fit around it.  I printed out the font on my printer, then ran it through the Cameo to cu the banner.  I adhered it to the card with a pop-dot in the center for some dimension.  I also curled up the ends of the banner.

This was a pretty intricate cut with the veins of the leaves and the fern-like pieces, but I think it turned out beautifully.  I know my grandmother will love it!  Enjoy!

Thursday, September 26, 2013

Mini Monsters - Creation #7

Today's project using the "Mini Monsters" cartridge is a birthday card that is perfect for a little girl.  See how versatile this cartridge really is?  I love it!  I haven't made an easel card in a while, so that is the fold I used for this particular card.


The card, when folded is 5 1/2"x4 1/4."  I used white card stock for my base.  I then cut two pieces of the pink/grey/black striped paper at 5 3/8"x4 1/8" and adhered them to the two pieces of my card base.  I used a Spellbinders Nestabilities die, called Label Ten, for my mats.  I cut a larger one in black and the next size down in white.  That is where I stamped my sentiments.  The top sentiment is from Scrappy Moms Stamps, "Happily Ever After" set.  The bottom sentiment is from My Pink Stamper and is a combination of two stamps.  I added some dark and light pink gems around the sentiments to give it a little bling.


The little princess is from "Mini Monsters."  I cut her at 4" and also used the shadow feature.  I used a Peachy Keen Stamp for her face.  It is from the "Sweet & Silly Face Assortment."  I used a chipboard button from Cloud 9 and tied it with some blossom twine from The Twinery.  I covered her boots in glossy accents and her hat streamers with some Stickles - cotton candy (light pink) and glam pink (darker pink).

Wednesday, September 25, 2013

Mini Monsters - Creation #6

With this project using "Mini Monsters" I have made another two versions of a card, this time using the same image.

I made a Halloween version with a witch hat and a birthday version with a wizard hat.

The cards are both 5 1/2"x4 1/4."  I used a shimmery black card stock for the Halloween card.  I cut a piece of purple starry paper at 5 3/8"x4 1/8."  

The border punch is from EK Success.  I used a stamp I found in my stash for the sentiment and added a couple of purple gems to the sides.  The sentiment is stamped using starlite black ink by Tsukineko.

The witch's hat is on page 68.  I cut it at 3 1/2."  It is adhered to the card with foam tape.  I also added some glossy accents to the purple star at the tip of the hat.  The spider is also from "Mini Monsters."  It is on page 74.  I cut it at 2 1/2" and trimmed off the web part so I would just have the hanging spider.

I used white card stock for the base of the birthday card.  I cut a piece of blue starry paper at 5 3/8"x4 1/8."  Both the starry printed papers are from K&Company.

The border punch is from EK Success.  The "birthday" part of the sentiment is from Fiskars and the "happy" part of the sentiment is from Lawn Fawn.  I stamped them using peacock feathers Distress Ink. 

The hat is again the cut found on page 68."  It is also cut at 3 1/2."  I just cut it using blues and whites to make it look more like a wizard's hat than a witch's hat.  I adhered it with foam tape and added glossy accents to the blue star at its tip.  I also added some of the stars that were left over from the border punch and covered them with crystal Stickles.

Tuesday, September 24, 2013

Mini Monsters - Creation #5

The thing I like about the "Mini Monsters" cartridge is that it can be quite versatile.  There are so many cute monsters on here - some are just generic monsters that you can use for anything, others are more Halloween specific, and then there are things like pumpkins for a more fall creation.  Anyways, this time I used a Halloween monster - the mummy for my card.


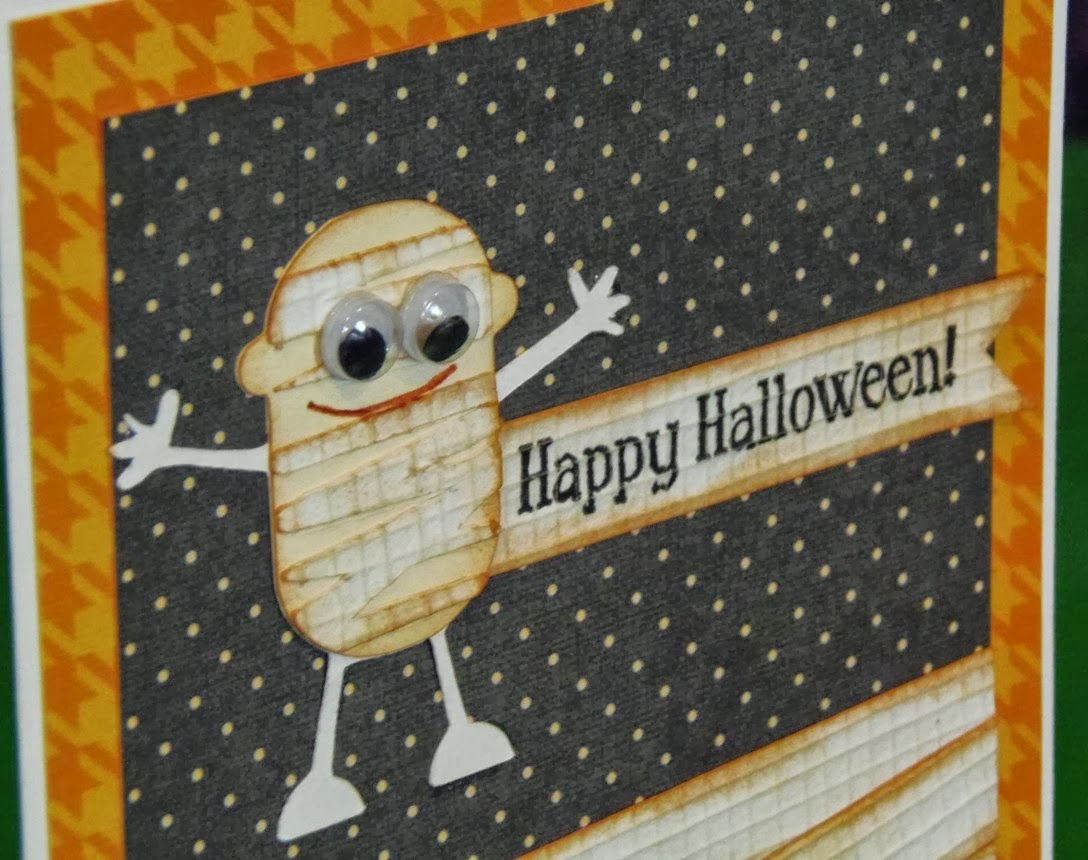
The card is 5 1/2"x4 1/4."  I used white card stock for the base, then trimmed a piece of orange hounds tooth card stock at 5 3/8"x4 1/8" for the matting.  The black polka dotted card stock is cut at 4 3/8"x3 1/8."  Both of the patterned card stocks came from the Bewitched Stack by DCWV.  I used some textured card stock from The Green Stack by DCWV and cut it into strips.  I inked the edges of the strips with some tea dye Distress Ink by Tim Holtz.  I adhered them to the bottom of my black piece of card stock to look like mummy wrappings.


My mummy is from "Mini Monsters."  It is on page 35 of the handbook and is cut at 1 3/4."  I used the same textured card stock for the wrappings and again inked them with tea dye Distress Ink.  I drew in the smile with a brown pen and used googly eyes to make it a little more cute.  The sentiment is from My Craft Spot's "Ghostly Greetings" stamp set.  I stamped it on one more piece of the textured and inked card stock.  I trimmed the end of it into a banner and adhered it behind my mummy.

I made this following the sketch at 365 Cards - "Day 265."

Sunday, September 22, 2013

Mini Monsters - Creation #4

I used the card feature on the "Mini Monsters" cartridge for today's project.


The card is 5 1/2"x4 1/4."  I used the pumpkin on page 60 and the card feature to cut my pumpkin from a brown card stock.  The orange layer is inked around the edges with some tea dye Distress Ink by Tim Holtz.  I cut two of the stem/leaf layers.  The first one is adhered to the card and the second is popped up with foam tape, but first I wrapped the stem with some orchid twine by The Twinery.


I used stamps from the "Stampin' Around Fall" set from My Craft Spot for my sentiment and the little pumpkin in the middle of the sentiment.  The sentiment is stamped in spring pansy ink and the pumpkin is stamped in pumpkin spice ink, both by Tsukineko.  The sentiment and the doilies were cut using my Cuttlebug and metal dies from My Craft Spot ("Tiny Doilies Metal Dies").  I adhered the top half of the doily to the stem and used foam tape on the bottom half.  I then tied a double bow with more orchid twine and adhered it at the top of the doily, where it meets the twine wrapped around the stem.

I made this card for the following challenges:
Color Throwdown: baked brown sugar, orchid opulence, pistachio pudding, tangerine tango
The Friday Mashup: fall/harvest food theme
{PIN}spirational Challenges: photo inspiration (color, fall theme)


Silhouette Sunday - Happy Cupcake

For this week's Silhouette Sunday project, I made a birthday card for a co-worker.


The card is 5 1/2"x4 1/4."  I cut some purple card stock at 5 1/4"x4" as a mat, then some pink polka dotted paper at 5 1/8"x3 7/8."  I added four purple gems in the corners and some doodling around the edges.  I adhered my cupcake and my speech bubble with foam tape for dimension.
I found the cupcake in the Silhouette Store, it is called "cupcake" by Miss Kate Cuttables (#48110).  Once it was all put together it measures about 3 1/4."  I added glossy accents to the cherry and her eyes.  I also added some glam pink and grape Stickles to the sprinkles.

My sentiment is a stamp from Scrappy Moms Stamps, "Hooray for Birthdays" set.  I stamped it in a speech bubble that I got from the Silhouette Store.  It is called "thought bubble" and is by Silhouette (#2956).  The speech bubble is about 1 3/4" tall.  I added a little doodling around the edges.

Friday, September 20, 2013

Mini Monsters - Creation #3

Today's creation using the "Mini Monsters" cartridge is a fun Halloween frame.


I used a wooden frame from JoAnn's.  I painted it black, then cut a piece of Halloween paper to fit the upper half of the frame.  On the bottom half I adhered a bunch of googly eyes in varying sizes.

For the picture in the frame I cut a piece of orange striped card stock at 3 7/8"x3 7/8."  I cut my monster and sentiment from the "Mini Monsters" cartridge.  This is the phrase feature of this cartridge and can be found on page 31.  It was cut at 2 1/2."  I used foam tape to adhere it to my striped square and gave him some googly eyes.


This isn't a difficult one, but it is quite time consuming to adhere all those little eyes down.  I really like the result though, so it was definitely worth it.  Enjoy!