Wednesday, September 11, 2013

Campin' Critters - Creation #8

Today's creation using "Campin' Critters" is a cute little thank you note card set.
 

The cards are 3"x3" and made from white cardstock.  I then cut some more white cardstock into three 2 7/8"x2 7/8" squares.  I covered them with different patterns of yellow washi tape.


The suns are from "Campin' Critters" and cut at 1 3/4."  I added glossy accents to the eyes.  The sentiment is a stamp from Fiskars.
 
I made these for the following challenges:
{Cupcake Inspirations}: cupcake photo inspiration (sun)
The Friday Mashup: set of 3"x3" notecards using washi tape
Perfect Sentiments: thank you

Tuesday, September 10, 2013

Campin' Critters - Creation #7

I made another shaped card with this cartridge.  This time it is a "get well" card.
 
 
I used the first aid bird found on page 45 for the shape of my card.  I cut two of the images, scored the second image just above the beak and adhered them at the top to create my card base.  The image was cut at 5 1/2" and makes the card just over 4" wide.
 
 
I cut a second piece of the white layer, which is the basic layer, and then hand cut out the bandage part of the image.  I then used a Cuttlebug embossing folder called Animal Print to create the look of a wrapped bandage.  I adhered it and the wing with foam tape for some dimension.  I gave my little guy google eyes just for some fun.
 
The sentiment is from Scrappy Moms Stamps, from the "Mini Messages" set.
 
I am entering this in the shaped card/layout challenge at BBTB2.

Sunday, September 08, 2013

Campin' Critters - Creation #6

I decided to finally make my Christmas card using "Campin' Critters."  In fact, I made two of them with this cartridge.  Here they are:
 
Both cards are 5 1/2"x4 1/4."  I used white cardstock
for their bases.  The dark blue snowflake mats are 5 3/8"x4 1/8."  I cut another white mat for each card at 4 1/4"x3" and a light blue snowflake mat at 4"x2 7/8."  The snowflake patterned papers are from the DCWV Arctic Wishes Stack.  I rounded the corners of the small mats.  I used a stamp from My Craft Spot for the sentiment on both cards.  It came from the "Tis the Season" set.  I stamped it with rich cocoa ink by Tsukineko.  This whole panel was added to the card base with foam tape.
 

For the deer card I cut a piece of glittery white cardstock at 3" wide and rounded its bottom corners.  I then hand cut it into a curvy shape to simulate a snow bank.  The skiing deer is the cut I used from "Campin' Critters" and is on page 29 of the handbook.  I cut it at 2 1/2."  I finished off this card with three snowflake shaped buttons.
 

I used the snowmobiling fox cut for my other card.  This little guy is on page 53 of the handbook and is cut at 2 1/4."  I finished off this card with three silver gems.
 
I used the sketch at 52 {Christmas} Card Throwdown for both of my cards. 

Silhoutte Sunday - Halloween Candy Apple

For this week's Silhouette Sunday I made another Halloween card, this one featuring a candy apple.  But, not just ANY candy apple...a poison candy apple!


The card is 5 1/2"x4 1/4" and made from a bright green cardstock.  I cut a piece of shimmery black cardstock at 5 3/8"x4 1/8."  I ran it through my Cuttlebug in a Darice embossing folder called "Spider Web Frame."  I covered the spider with some black diamond Stickles.

The image is from the Silhouette store.  It is called "poison apple" by Megan Hardy Designs (#33257).  I cut the apple from green and the candy (or caramel) coating from a shimmery orange.  Once it was all adhered I covered the coating in glossy accents to make it even more realistic.


The sentiments are from Scrappy Moms Stamps.  Both are from the "A Haunting We Will Go" set.  The sentiment on the front is heat embossed with some bright green embossing powder.  The spider stamp on the inside is from My Craft Spot, the "Stampin' Around Fall" set.
I am entering this in the current CASology challenge.  The current cue word is "apple."

Friday, September 06, 2013

Campin' Critters - Creation #5

For today's card using "Campin' Critters" I decided to make a z-fold, also called s-fold, card.
 
The card is 5 1/2"x4 1/4" when folded.  I started with a 5 1/2"x8 1/2" piece of white cardstock.  I scored it at 2 1/8" and 4 1/4."  I then folded it to create my z-fold (or s-fold) card.  I cut three pieces of brown cardstock and three pieces of the pale teal wood grain cardstock for my mats.  The brown pieces were cut at: 5 3/8"x4 1/8" and 2"x4 1/8" (I cut two of that size).  The wood grain pieces were cut at 5 1/4"x4" and two pieces at 1 7/8"x4."
 
 
I used "Campin' Critters" for all the elements, and they can all be found on page 47.  The sign, which is actually the sign feature (and its layers) was cut at 2 3/4."  The frog and smallest butterfly were cut at 2 1/2" from the basic feature.  The two larger butterflies in the corners were cut using the badge feature, its layers at least.  The one in the upper corner is cut at 2" and the larger one was cut at 2 1/2."  All the butterflies were adhered with foam tape.  The frog was covered in glossy accents and his eyes are brown gems.
 
For the inside I cut another sign at 2 1/2" from brown cardstock, then again at 2 1/4" from white cardstock.  The sentiment was stamped in rich cocoa ink by Tsukineko.  The stamp is from Scrappy Moms Stamps, the "Little Critters" set.
 
I made this card for the following challenges:
Color Throwdown: chocolate chip, sage shadow, white, kiwi kiss, old olive
Scrappy Moms Stamps: gone buggy
{PIN}spirational Challenges: photo inspiration (frog)


Tuesday, September 03, 2013

Campin' Critters - Creation #4

Today I am presenting you with my fourth creation using "Campin' Critters!"
 
The card is 5 1/2"x4 1/4."  I used dark brown cardstock for the card base.  The striped paper is from The Indian Summer Stack by DCWV and is cut at 5 3/8"x4 1/8."  I then cut a piece of leaf/acorn patterned paper at 3"x3" (it is also from the Indian Summer Stack) and a piece of dark brown cardstock at 3 1/8"x3 1/8."

My guitar playing bunny can be found on page 32 of the "Campin' Critters" handbook.  He is cut at 2" and I hid his eyes in Cricut Craft Room so that I could stamp some eyes from Peachy Keen.  The eyes are from the Cute & Cuddly Face Assortment.  The music notes are also from "Campin' Critters."  They belong with the bird, found on page 33.  I sized them to fit on my matting.  The bunny is adhered with foam tape.

The sentiment is also from Peachy Keen.  It is from the July 2012 Stamp of the Month kit.  I trimmed it down into a banner.  I then tied some twine into a bow through a green button and added it to the sentiment.

For the inside, I cut a green mat at 5 1/4"x4" and a striped mat at 5 1/8"x3 7/8."  I then cut a dark brown mat at 4 1/4"x3" and a cream mat at 4 1/8"x2 7/8."  The sentiment on the inside is from Scrappy Moms Stamps, from the "Hooray for Birthdays" set.  I cut two more musical notes and added a Peachy Keen face to the larger one.  This face is from the September 2012 Stamp of the Month kit.

I made this card for the following challenges:
365 Cards: "Day 244" - sketch
Fantabulous Cricut: music notes or musical instruments
My Sheri Crafts: fall colors
Peachy Keen Stamps: photo inspiration (colors, fall feel of the picture)

Sunday, September 01, 2013

Silhouette Sunday - Eat, Drink, & Be Scary

I thought I would start getting into the Halloween spirit a little early.  Although at work we have had the Halloween stuff set for a couple of weeks already.  Anyway, here is the Halloween card I created:
 
I used a pre-made card from DCWV for my card base, it is 5 1/2"x4 1/4."  I cut a piece of patterned cardstock from K&Company at 5 1/4"x4" for my mat.  The "drink with skull" is #47759 and designed by Michelle Renee.  When it is all assembled it comes to about 5."  The cup alone is just shy of 4," about 3.98."  I cut the cup out of white cardstock and then again in a pale blue vellum to get the right look.  I covered the little bubbles coming out of the drink with some star dust Stickles. 
 
The skull and crossbones were covered with Crackle Accents for a little added texture.  The crossbones were adhered to the cup with foam tape.
 
I ran a piece of lilac twine across the card and added two twine bows.  I adhered my sentiment banner over the top of the twine.  The banner is actually "fold over page markers (#40848)" by Megan Hardy Designs.  I used just one of them, the far left one when you look it up in the Silhouette Store.  The sentiment is from Scrappy Moms Stamps, from the "A Haunting We Will Go" set.

Thursday, August 29, 2013

Campin' Critters - Creation #3

For today's "Campin' Critters" creation I made a shaped card, with the help of Cricut Craft Room, of course.
 
I welded two shadows of the lake scene together in Cricut Craft Room to create my card base.  The lake scene is found on page 64.  I cut it at 4."  I layered all my pieces together, embossing the lake with the D'vine Swirls embossing folder.
 
The little tubing duckie can be found on page 49.  I cut it at 2."  I adhered the duckie with some foam tape.  I also covered the bill and tube with glossy accents.
 
The sentiment is from Scrappy Moms Stamps.
 
I made this for the following challenges:
365 Cards: "Day 240" - trigger word "cool"
BBTB2: water project
Fantabulous Cricut: summer heat

Campin' Critters - Creation #2

Here is the card I created for my second creation using the "Campin' Critters" cartridge:
 
I used the cute little reading squirrel found on page 31 of the handbook.  I cut him at 2 1/2."
 

The card is 4 1/2"x6 1/4."  I cut a strip of shimmery green cardstock at 2"x4" and adhered it down.  I cut a square of kraft cardstock at 3"x3" and a square of ivory cardstock at 2 7/8"x2 7/8."  I adhered my squirrel to the squares and then adhered that to the card with foam tape.  I finished it off with a sentiment from Paper Smooches, stamped in rich cocoa ink by Tsukineko.
 
I made this card for the book challenge at CASology.

Wednesday, August 28, 2013

Campin' Critters - Creation #1

So, now that I have played with the "Groovy Times" cartridge, and showed you a bunch of fun projects to make with it, I am moving on to my next cartridge to explore: "Campin' Critters."  This is such a fun cartridge with some really cute images.  If you like to camp or just be outdoors, then this is a great cartridge for you to own.  Here is the first project I have made with this cartridge:
 
I created a clock for our camper!
 
I bought a cheap clock at Walmart and then fixed it up using the "Campin' Critters cartridge and some fun cardstock.  I measured the clock face and cut two circles, one for the actual face and one for the hole for the clock hands, using the "Cricut Craft Room Basics" digital cartridge.  It was really easy to line up using the Cricut Craft Room.  I am so glad to have the program when making things like this.  I used some patterned cardstock from The Paper Studio's Great Outdoors paper stack for my background.
 
I sized everything in Cricut Craft Room to make sure it would fit on my clock face.  The car and the camper are the cuts I used from "Campin' Critters."  The car is found on page 55 and I cut it at 3."  The camper is on page 54 and I cut it at 2 1/4."  I welded the black layers together to really give the car the appearance that it was pulling the camper.  I then adhered it to the clock face.  I covered the white part of the camper with glossy accents and the lights of the card with some paprika Stickles.
 
All the numbers are from the digital cartridge "Cricut Craft Room Basics."  The 12 and 6 were cut at 1" and the rest of the numbers at 3/4."  I left off the 3 and 9 because of my image.  I also adhered the 12 and 6 with some thin foam tape for a little dimension, but not thick enough to get in the way of the hands of the clock.
 
I am entering this in the current challenge at Exploring Cricut, which is to create a project using any Cricut cartridge and at least two cuts.

Sunday, August 25, 2013

Groovy Times - Creation #6

Here is a fun masculine birthday card for my sixth creation using "Groovy Times."
 
 
The card is 5 1/2"x4 1/4."  I used dark brown cardstock for the card base.  I cut some red patterned paper at 5 3/8"x4 1/8" and some mushroom patterned paper at 5 1/4"x4."  I then cut a square of brown cardstock at 2 3/8"x2 3/8," some red patterned paper at 2 1/4"x2 1/4" and finally, some tan patterned paper at 2 1/8"x2 1/8."  All the patterned paper is from Colorbok, their Woodland paper stack.
 
The mushroom is cut at 3 1/2" from "Groovy Times."  It can be found on page 36 of the handbook.  I used my computer to generate my sentiment and printed it out on the tan patterned paper and cut it into a banner shape.  I matted it with some blue patterned paper.
 
The mushroom is adhered with pop-dots.  I also adhered the middle of the sentiment banner with some pop-dots for more dimension.  I finished off the card with some pale blue pearls.
 
I used the sketch from "Day 237" at 365 Cards for the layout of my card.

Silhouette Sunday - Autumn Greetings

For today's Silhouette Sunday I decided to create an autumn card.  It has been so hot here lately that I thought I would think of cooler temperatures and autumn is my favorite season.
 
The card is 5"x7" and the card base is made from orange cardstock.  I cut a piece of brown cardstock at 4 7/8"x6 7/8" and a piece of wheat patterned cardstock at 4 3/4"x6 3/4."  The wheat cardstock is from Debbie Mumm.
 
My Silhouette cut is the wagon load of pumpkins.  It is #47520 and is designed by Miss Kate Cuttables.  I didn't use the shadow beneath the wagon or the corn.  When it is all assembled it is about 3" tall and 6" long.  I popped up part of the wagon and the small pumpkin in the wagon.  I also cut a piece of yellow cardstock and punched it with a Fiskars grass edge punch.
 
The sentiment is from Peachy Keen and is stamped in dark cocoa ink by Tsukineko.  I trimmed the cardstock into a banner shape.  I adhered it down with a pop-dot in the middle to give it a wavy look.  I then finished off the card with a brown button at the edge of the sentiment.
 
I made this for the "Day 234" challenge at 365 Cards, which is to make a card 5"x7" or larger.

Wednesday, August 21, 2013

Groovy Times - Creation #5

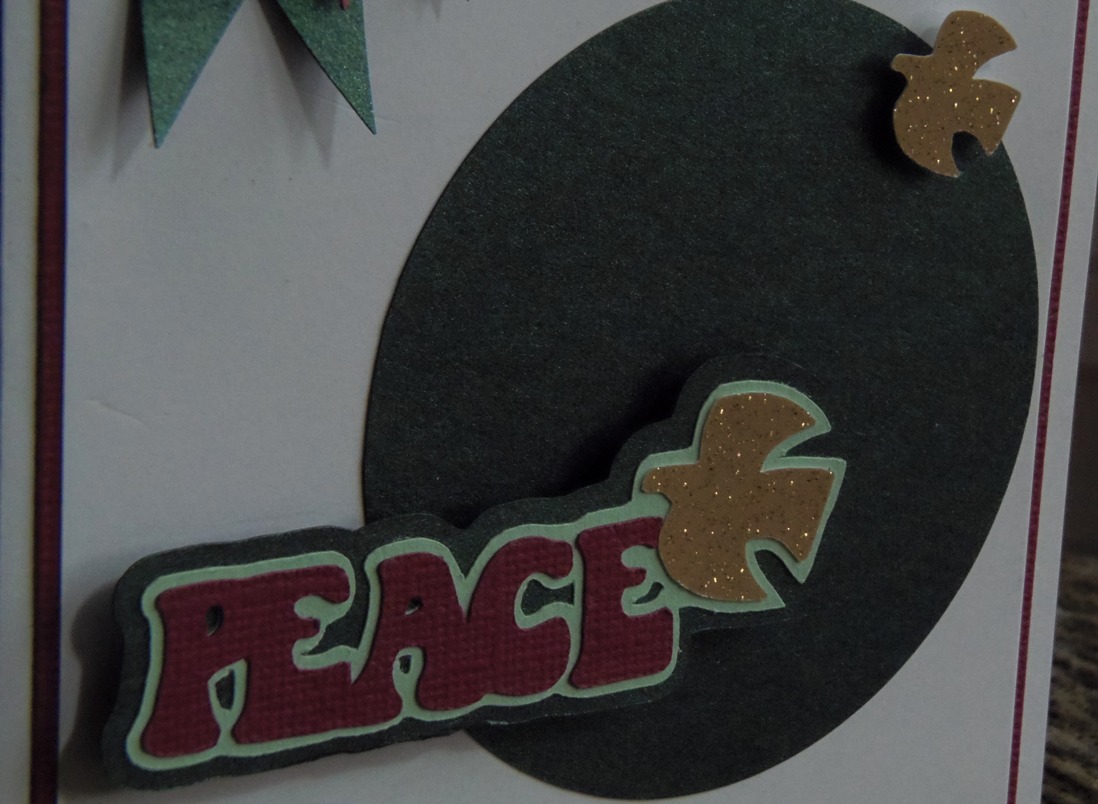
I created a Christmas card for my 5th creation using the "Groovy Times" cartridge.
 
The card is 4 1/2"x6 1/4."  The burgundy mat is 4 1/4"x6" and the white mat is 4 1/8"x5 7/8."  The green circle is 3," the green banner is 3"x3/4" and the red banner is 2 1/2"x1/2."
 
I used the "peace" image found on page 50 for the image of this card.  I cut it at 1 1/2".  The two smaller doves are cut smaller, but I don't remember the size.  I used foam tape to adhere the word peace and the dove on the circle.  The dove on the banners is just adhered down, it is also flipped from the regular image.
 
For the inside I matted it with the burgundy and white again, in the same sizes as the outside.  I used a stamp from My Craft Spot's "Joy to the World" stamp set for the sentiment.  It is stamped in pearlescent ivy ink by Tsukineko.  I then matted it with burgundy and green.  I cut two more doves from "Groovy Times" and adhered them around the sentiment.
 
I chose to use much more traditional Christmas colors for this card since the image I used was quite non-traditional.  It is much more of a hippie peace than the typical Christmas one, but I think it works quite well with the red, green, and gold colors.
 
I made this for the following challenges:
365 Cards: "Day 230" - sketch
BBTB2: use a bird image
Christmas Card Challenges: non-traditional Christmas image

Sunday, August 18, 2013

Silhouette Sunday - Sharpest Tool

For this Sunday Silhouette project I made a masculine card using some tool shapes I cut with my Silhouette Cameo.
 
The card is 5 1/2"x4 1/4."  I used dark brown cardstock for the card base.  The blue mat is 5 3/8"x4 1/8" and is from The Guy Stack by DCWV.  I cut a measuring tape border using some paper from the My Sunshine Stack by DCWV.
 
All the tools were from the Silhouette store.  The pliers are #18204 , the hammer is #18200, the wrench is #18203 , the handsaw is #18201 , and the screwdriver is #18202.  They are all from Hero Arts.  I cut just their silhouettes from dark brown cardstock.  I mounted them on some kraft cardstock that was embossed with the wood grain folder by Darice.  They are all then matted with more dark brown cardstock.
 
The sentiment is from Scrappy Moms Stamps.  It is off their "For the Boys" set.  I stamped it in rich cocoa ink by Tsukineko on some kraft cardstock.  It was also then matted in dark brown.