Thursday, December 12, 2013

25 Days of Christmas - Christmas Shadow Box

I have done something similar to this before, but I really like how it turned out the, in the 12"x12" size, and wanted to try it again.


This time I used an 8"x10" shadow box to create the decor.  I used a piece of red and green polka dot card stock to cover the back and filled the shadow box with red and green mini ornaments.  I used a digital image from Cricut called "Teresa Collins - Christmas Collage" for my subway art.  I sized it at 9"x7," turning off the aspect ratio to make it work.  I cut it from white vinyl and put it on the glass of the shadow box.  That's all there is to it.  This sort of project is really simple, it just takes a while to cut all those words out. 

Wednesday, December 11, 2013

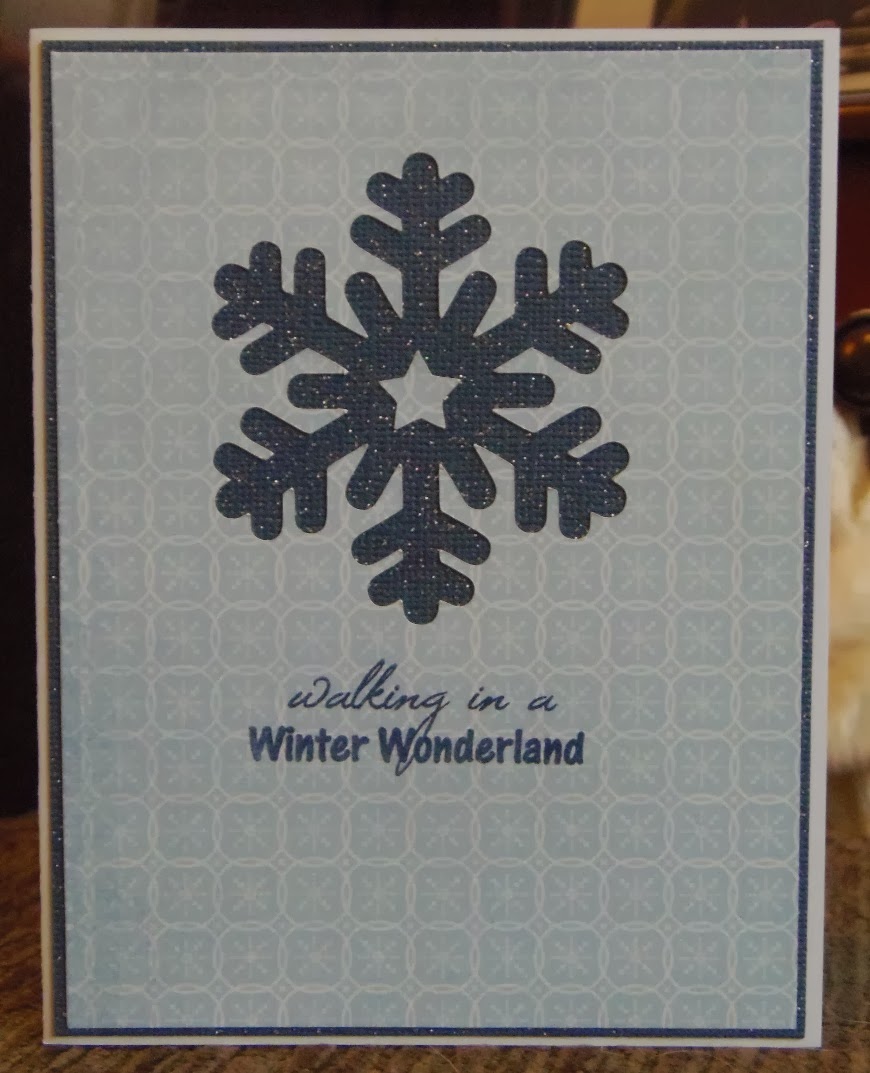
25 Days of Christmas - CAS Snowflake

Today's card is super simple to make!  This would definitely be one that would be easy to mass produce for Christmas cards.  I may have to remember this for next year, or something similar.


The card is 5 1/2"x4 1/4" and made from white card stock.  The glittery dark blue mat is from Core'dinations and is cut at 5 3/8"x4 1/8."  The snowflake patterned card stock is from DCWV and is cut at 5 1/4"x4."


The snowflake was cut using the Silhouette Cameo.  It is called "snowflake set" and is by Sophie Gallo (#52668).  I used only one of the snowflakes, it is the red one if you are looking at the image in the Silhouette Store.  I cut it at about 2 1/2."  I cut it out of the snowflake patterned card stock so I used the negative space, with the glittery blue card stock showing through.  The sentiment is from My Craft Spot, the "Winter Wonderland" set.

I made this for the current challenge at CASology, the cue word is "snowflake."

Tuesday, December 10, 2013

25 Days of Christmas - Another Christmas Tag

Today I have another tag, this one is complete with a present.


I used "Winter Woodland" for the tag shape.  It can be found on page 78 and I cut it at 2 1/2."  The bird wreath is from the "Martha Stewart Seasonal Cake Art" cartridge.  It can be found on page 43 and I cut it at 1 3/4."  I covered the bow with flocking powder and covered the birds in red glitter and glossy accents.


I used stamps from My Craft Spot for the back of the tag.  The "to" and "from" are both from the "Merry Christmas" set.  "Happy Christmas" is from the "Mistletoe" set. 

I made this for the current challenge at Die Cuttin' Diavs, which is to create a tag.

Monday, December 09, 2013

25 Days of Christmas - Sparkly Snowflake

Here is a nice wintery card for you today.  It goes with the incredibly cold weather we are having here in Minnesota.

I made a snowflake shaped card.  The snowflake, and all its layers, was cut at 5."  The snowflake shape is from the "Joys of the Season" Cricut cartridge.  It can be found on page 60, and I used the shadow (navy), blackout (light blue), regular (white-coarse glitter), and layer (white-fine glitter) features.  I covered the larger white piece with coarse white glitter and the smaller white piece with crystal fine glitter, both by Martha Stewart.


I adhered the smaller white piece with foam tape for some added dimension.  I added some blue pearls and gems to parts of the snowflake.  I used the tiny metal doilies set from My Craft Spot to cut the scalloped circles and plain white circle.  I also used the "Stampin' Around Christmas" set to stamp the sentiment.  I added a shimmery blue gem to the middle of the sentiment.

I made this for the following challenges:

BBTB2.: winter project
Fantabulous Cricut: holiday cards
52 {Christmas} Card Throwdown: pick a previous 2013 challenge (April color challenge - navy, light blue, and white)

Sunday, December 08, 2013

25 Days of Christmas - Santa Puppy

And yet another Christmas card for you today.  This one is the one we are giving our newspaper carrier.


The card is 5 1/2"x4 1/4."  I used white card stock for the card base, then cut a black mat at 5 3/8"x4 1/8" and a red argyle mat at 5 1/4"x4."

The Santa puppy is from the "Paper Pups" cartridge.  I cut it at 2 3/4."  This particular image can be found on page 101 of the handbook.

The sentiment on front is from the stamp set "Jingle All the Way" by My Craft Spot.  It is stamped on a banner cut from the Ribbon Banner Spellbinders die.

Here is the inside of the card.  I cut a black mat at 5 1/4"x4" and another red argyle mat at 5 1/8"x3 7/8."  I cut another black mat at 4 1/4"x2 3/4" and a white mat at 4 1/8"x2 5/8."  The sentiments on the inside are also from the "Jingle All the Way" stamp set.

Saturday, December 07, 2013

25 Days of Christmas - Rhinestone Holly

Today's Christmas card is incredibly clean and simple.


The card is 5 1/2"x4 1/4" and made from white card stock.  I cut some foiled red card stock at 5 3/8"x4 1/8" and then more white card stock at 5 1/4"x4" to finish of my card base.  I used the Silhouette to cut the holly.  It is a rhinestone image, meaning it cuts numerous small holes to create a stencil or template of the image.  You then fill in those holes with rhinestones to create the image.  The image is called "holly," and it is by Samantha Walker (#5656).  Since I didn't have enough green rhinestones, I colored some clear ones.  The larger red rhinestones are from DCWV and I colored the smaller red ones.  I finished off the card with a stamped sentiment, using pearlescent ivy ink by Tsukineko.

Friday, December 06, 2013

25 Days of Christmas - Gingerbread Ornaments

I made two adorable little gingerbread ornaments for today's Christmas project.


The gingerbread boy and girl are both Peachy Keen Stamps.  I used the coordinating SVG file they have to cut them out of kraft card stock, using my Silhouette Cameo.  I then stamped the images in black ink, then the "icing" in embossing ink and heat embossed it with white embossing powder.  I colored in their heart buttons with a red marker, then covered them with glossy accents.  I finished them off by punching holes in their heads (that just sounds wrong doesn't it?) and tying some baker's twine through them so that they could hang on my tree.  Since I don't have my tree up yet, I am currently displaying them on my wreath.


I made this for the current challenge at Peachy Keen Stamps, which is to create a 3-D object that you can hang on a tree.

Thursday, December 05, 2013

25 Days of Christmas - Horseshoe Gift Tag

For today's Christmas project I created a gift tag for my father and his wife.  They have a number of horses and it coordinates well with the gift my husband and I got them.


The tag is cut from the "Winter Woodland" cartridge.  It can be found on page 80 of the handbook.  I sized it in Cricut Craft Room, since it is more square than I wanted.  It is 4.792"x3.667" (shadow); 4.597"x3.486" (regular).  The horseshoe and holly were also sized in Cricut Craft Room to fit the tag.  The horseshoe is from "Create a Critter," page  59 (the accessory feature).  It was cut at 3.333"x3.042."  The holly is from "A Quilted Christmas."  It is on page 73, layer 2 (both regular and shift).  I cut the holly at 2" (real size).  I covered the berries in red glitter and glossy accents.


The tag was stamped with a stamp from Scrappy Moms Stamps, from the "A Holiday to Remember" set.  I then embossed the tag with a Cuttlebug embossing folder by Anna Griffin, called Dancing Holly.  I adhered everything together.  I finished it off with a bow tied from baker's twine in the color maraschino, by The Twinery.

Wednesday, December 04, 2013

25 Days of Christmas - Simple Snowflake

Since it is snowing outside I thought a nice wintery card would be appropriate for Day 4 of my 25 Days of Christmas.  Here is what I made:


The card is 5 1/2"x4 1/4."  I used white card stock for the base.  I cut a shimmery blue mat at 5 3/8"x4 1/8."  The white strips are 1 5/8"x4."  I embossed them with a Cuttlebug embossing folder by Anna Griffin called "Paper Snowflakes."  I wrapped the card with a ribbon that I got at JoAnn Fabrics last year.  The snowflake cut is from the Silhouette Store.  It is called "snowflake" and is by Sweet Elsie (#51692).  I used foam tape to adhere it to the card.


For the inside of the card I cut some shimmery blue paper at 4 1/2"x3 1/4."  I then cut some white card stock at 4 1/4"x3."  I used stamps from My Craft Spot for the sentiment and the snowflakes.  They both came from the "White Christmas" set.

I made this card for the following challenges:
CASology: ribbon

Tuesday, December 03, 2013

25 Days of Christmas - Holiday Deer

I have another card for you today!


This card is 9"x4."  The card base is white card stock.  I  then cut a dark turquoise mat at 8 7/8"x3 7/8."  The stripey/snowy patterned paper is 8 5/8"x3 5/8" and the white piece is 2"x3 5/8."  I used a Martha Stewart border punch to create my icicle border.  The reindeer is a cut from the Silhouette Store called "cute Christmas reindeer."  It is by PPbN Designs and is #52256.  I cut it at 3.305."  I did not cut the eyes and instead used a face from the Peachy Keen "Sweet and Silly Face Assortment."  The sentiment is a stamp I found in my stash and I added a few crystal Stickles to the snowflakes around it.  I finished off the card with some red bling scattered on the front.

Monday, December 02, 2013

25 Days of Christmas - Jingle Bells

I think a lot of what I create for my 25 Days of Christmas challenge will be cards, pretty much because they are usually quick and easy.  Here is the first of many, I am willing to bet.


The card is 5 1/2"x4 1/4."  I used gold card stock as the card base.  I cut some white card stock at 5 3/8"x4 1/8" and covered it with coarse white glitter.  The sheet music card stock is from The Paper Studio's Ornamental Christmas stack.  I cut it at 5 1/8"x3 7/8."  The image is cut from the "Winter Wonderland" Cricut cartridge.  It can be found on page 91 of the handbook.  I cut it at 2 3/4."  I covered the white ribbon with more coarse white glitter and used glossy accents on the bells.  I adhered the whole image with foam tape for dimension.  I then finished off the front with some gold gems.


I also finished the inside of this card.  I cut a piece of ivory card stock at 5 3/8"x4 1/8," then some gold card stock at 5 1/4"x4" and finally, some sheet music card stock at 5 1/8"x3 7/8."  I then cut another piece of gold card stock at 4 1/4"x2 3/4" and more ivory card stock at 4 1/8"x2 3/8."  The bell is also from the "Winter Wonderland" cartridge and is on page 74.  It is just the bell layer of this image.  I adhered it down and covered it with glossy accents.

I made this card for the following challenges:
365 Cards: "Day 336" - use lots of gold on your card
Fantabulous Cricut: holiday project without red or green
My Craft Spot: sparkle or shine
Exploring Cricut: Christmas card
52 {Christmas} Card Throwdown: pick a previous theme (Christmas carol/hymn - "Jingle Bells")

Sunday, December 01, 2013

25 Days of Christmas - Reindeer Wall Decor

It is December 1st and that means we are in full holiday swing.  I think it would be fun to feature 25 days worth of holiday projects leading up to Christmas.  So, without further ado, here is the project for Day 1:

I made a 3-D reindeer head for some wall decor.


The 3-D reindeer head is a Cricut Craft Room exclusive called "3D Rudolph Head."  I cut it twice at 10."  The first layer is from ivory card stock and the second is from an ivory musical note card stock.  I adhered the layers together to make them more sturdy.  The final layer was cut from a glittery red corrugated card stock, this is the plaque piece and nose.  


I covered a piece of wooden canvas with green damask card stock for my background.  I then adhered the plaque piece with the deer head attached to the canvas.  Both pieces of patterned card stock are from the Ornamental Christmas stack by The Paper Studio.

Silhouette Sunday - Doctor Who Bookmarks

I totally geeked out a bit when I saw the Doctor Who cut files over at Pretty Paper Pretty Ribbons.  Here are the links for The Doctor and The Enemies cut files.  When I saw these I just had to have them and then I just had to create something with them.


I decided to make some bookmarks!

I can't wait to make even more projects with them, but I just love how all these turned out.

The first one I made was a bookmark featuring the TARDIS.  When you get the cut files for all these images you get two sets, one assembled and one separated.  I used the ones that were all ready assembled.  This one is called "PPPR Police Box."  If I wanted to cut an assemble all the pieces for this one I would use the file called "PPPR Police Box Separated."  The TARDIS is sized at 3.84" tall.  I used the cut file "bookmark set" which can be found in the Silhouette Store under #31601 and is by Samantha Walker.  The white layer of the bookmark is 6.33"x2.375" and the blue layer is 6.58"x2.625."  I found a Doctor Who font online and used it to write out my sentiment, fitting it into the bookmark.  I then printed the TARDIS and the sentiment and cut out the white layer with the printed images and finally, the blue layer.  I then threaded some midnight blue baker's twine, from The Twinery, through the hole at the top.

The Dalek bookmark is the same bookmark shape as I used on the TARDIS.  The white layer of my bookmark is 5.785"x2.17" and the red layer is 6.015"x2.395."  The Dalek is 2.935" tall.  The sentiment is another font I found online called Dalek.  I sized it to fit the bookmark.  Again, I printed the Dalek and sentiment, then cut everything out.  I threaded some grey baker's twine, from Doodlebug Designs Inc., through the hole at the top on this bookmark.

I then decided to make a bookmark with the Weeping Angel.  I did this one a little differently.  The Weeping Angel is 2.335" tall.  I printed it out, then cut just the edges.  I also cut another one, without printing, from dark grey card stock to adhere to the back and make it a little sturdier.  For the bookmark I used one of the shapes from "bookmark basic shapes" cut file by Loni Harris (#18305).  The bookmark is 4.2"x1.5."  I typed the sentiment in a font called Franklin Gothic Demi Cond.  The sentiment is the Doctor's quote, on the episode "Blink," about the Weeping Angels.  I printed it on light grey card stock then cut it out.  I then cut a larger size of the bookmark from dark grey card stock at 4.36"x1.66."  I adhered the bookmark pieces together, then adhered the Weeping Angel at the top.


My last two bookmarks are sonic screwdrivers from Doctors 10 and 11.  10's sonic screwdriver (left) is 5.01" tall and 11's sonic screwdriver (right) is 5" tall.  The bookmarks are the same, and are both 6.275"x1.515" (white layer) and 6.475"x1.73" (black layer).  The cut file I used for the bookmarks on this one is called "5 piece gift tag set" and is by Sophie Gallo (#20960).  It does not come with an outline or shadow, I created that myself by just eyeballing how it looked.  I printed the sonic screwdrivers then cut the bookmark pieces.  I then ran some blue baker's twine, from Doodlebug Designs Inc., through the 10th Doctor's sonic screwdriver bookmark and peapod baker's twine, from The Twinery, through the hole of the 11th Doctor's sonic screwdriver bookmark.

Now I have to make some bookmarks featuring the actual Doctors, since I have the cut files for 9, 10, and 11.  I can't wait to see what else I will come up with using these fantastic images.


Friday, November 29, 2013

Countdown to Baby - No Wake Zone

I am not the one having the baby, but it will probably be as close as I come.  My best friend and her husband (who is actually a friend of mine - I introduced them) are expecting their first baby.  They have already found out that it will be a boy and I get the privilege of creating a lot of the art and decor for the baby's room, plus some onesies and shirts.  :)  I am actually quite excited about it since I will basically be an honorary aunt!  They are going with an ocean themed room, a kind of "under the sea" thing, so this is my first project for their room, it will probably be on the door or just outside the room.


I started with a piece of 10"x10" canvas.  I then painted it with navy blue paint.  The main color they chose is a teal/turquoise color and their accent is navy blue.  I used my Silhouette Cameo to cut all my elements for the canvas and cut all but the stroller from vinyl.  The waves are from a set called "nautical objects" by Sophie Gallo (#47440).  I cut the two at the top left side at 0.6"x5.63" and the two at the bottom right at  0.75"x7.09."  The words are all cut in a white vinyl using a font called "sail" that I found online.  All the words are about 3 1/2" tall (approximately).  The stroller is called "echo park stroller" by Echo Park (#26751).  I cut it at 2.99"x3.25" and cut it out of card stock.  I adhered the stroller with some foam tape for a little dimension.


This was a pretty simple one, but I absolutely love how it turned out.  I am pretty sure they will as well.

This project was based on something I found on Pinterest.  You can see the original pin here.