Thursday, August 14, 2014

Luau Oalf

My cousin usually asks me to make invitations and decorations for her daughter's birthday.  This year they didn't start planning it until it was too late to ask me to make anything.  So, she ordered the invitations from online and same with the decorations.  However, she did ask for my help in getting them put together since I have more experience with it.  So, here we go:


The party theme is a luau, but it features Olaf, the snowman from the Disney movie "Frozen."  This is the happy birthday banner I put together.  I cut out all the pieces, then punched holes in the corners and strung them with green ribbon.  


I had two of the Olaf pieces so I figured I would use them at either end.  That meant I needed something to put in between the words.  I used "Elegant Edges" to cut the shape and I used my Silhouette to cut the tiki.  The label image can be found on page 21 and it was cut at 7 1/2."  I edged it with icicle Stickles and added a couple of dark pink glitter gems.  The tiki is from the Silhouette Store and is called "Tiki" and is by Sarah Bailey (#10202).  It was cut at 6."


She also requested a cake topper and instead of using the same Olaf image I created my own from a few different cut files.


I used a cut file from PPbN Designs for the actual Olaf cut, it is called "Happy Magic Snowman."  He is cut at about 7 1/2."  I used the lei from the tiki that you saw earlier.  The grass skirt and sunglasses are both from the Silhouette Store.  The grass skirt is from a set called "Hula Costume" and is by Silhouette (#1694).  The sunglasses are a cut file called "Sunglasses" and are by Sarah Bailey (#44999).  Everything was sized to fit Olaf.  I cut everything twice, one of those on flipped, then adhered it all together and to a popsicle stick for my cousin to stick in the cake.


Sunday, August 10, 2014

Dragons

After making something out of vinyl to put on my husband's computer, I just had to do something to mine as well.  This is what I made to put on mine:


I used two cut files from the Silhouette store by Deborah Stine for my images.  The larger one on the left is called "Soaring Dragon Silhouette" (#62682), and it is about 3" tall.  The other one, on the bottom right, is called "Flying Dragon Silhouette" (#58912), and it is about 2" tall.  Both were cut from red vinyl and adhered to the top of my laptop.  Simple as that!


Thursday, August 07, 2014

Bullseye

Today I made some vinyl for my husband's computer.


I used "Outdoor Man" for both the image and the sentiment.  The target image is on page 21, and cut at 3."  The sentiment is on page 54 (phrase feature) and is cut at 2."  The bullet holes are from the phrase found on page 52, I hid everything except some of the holes, then positioned them on the target.  It was cut at 2" to get those holes the size I wanted.


Wednesday, August 06, 2014

Outhouse

How is this for a fun shaped card?  


I used the "Outdoor Man" cartridge and Cricut Craft Room to create this shaped card.  The image can be found on page 37 of the handbook.  I welded two of the shadows together to create the card base.  I then cut another shadow for the front of the card and adhered all my layers to it.


The image was cut at 7."  I embossed the light brown part of the door with the Distress Stripes embossing folder.  I then inked it with tea dye Distress Ink.  The grass is also inked, but with crushed olive Distress Ink.  I adhered the door to look like it was partially open.  The hinged side is adhered to the card, the middle has one layer of foam tape, and the handle side has two layers of foam tape.  I covered the dark brown parts of the door (hinges, handle, crescent moon) with glossy accents.


The sentiment is from Scrappy Moms Stamps, the Happy Campers set.  I stamped it on light brown card stock, then matted it with a medium brown card stock.  The sentiment is stamped in walnut stain Distress Ink.  I then added two bronze brads to the sign and used some baker's twine to give it a way to hang.  I hung it over another larger bronze brad in the door.  The sign is actually adhered with foam tape.

I am entering this in the current challenge at BBTB2, which is to make something to do with camping.

Saturday, August 02, 2014

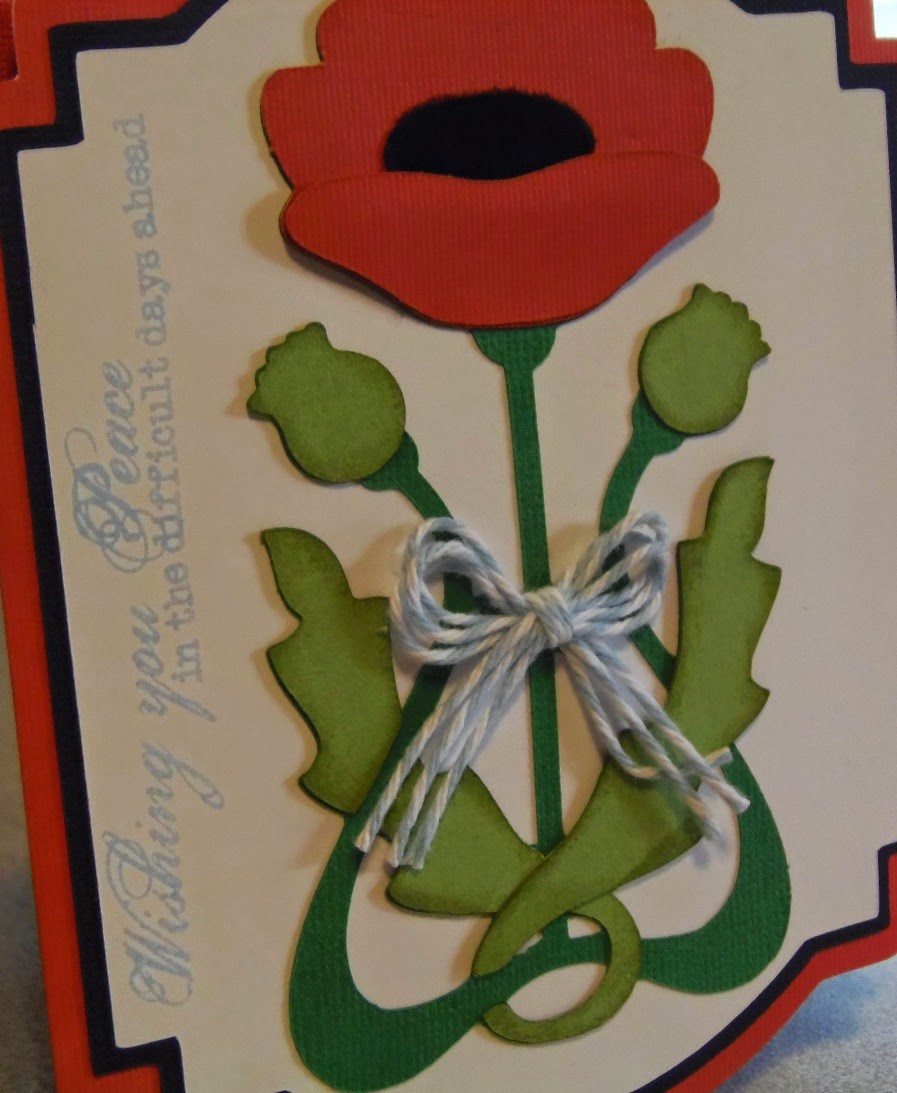
Poppy


This shaped card was created with the "Elegant Edges" and "Art Nouveau" cartridges.  The card base was created by welding two of the shadow (shift) features of the shape on page 29 of the "Elegant Edges" handbook.  It is sized at 5 1/4."  I then used the oblong (shift) feature for the black layer, again at 5 1/4."  The white layer is the same as the black, just 5."


The poppy image is from "Art Nouveau," page 22.  It is cut at 4 1/2."  I inked the edges of the lighter green leaves with peeled paint Distress Ink.  The flower is inked with tea dye Distress Ink and the black center is flocked.  I also added a little dimension by adhering the front petal with foam tape at the top part.


The sentiment is from My Craft Spot, the With Deepest Sympathy set.  It is stamped with summer sky ink by Tsukineko.  I tied three pieces of baker's twine into a bow and added it to the flower to finish off the card.


I made this for the following challenges:
My Sheri Crafts: shaped cards

Color Throwdown: photo inspiration (colors)


Friday, August 01, 2014

Nautical Name Sign

My friends had a baby boy in March and have a sort of nautical/underwater theme for him.  I made a name sign to go in his room, since that is what I do.


I used separate 8"x10" canvases for each letter and the image.  I will also be doing two more images, once I settle on two that I like and work with the silhouette idea I went with.  I just really wanted to use the "Art Nouveau" jellyfish.  I was stung by a jellyfish when we were in Belize for their wedding.


The letters are from "Extreme Fonts," the Little League feature.  They were cut at 8."  The jellyfish is from "Art Nouveau," page 61, and was cut at 7."

Thursday, July 31, 2014

Moth Shaped Card

I love shaped cards and thought that the moth in the "Art Nouveau" cartridge would lend itself very nicely to a shaped card.  I don't think I was wrong.


The moth is on page 55 of the handbook.  I cut it at 4 3/4" for all the layers.  I used Cricut Craft Room to weld two shadows of the image together to create the card base.  I then cut another shadow and used that for the card top for all my layers.


I covered the dark orange pieces with some dark orange glitter, then covered them in diamond glaze.  The lighter accent pieces are covered with tattered rose Distress Stickles.  The sentiment is one I found in my stash.  It is stamped in rich cocoa ink by Tsukineko.

Wednesday, July 30, 2014

Nouveau Bee


Today's card is 4 1/4"x5 1/2."  I used dark brown card stock for the card base.  The hexagonal print mat is 4"x5 1/4."  I wrapped the bottom part with some dark brown ribbon and tied a bow with the same ribbon.


The circle is cut at 2 1/2" and is from the "Cricut Craft Room Basics" digital cartridge (basic-shift and shadow-shift).  I popped it up with foam tape.


The bee is from the "Art Nouveau" cartridge (page 56).  It was cut at 2 1/2."  I pieced it all together and added it to the circle.  I then covered the ivory part of the wings with star dust Stickles and the brown stripes with cinnamon Stickles.  The yellow parts are covered with glossy accents and the eyes are brown gems.  The entirety of the wings are also covered with glossy accents.

The sentiment is from my stash and stamped in rich cocoa ink by Tsukineko.


I made this for the following challenges:

BBTB2.: Cricut cut bee

Die Cuttin' Divas: anything goes

Cupcake Inspirations: cupcake photo inspiration (ribbon)

Sunday, July 27, 2014

Heron

I decided to make some new wall art for my bathroom.  This is what I made:


I used "Art Nouveau" for the heron image.  It was cut at 7 1/2" wide, and whatever its corresponding height would be.  I inked the light blue wing layer with summer sky ink by Tsukineko, then popped it up for dimension.  I flocked the dark blue wing layer and also popped it up.  I added glitter and diamond glaze to the bill and used a dark grey enamel dot for the eye.


Thursday, July 24, 2014

Super Bird-day!


Dang it!  I didn't come up with the "bird-day" thing until after I had already stamped my sentiment on the card!  Such a lost opportunity!  Oh well, the sentiment still works and the card is still cute.  Maybe next time.


I used "3 Birds on Parade" (again) to create this fun shaped card, great for a little boy's birthday.  I used the superhero bird image, on page 69 of the handbook.  I cut the shadow image twice from white card stock and adhered them at the top to create my card base.  All the pieces were cut at 3 3/4."  This makes the card 3.944"x8.653" when all assembled.  I used Cricut Craft Room to lay out my design.


Once everything was cut I added glittery orange flocking powder to the wing.  I then covered the beak, eye, and accent on the cape with glossy accents.  I also added a button to the accent on the cape.  The sentiment was created using some stamps from Scrappy Moms Stamps.  The "birthday wishes" part is from the Simple Sentiments set.  "Super" was created, with some careful masking, from the word "Surprise" from the Hooray for Birthdays set.  And this is where I wished I had thought of using "bird-day" instead of birthday.  Ah well, such is life.

I have been wanting to make a card using this cute little superhero bird for a while and the current challenge at My Craft Spot was the perfect reason.  The challenge is "just for little boys."

Wednesday, July 23, 2014

A Banner Birthday


This card is 4 1/4"x5 1/2."  I used white card stock for the card base.  The background is a pattern from the Silhouette store.  It is called "Christmas Diamond Pattern," by Jamie Koay (#21187).  I printed it and then trimmed it to 4 1/8"x5 3/8."  The banner is also from the Silhouette store.  It is by Lori Whitlock (#12744).  I cut it to fit the length of the card, then covered it with fluorescent turquoise glitter by Martha Stewart.  The white mat is 4 1/4"x4 1/2" and is embossed with a Darice embossing folder called Scrolls Background. 


Under the Weather?


Today's card is 4 1/4"x5 1/2."  I used a green plaid card stock for the card base.  I cut a blue mat at 4"x5 1/4."  I then stamped a spotted background stamp, twice, across the blue mat.  I used pearlescent sky blue ink by Tsukineko.  The stamp is from All Night Media.


I used "3 Birds on Parade" for the image.  It was cut at 3 1/2" and is on page 30 of the handbook.  I cu the raindrops (layer 1) three times to get a good amount of raindrops for the card.  I adhered the bird and rain drops to the card and use a double layer of pop-dots to adhere the middle of the umbrella.  It gives is a pretty cool 3-D effect.  I used glittery flocking powder on the bird's wings.  I also covered her beak in glitter and then glossy accents.  The raindrops and her eyes are also covered in glossy accents.  I used a Peachy Keen stamp for her eyes, one from the Kawaii Face Assortment.


The sentiment is from Scrappy Moms Stamps, the Sweet Somethings set.  I also used a stamp from that set on the inside as well.  The blue mat inside is 4"x5 1/4," the green plaid mat is 3 1/4"x4 1/2," and the pink mat is 3"x4 1/4."  I also added two more rain drops, covered in glossy accents, to the inside of the card as well.


I made this for the following challenges:

Cupcake Inspirations: cupcake photo inspiration (colors)

Fantabulous Cricut: project related to water

The Friday Mashup: project with a 3-D element and using a background stamp