Thursday, November 03, 2011

Gingerbread Kisses

This is a 4 1/2"x6 1/4" card. I used some striped cardstock for the card base. I wrapped it with some green glitter ribbon. The double matted label is from Elegant Edges. I used the oblong feature and my Gyspy to make it taller without going wider. It measures 5 1/4"x3 1/2" (the green layer) and 5"x3 1/4" (the white layer). The stocking is cut at 5." I flocked and embossed the white layer with the D'vine Swirls folder. The green layers are embossed with the Swiss Dots folder. I used glossy accents on the nail. The gingerbread man is cut at 2 3/4" from "Just Because" Cards. I used my white gel pen to draw on his icing stripes and some white pearls for his eyes, smile and buttons. I only adhered down the bottom part of the stocking so that I could create a pocket at the top part for the gingerbread man. I pop-dotted the top part of the stocking and put my little gingerbread guy inside. For the inside I cut more of the striped cardstock 1/8" smaller than the card base. I then cut some green cardstock 1" smaller than the striped cardstock and the white cardstock is 1/4" smaller than the green. I used a Scrappy Moms Stamp for the senitment and stamped it in jumbo java ink, by Tsukineko.

I made this card for the following challenges:

Wednesday, November 02, 2011

Eagles Everywhere

This is a 12"x12" layout I made using some pictures of a trip to Homer, Alaska. It seems like there are eagles everywhere you look down there. This particular one landed on a sign, then just sat there and posed for pictures. We were not the only ones that pulled over to take pictures. The middle picture is 4"x6" and double matted. The other two pictuers are 3 1/2"x5" and single matted. The eagle at the top was cut from Independence Day at 3 1/2." The mountains are from Dinosaur Tracks. I welded two of them together using my Gypsy, then cut them at 2 1/2." I used 3 Birds on Parade for the title, it is cut at 1." The hidden journaling tag is cut at 3 3/4" using Elegant Edges (the oblong feature). I pop-dotted the eagle and the title.


I made this layout for the following challenges:


Tuesday, November 01, 2011

Happy Fall

This is a cute little 5 1/2"x4 1/4" card. I used some olive cardstock for the card base. I cut some orange/green/red plaid paper 1/4" smaller. The plaid paper is from the Indian Summer Stack by DCWV. I cut two strips of olive cardstock, one at 1 3/4"x4" and one at 2 1/2"x4." I then cut some white cardstock 1/8" smaller and embossed it with the Distress Stripes emobssing folder. The larger rectangle is layered with some more plaid paper, also cut 1/8" smaller than the olive cardstock. I used George and Basic Shapes to cut the two circles, one at 3 1/4" and one at 3." The pumpkin is cut from Smiley Cards. I used the Distress Stripes folder on him as well. I also added black pearls for his eyes, glossy accents on his tongue and crackle accents for the stem. The senitment is from Scrappy Moms Stamps. I stamped it on white cardstock, then matted it with some olive cardstock. The circles are pop-dotted to the card base. I made this for the following challenges:


Sunday, October 30, 2011

Footballer

I made this card in about 1/2 an hour, since that is all the time I had while my dinner was cooking. I started it just after putting my dinner in the oven and was finishing up the stamping when the timer beeped...perfect! This is a 4 1/2"x6 1/4" card. I used purple for the card base. I used my Gypsy to create the yellow paper with the goal posts. This is the background feature on Sports Mania. I used my Gyspy to size it, since it is supposed to be square. I used a purple Cri-Kit to draw the background paper. I wrapped the yellow paper with some football ribbon that I had in my stash. The grass was cut from Sports Mania using the cut to length feature, so it was cut at 4 1/4." The football player was also cut form Sports Mania at 3." I used two different sizes of pop-dots to adhere the grass, then the football player. I used the colors of my state's football team...the Vikings! I think it will make a great birthday card for a die hard Vike's fan.

I made this card for the following challenges:


Wednesday, October 26, 2011

Autumn Blessings

This is an 8"x10" wall hanging I made. The background paper is from Debbie Mumm. The scarecrow is cut from Celebrate with Flourish at 7 1/2." The owl is from Gypsy Wanderings. "Autumn" is cut from Lyrical Letters and "Blessings" is cut from Cindy Loo, both are cut at 4" using the cut to length feature.

I made this for the following challenges:

Snow One Like You!

This is a 5 1/2"x4 1/4" card. I used a pre-made card from DCWV for the card base. I cut some snowflake patterned cardstock, also from DCWV (their Peppermint Forest Stack), 1" smaller. I used a corner punch on the card base and the smaller piece. I wrapped the bottom of the snowy rectangle with some white ribbon, then tied a bow with another piece and adhered it to the ribbon. I adhered the rectangle to the card base. The snowman is cut from Doodlecharms, using some glittery white cardstock. He is adhered to the card. I added crackle accents to his arms and glossy accents to his nose. To make his eyes, smile and buttons look like coal I used some black pearls. To finish off the front of the card I added some diamond Stickles to the ribbon and bow and put a snowflake button on the middle of the bow. For the inside of the card I cut some of the same snowflake patterned cardstock 1/8" smaller than the card base, then some white cardstock 1/2" smaller than the snowflake piece. I used a corner rounder on those pieces as well and adhered them to the card base. I then stamped my sentiment in some blue ink by ColorBox. The sentiment stamp is from Scrappy Moms Stamps.

I made this card for the following challenges:


Monday, October 24, 2011

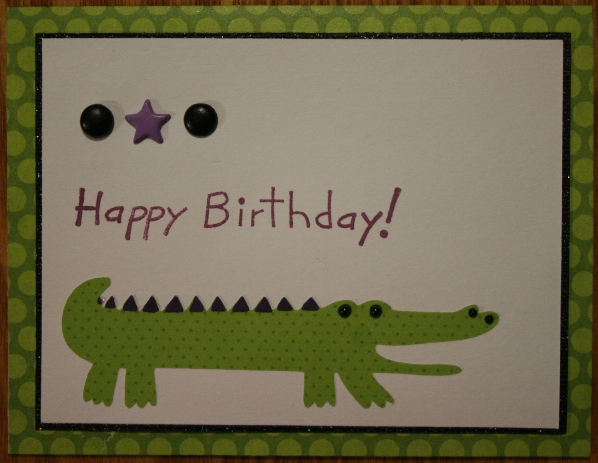
Alligator

This is a 5 1/2"x4 1/4" card. I used a green patterned cardstock for the card base. I cut some black glittery cardstock 1/2" smaller and the white carsdstock 1/8" smaller than the black. The alligator is cut from Birthday Bash at 1 1/4." I used my Gypsy to hide all the cuts for the letters he is supposed to have on him. I used black pearls for the eyes and nose. I stamped the senitment in some purple ink and added three brads to finish it off.
I made this card for the following challenges:

Saturday, October 22, 2011

Halloween Layout

This is a double layout I made of my pictures from Halloween 1985. I was two months shy of my 4th birthday and my brother is 6 months old. The patterned background cardstock is from K&Company. The black cardstock was punched with a Martha Stewart border and corner punch. I double matted all the photos. The bats and spider were cut from Paper Doll Dress Up. The bats are coverd with glossy accents and the spider is flocked with google eyes and purple Stickles for the mouth. The fence is from Pooh and Friends, I ran it through my Cuttlebug, using the Distress Stripes embossing folder and some tea dye Distress Ink. The cat is cut from Everyday Paper Dolls, with some black pearls for the nose and eyes. The pumpkin is cut from Designer's Calendar, and I used it for my journaling space. "Happy Halloween" is cut from Lyrical Letters and I covered it with orange peel Stickles. I used pop-dots to adhere the cat, spider and bats.

I made this for the following challenges:

Wednesday, October 19, 2011

Too Cute to Spook

Here's a cute little altered frame for you. I got the frame from JoAnns. I covered it with two pieces of patterned cardstock, which are by K&Company. I painted the edges purple and covered the cardstock with ModPodge. I cut Hello Kitty from Hello Kitty Greetings at 4." I covered her in black flocking and used some orange pearls for her paws. I also cut her out of chipboard to give her some stability, since part of the image is off the frame. The frame around the opening was created with Elegant Edges, George and Basic Shapes and my trusty Gypsy. I sized the curved square (from George) on my Gypsy, then sized the frame (from Elegant Edges) a little larger. I then covered it in purple glitter. I also used my Gypsy to create my title. The "too" and "to" are from Simply Sweet and welded together, they are cut at 3/4." The "cute" is cut from Create a Critter, cut at 1 1/2." "Spook" was cut from Happy Hauntings at 2." I also welded "cute" and "spook" together. Once they were on the frame I covered them in black diamond Stickles.


I made this for the following challenges:


Bride of Frankenstein

This is a 6"x6" card. The card base is created from striped cardstock from the Midnight Spell Stack by DCWV. I cut some shimmery purple cardstock at 3"x6" and adhered it to the bottom of the card. I then wrapped it with some orange glittery ribbon. The Bride of Frankenstein is cut at 5" from Happy Hauntings. I flocked her hair, used some white Liquid Pearls on the white stripe in her hair, put glossy accents on her lips and covered her dress with purple Stickles. I adhered her to the spider cardstock, which is also from the Midnight Spell Stack. The spider cardstock is cut at 5 1/8"x2 7/8" and I cut some black cardstock at 5 1/4"x3" to mat the spider cardstock. I used pop-dots to adhere the recatangle to the card. I stamped the sentiment, which is from Scrappy Moms Stamps, on white cardstock and trimmed the cardstock to fit, then matted it with black cardstock. I also pop-dotted the sentiment.

I made this card for a former co-worker who is deployed to Kuwait. I made it this large so that I can bring it in to work for everyone to sign, then we can send it off to her, so she knows we are thinking about her.


I made the card for the following challenges:


Sunday, October 16, 2011

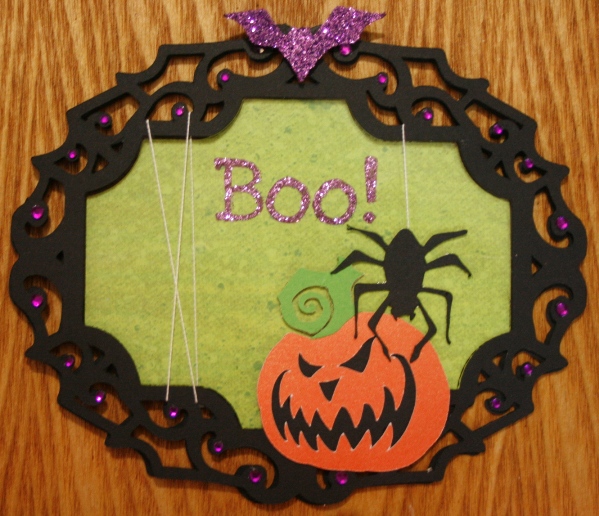
Spooky Pumpkin

I created this card using my Gypsy. The card base was made by welding two of the frames from Happy Hauntings. I hid the inner cut on one of them, then cut just the inner part out of the green cardstock. I covered the inner part of the cut-out with acetate. The card is about 4 1/2" tall. I placed puple gems around the frame. The bat is cut from Designer's Calendar at 1 1/4" (real dial size). I covered it with purple glitter and used pop-dots to adhere it to the card. The pumpkin is from October 31st, cut at 2." The spider is from Wrap It Up, cut at 1 1/4." I used some white floss to create the "web" it is spinning. For the inside of the card I stamped the sentiment then covered it with lavender Stickles.

I made this for the following challenges:

3 Birds on Parade Card

Here is a cute little Christmas card using 3 Birds on Parade and the Christmas cartridges. The card is 4 1/2"x6 1/4." I used red cardstock, then trimmed some patterned cardstock 1/4" smaller. I wrapped the printed cardstock with the green and red ribbons. The tree is from the Christmas cartidge, cut at 4." The bird is from 3 Birds on Parade, cut at 3 1/2." I pop-dotted the bird to the card. I added glossy accents to the beak, crackle accents to the legs and Stickles to the string of lights. I also gave him some green google eyes.

I finished the inside of the card as well. The white cardstock is cut 1/4" smaller than the card base. I stamped my sentiment in pearlescent ivy ink by Tskukineko. The lights are also a border stamp, using the same ink. I then covered the lights with Stickles.

I made this using the Super Sketchy Sunday sketch for Day 223 at 365 Cards.

Friday, October 14, 2011

Ornament Easel Card

This is a 4 1/2"x6 1/4" easel card. I used white cardstock for the easel base. I trimmed some dark blue shimmer cardstock 1/4" smaller and some white cardstock 1/4" smaller than that and layered them all together. The front of the card was made with the dark blue shimmer cardstock, cut at 4 1/2"x6 1/4." I cut some white cardstock 1/4" smaller. To create my patterned background, I punched a snowflake out of a piece of paper. I then used it as a stencil and inked snowflakes onto the white cardstock. I used a blue and a silver ink for the snowflakes. I cut the ornament from the Celebrate with Flourish cartridge. It is cut at 5 1/2." I then added a couple of silver snowflake buttons. To finish the inside I cut a strip of dark blue shimmer cardstock at 4"x1." I then added another silver snowfake button to act as the stopper for the easel. I also stenciled in two more snowflakes with silver ink and stamped my sentiment in the blue ink.
I made this card for these two challenges:


  • 365 Cards: "Day 225" - use a punch to create a stencil to decorate your card

  • Friday Mashup: create an easel card with snowflakes