Showing posts with label Paper Doll Dress Up. Show all posts

Tuesday, March 12, 2013

Lucky Shamrock

How cute is this guy's face?!  I just love it!
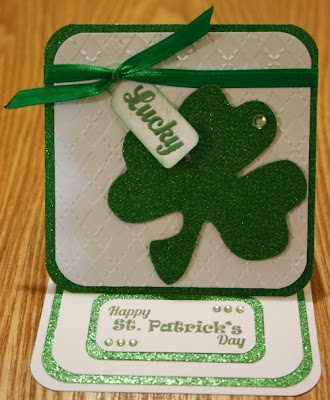
This card is 5"x5" and the card base is a dark green cardstock.  I cut a black mat at 4 3/4"x4 3/4" and then some green paper, with a linen-like print to it, at 4 5/8"x4 5/8."  I cut another black mat at 4 1/8"x4 1/8" and some green argyle paper at 4"x4."  I used a stamp from Peachy Keen Stamps for the sentiment and stamped it in black ink in the upper left corner.  I also added three black pearls to the remaining corners.
 
I used Paper Doll Dress Up for the shamrock.  The black one is cut at 4" and the green polka dotted one is cut at 3 1/2."  I layered them together and adhered them to the card with foam tape.  I used another Peachy Keen stamp for his face.  I colored in the mouth and tongue with markers and used a white gel pen on his eyes and tooth.  I also covered the eyes, tooth, and tongue with glossy accents.  I finished off my little guy with a black baker's twine bow.
 
I made this card for the following challenges:


Tuesday, February 05, 2013

Joy, Alaska

This layout is from a trip my mom, my husband, and I took when my mom was visiting us while we lived in Alaska.  We went with a tour group up to the Arctic Circle and on the way we stopped in this tiny little town called Joy, Alaska.
 
This double layout is 12"x12."  The background paper has a woodgrain pattern to it and I just love it!!  I used Extreme Fonts for the title and the text for my little "sign."  I created the "sign" to read exactly what the actual sign on the door of the general store said.  I thought it was hilarious....and very true.
 
The mountains are from Paper Doll Dress Up and the trees from Plantin Schoolbook.

 The bears are from Campin' Critters and my journaling spot was created from Elegant Edges.
 For the sign, I cut my text out of the green cardstock and matted it with brown cardstock, using the negative images.  I thought it was a pretty cool look.
 
I added black enamel to the noses of the bears, gave them black pearl eyes and added some yellow Stickles to the badge of the ranger bear.  I also added white enamel to be the "snow" on the mountains and I inked up the forest.  The forest and both bears are adhered with foam tape.  The "sign" is held up with two brads.


Monday, October 15, 2012

Boo to You!

I have a really simple Halloween card, but I think it is really cute too!
The card is 5 1/2"x4 1/4" and folds at the top.  I used white cardstock for the card base, then cut some black cardstock at 5 3/8"x4 1/8."  Using my Cuttlebug and the Seeing Spots embossing folder I embossed the black cardstock.  I cut some green polka dotted cardstock at 4 1/2"x3 1/4."  I then inked the edges of the polka dotted cardstock with some black ink.  My cute little ghost guy was cut from Paper Doll Dress Up at 4."  I adhered him to the card with pop-dots.  I used glossy accents on his shoes and ran some star dust Stickles around the edge of the ghost.  I also gave him some googly eyes because I think they just make thing so much more cute.  I used a stamp from Scrappy Moms for my sentiment.  I stamped it on white cardstock and trimmed it to fit.  I cut some more green polka dotted cardstock 1/4" larger and adhered it to my ghost, to make it look like he was holding it.  I then finished off the front of the card with black pearls. 
I also finished the inside of the card.  I cut some black cardstock at 5 3/8"x4 1/8" and the green polka dotted cardstock at 5 1/4"x4."  The white cardstock is cut at 3 1/2"x4 3/4."  I used stamps from My Craft Spot for the interior sentiments and the ghosts.
 
I made this card for the following challenges:
 
365 Cards: "Day 229" - Favorite Things: favorite color (green), favorite craft tool (Cricut or Cuttlebug), favorite patterned paper (polka dots)
My Sheri Crafts: Halloween
My Craft Spot: embossing
Paper Playtime: "Welcome to Boo-ville"

Tuesday, March 06, 2012

Go Green

I have another St. Patrick's Day project. And, it using another leftover shamrock from my "Lucky Banner." It is the last one, so probably no more with this same shamrock...maybe. ;) I also used more of that glittery green paper. If you haven't guessed by now, I LOVE that stuff. I saw it when I was working one day, I work at JoAnns for those of you that don't know, and just adored it, so I picked up a bunch of it! I won't be running out for a while. :)
This card is 5 1/2"x4 1/4." I used the glittery green paper as my base. The next layer is white cardstock that I splattered with green paint. I just used a dry brush, dipped it in the paint and splattered it on. It was a lot of fun to just be messy! My three patterned papers are from the Flower Shower Spring Stack by DCWV. I cut them in different sized strips and used a scallop punch on the top one. The scalloped circles are Nestabilities dies. I embossed the smaller, white one with the Swiss Dots folder and my Cuttlebug. The shamrock is from Paper Doll Dress Up. I used 1/4" thick foam adhesive to adhere it to the card for more dimension. The sentiment is a stamp from Scrappy Moms Stamps. I stamped it with cottage ivy ink by Tsukineko. I also added a strip of green bling along the top of the polka dotted paper. My shamrock just looked like it need a little something extra, so I added the polka dotted bow and thought it was just the right touch. Enjoy!
I made this card for the following challenges:

Sunday, March 04, 2012

Lucky Shamrock

I have a nice and simple St. Patrick's Day card for you today. I created a 4"x4" easel card. I embossed the white layer with the Argyle embossing folder. I wrapped it with some green ribbon and tied it off in a knot. I used Tags, Bags, Boxes, & More for the tag. I used my Gypsy to size it for the stamp, it came out to 0.8"x1 3/4." The stamp is from Scrappy Moms Stamps and I heat embossed it with some shimmery green embossing powder. I also inked the edge of the tag with some green ink. I used another Scrappy Moms Stamp for the inside sentiment. I finished off the card with a little bit of bling on both the senitment and the shamrock.
I made this card for the following challenges:

Friday, March 02, 2012

Friday Mashup Guest Designer

I am so honored to have been asked to be a guest designer for the month of March at the Friday Mashup challenge blog. If you have never seen their challenge blog, check it out, they are always so fun! So, now onto the challenge:


Challenge #48

So here is the "Mashup" Challenge :

Make a project for "St. Patrick's Day".

Or Make a project using "at least 2 Punches".

Or "Mash it Up" and create a project for "St. Patrick's day using your Punches

This is the project that I made...a St. Patrick's Day banner! I think it turned out so cute!! I didn't have any punches that were just screaming to be used, so I just went with the St. Patrick's Day project. I started with the shamrocks, they are from Paper Doll Dress Up, cut at 3." The letters are cut from Art Nouveau at 2." The pots of gold are cut from Simply Charmed at 5." The leprechauns are also from Simply Charmed and also at 5." I cut all pieces from chipboard first, then layered my papers on. I used pop-dots to adhere both the letters to the shamrocks and the shamrocks to the pots of gold. I used glossy accents on the pots (it takes FOREVER for that much surface are to dry, by the way) and also on the buckles of the leprechauns' hats. I also used some bling for their buttons, yellow Stickles on the gold and gave the leprechauns some slightly rosy cheeks with chalk. I punched some holes on each side of each piece and added some eyelets, orange on the leprechauns and black for the pots. I linked them all together using jump rings, which are primarily used in jewelry-making. I used some green ribbon to tie off each end of the banner.

I hope you enjoyed my project and I hope that you decide to join along in this challenge!

Saturday, October 22, 2011

Halloween Layout

This is a double layout I made of my pictures from Halloween 1985. I was two months shy of my 4th birthday and my brother is 6 months old. The patterned background cardstock is from K&Company. The black cardstock was punched with a Martha Stewart border and corner punch. I double matted all the photos. The bats and spider were cut from Paper Doll Dress Up. The bats are coverd with glossy accents and the spider is flocked with google eyes and purple Stickles for the mouth. The fence is from Pooh and Friends, I ran it through my Cuttlebug, using the Distress Stripes embossing folder and some tea dye Distress Ink. The cat is cut from Everyday Paper Dolls, with some black pearls for the nose and eyes. The pumpkin is cut from Designer's Calendar, and I used it for my journaling space. "Happy Halloween" is cut from Lyrical Letters and I covered it with orange peel Stickles. I used pop-dots to adhere the cat, spider and bats.

I made this for the following challenges:

Tuesday, October 11, 2011

Fright Night


This is some Halloween wall decor. It is 8"x10." The background cardstock is from DCWV, the Midnight Spell Stack. The tree is cut from Paper Doll Dress Up. I cut it large enough to fit the page, I don't remember what size that was though. The vulture is cut from Life's a Party at 2 1/2." I used crackle accents on the head and feet, glossy accents on the beak, black diamond Stickles on the body and white flocking on the ring around the neck. The moon was cut using George and Basic Shapes. I was inspired by the moon I saw this morning on my way to work (yeah, I work early enough that it was still dark and the moon was out). It took me a while to find the right combination of colors and paper. I used an ivory cardstock and a yellow-tinted vellum, which I embossed using the Tiny Bubbles embossing folder. The bat was cut from October 31st at 2 1/4." I covered it with glossy accents. The ghosts were cut from silver-tinted vellum at 2 1/2" (the ghost on the right) and 3" (the ghost on the left), both are from Happy Hauntings. The pumpkin is also from Happy Hauntings, cut at 1 1/4." I used the Distress Stripes embossing folder for the orange cardstock. I am loving this folder for pumpkins...it was like it was made for it! I used Happy Hauntings and my Gypsy to cut "Fright Night." It is cut at 1.15" using both the shadow and regular vampire font features. I adhered the moon and bat to the background cardstock. The tree was pop-dotted with thinner pop-dots, as was the title. Everything else was adhered with thicker pop-dots, except the ghosts. I adhered the lower part of them to the background cardstock, then curled them up slightly for some dimension. I am putting this in a shadow box to hang on my wall for Halloween.


I made this for the following challenges:

Sunday, September 18, 2011

I Froggot!

This cute little card is 4 1/4"x5 1/2." I used a pre-made card by DCWV for the card base. I then cut a piece of Core'dinations cardstock 1/4" smaller. I embossed it with the Happy Birthday embossing folder. I then used some sandpaper to expose the green core. I cut two strips of white cardstock, one at 1"x4" and one at 3/4"x3 3/4." I stamped my sentiments on them and adhered them to the card base. I then cut a strip of patterned paper at 5 1/2"x1" and adhered it to the card. I then added some faux stitching around the edges of the white strips. My frog is cut from Paper Doll Dress Up, cut at 3" (using real dial size). I used pop-dots to adhere it to the card and gave it some google eyes.

I made this card for the following challenges:

Saturday, March 12, 2011

Card Creations & More Challenge #5

Hello everyone! It is time for another So Saturday Challenge at Card Creations & More! This week's challenge is to make a tri-fold or z-fold card. I chose to feature the z-fold, and created this simple, but cute, St. Patrick's Day card.
I used a light green cardstock for the card base. I scored it where I needed it to fold, then embossed the far left portion with the Argyle embossing folder. When this card is folded it measures 5 1/2"x4 1/4." I used some shimmery dark green cardstock and layered it with some white cardstock. I wrapped it with a light green ribbon. The shamrock is cut from Paper Doll Dress Up, I used a light green glitter cardstock and I stuck it under the ribbon. The sentiment is from My Pink Stamper and I used pearlescent ivy ink by Tsukineko. I also used the same shimmery green cardstock and white cardstock for the inside of the card.
So there is my simple card for you all, but I like how it turned out! Now it is your turn to participate! Come on over to
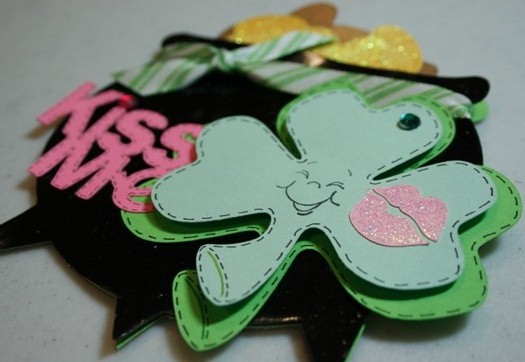
 Card Creations & More and show us your tri-fold or z-fold cards. I can't wait to see what you come up with!

Saturday, March 05, 2011

Kiss Me...

Here is a super fun shaped card for you today! I used the pot of gold from Simply Charmed and welded two images on my Gypsy to get my card base. It is cut at 5." I used a shimmery gold cardstock for the base, then cut the gold pieces from yellow cardstock and the pot from black cardstock. I then used some yellow Stickles on the gold (because you HAVE to have sparkly gold) and some glossy accents on the pot. The glossy accents too FOREVER to dry since it was such a large area. :) The shamrock is cut from Paper Doll Dress Up. The larger layer is cut at 3 1/2" and the smaller one is cut at 3." I then added some faux stitching around both images and gave him a cute Peachy Keen face. I added a piece of green bling and pop-dotted the smaller layer to the larger layer. I cut the lips from Indie Art, using my Gyspy so I could hide all those cut-outs, at 3/4" from a pink cardstock. I then added some diamond Stickles to them. The sentiment, "Kiss Me," is from Sweethearts. I cut it at 1 1/2" and added some faux stitching and some bling to it as well. I tied a ribbon around my pot and then layered my pieces on. I cut out the pot of gold again, this time in a glittery yellow and the pot in green for the inside. I then stamped the, "i'm Irish," sentiment on the inside. This card is about 5"x5" with all its layers. I just love how it turned out! :)

I made this card for the following challenges:
  • Peachy Keen: "Let's Face It Friday" - use faux or real stitching
  • Paper Cutz: St. Patrick's Day
  • My Creative Time: "Throwback Thursday" - use an older cartridge and make something for St. Patrick's Day
  • Fantabulous Cricut: shaped card
  • Alphabet Challenge: R for Ribbons
  • 365 Cards: "Wednesday-Pick 5" - create a card using answers to the following:
    1)Favorite color: green
    2)Favorite design technique: Cricut
    3)Favorite embellishment: ribbon or bling
    4)Least favorite color: pink
    5)Favorite card size: 5"x5" or shaped card