Showing posts with label Don Juan. Show all posts

Saturday, August 11, 2012

Paddle Log

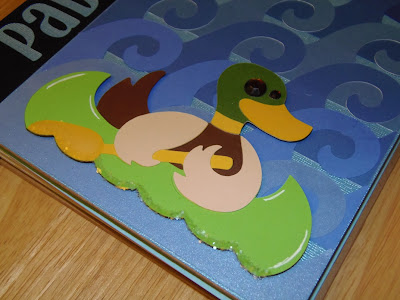
Fantabulous Cricut Challenge Blog is having a challenge to create a project with a water theme and I knew exactly what I wanted to do for this one. I have been meaning to make a book to log the lakes and rivers that my husband and I kayak on and to write notes about what we think about the location. I bought a Smash book a while ago, but haven't done anything with it until this push. It was exactly what I needed in order to create my "Paddle Log."
I covered the Smash book with a pearlized blue cardstock. I then cut seven waves from different shades of blue cardstock. I used Life is a Beach for the waves, they are cut at 2 1/2." I adhered them on the book, overlapping them slightly. The canoing duck is from Campin' Critters, cut at 3 1/2." I added some brown gems for his eyes and glossy accents on his bill and paddle. I added some glitter to the bottom edge of the boat and a little on the bottom of the paddle to look a little like frothy waves. My husband and I actually kayak, but there are no kayaking images and I think the canoing duck is really cute, so it works for me. I adhered him to the book with foam tape. The title is cut from Don Juan at 1 1/4" from the same pearlized blue cardstock that I used to cover the book. Now I just need to start putting my lake and river info in the book. ;)

Saturday, January 21, 2012

Belize Wedding Layout

I think this layout turned out beautifully! I might be a little biased though. :)

The couple in the photo are two of my closest friends. They had a destination wedding in Belize (if you couldn't guess) in June and my husband and I were able to go down and share their special day with them. Well, now I am working on the scrapbook of their wedding. It is a slow process since I am way more of a card maker, but I also love to do layouts, so it is enjoyable when I do work on one of the pages for the scrapbook. I have already gotten a couple of two-page layouts done for them. This is my most recent one and will be the first page. I was inspired to do this one when I saw the current sketch challenge at Stuck On U Sketches, and I will be entering this layout for the challenge.

It is 12"x12" and I used a glittery teal cardstock for the base of the page. I covered it with 2"x2" squares. There are five colors/patterns. I used a shimmery coral cardstock, an ivory cardstock, a beachy striped cardstock, a sand patterned cardstock and a lacy floral patterned cardstock. Since it is a wedding I want there to be some formal elements to the pages, but it was a destination beach wedding, so it also has to be fun. The solid colored cardstocks (shimmery coral, glittery teal and ivory) are all from the Mediterranean Stack by DCWV. The striped and sand patterned cardstocks are from the Tahiti Beach Stack and the lacy floral cardstock is from the Formal Affair Stack, both are by DCWV. The photo is 5"x7" and is matted with the ivory and shimmery coral cardstocks. Both mats are 1/8" larger than the previous layer. I used my Gypsy and Don Juan to create the title. Both the font and the swirl are from the Don Juan cartridge. I welded the shadow font and the swirl together and cut them from the glittery teal cardstock. I then cut the regular font from the shimmery coral cardstock. The title is adhered down and I added glossy accents to the coral part of the title. I also handwrote in the date, following the curve of the swirl. The largest white flower is cut using Mother's Day Boquet. I cut the largest flower at 3," the next one at 2 1/2," the next smaller one at 2" and the final flower at 1 1/2." I embossed them all with the Victoria embossing folder, sprayed them with shimmer mist, then attached them together with a teal pearl brad. I curled the petals of the bottom two layers under and curled the top two up. The flower is adhered with three pop-dots. The rest of the flowers are all Prima flowers that I sprayed with bahama blue and coral reef Glimmer Mist, by Tattered Angels. I put two or three of them together, using either teal or white pearl brads to attach them. They are adhered either with glue dots or pop-dots.

Thursday, September 01, 2011

First of the Month Challenge #20

Our second challenge for this month is to create something for your craft space. I decided to create three corkboards for my wall in my craft room. I had these three 14"x14" corkboards and I just added some titles to them. The "notes" is from Don Juan and I used the Birds & Swirls Cuttlebug folder to emboss the letters. The "ideas" is from Cricut American Alphabet, one of the pre-loaded cartridges on the E2, and I used purple Stickles around the edges of those letters. The "inspiration" is from Opposites Attract, the opposite feature. I used Swiss Dots to emboss those letters. I can't remember what sizes the letters are, but I used my Gypsy to size them all.
Don't forget to come up with your own project for you own craft space and link it up to the First of the Month Challenge. I can't wait to see what you create!

Friday, May 20, 2011

Ride

Yet another layout of some pictures from my high school trip to Sweden. I am bound and determined to get this album done. It works out so well when I can create something for the album to meet a challenge or two, like this layout. It is a 12"x12" layout. The background cardstock is from K&Company and I thought it was perfect with those little bikes on it (they are kind of hard to see though - just take my word for it). I cut a piece of shimmery orange cardstock at 6 3/4"x8" and a piece of ivory cardstock at 6 3/4"x7." I adhered them together and then adhered them to the page. I added the picture and the bus pass. I then used Going Places to cut out the bus and the bike, using the regular and shadow features on both. The bus is cut at 2" and the bike is cut at 1 1/2." I used Don Juan for the title, it is the under pressure creative feature. It is cut at 1 1/4." I then attached all my cuts and added some faux stitching to the title. I finished it all off with the journaling.

I made this page following the sketch at Papercraft Star. I also made it to meet the challenge at My Sheri Crafts. The challenge there is "transportation." I thought a bike and a bus met that, plus that WAS my transportation in Sweden (for the most part).


Friday, April 29, 2011

Flaunt It Fridays Challenge #21

It is time for another Flaunt It Fridays challenge!! This is challenge #21 and our challenge is to flaunt the Nifty Fifties cartridge, specifically, the car cut.


I decided to make a couple of altered frames for my design team project. I got the frames at Miachaels and I stainted them with a cherry finish. Both the car and the truck are cut from Nifty Fifties. I cut the car at 2" and the truck at 2 1/4." The brown panel on the bed of the truck was embossed with the Woodgrain Sizzix folder, then inked with a reddish brown ink. The "classic" senitment is cut from Cursive 101 on the car frame and Don Juan on the truck frame. I cut it at 1 3/4" out of Cursive 101, using my Gypsy to weld the letters and at 2" from Don Juan. I then adhered everything to my frames once the stain was dry and covered it all with a clear sealant.


Head on over to Flaunt It Fridays and get some more inspiration from the rest of the design team. Then create your own project and enter it in to win the prize ($20 gift certificate) from our fabulous sponser, www.scrapbuck.com! I can't wait to see how you flaunt it!!

Sunday, December 12, 2010

Santa

Here's another one for you today. I used the sketch from 365 Cards, and the colors from Crafty Ho's, which is red and green. The Santa theme is for Bitten By the Bug 2 and Jitterbuggin'.
The card is 5 1/2 x 4 1/4. I used the patterned green paper, which has the flocked white trees on it. The strips are all 3/4" wide and out of shimmery paper. The Santa is from Doodlecharms and cut at 2." I flocked all the white pieces on him and used some black flat-backed pearls for his eyes. The word "Santa" is cut at 3/4" from Don Juan. I then used some star dust Stickles to give it some shimmer. I used pop-dots to adhere Santa to the card. Cute and simple!

Monday, November 01, 2010

I Got to Craft!

I actually got to do some crafting the other day! My mother-in-law was putting on a craft sale at her church and needed some signing for it. When I told her that I had my Cricut, all I had to do was unpack it, she got excited. I just had to buy some paper and cutting mats and I was all set. I had my Gypsy too, which is good since all my cartridges are packed. I was so excited to actually be able to use my Cricut, I've felt so deprived lately! I just found out exactly what she needed me to make and then I went to town. I had such a great time and here is the result.
I made the restroom sign first. My mother-in-law thought they would need a large restroom sign so that people would be able to see it from anywhere in the room. The letters are from Cricut Keystone and cut at 2 3/4." The man/woman signs are from Going Places and cut at 2 1/2." This sign really did work, you could definitely see it better than the little sign on the wall.
There was a door prize drawing every half an hour at the show, so I made a sign for that table. I used the tickets, cut at 4," from Fabulous Finds and then doodled around the edges to give them a little more dimension. The lettering is from Pooh Font Set and I welded it together. Both this sign and the restroom sign are mounted on black foamcore board.

I made two of these welcome signs, one for each entrance to the church. I also made arrows for the sign, but left them off because I didn't know which way they needed to point. When the signs were set up someone attached the arrows where they needed to be. This other sign was for the landing on the stairs. The landing has three or four classrooms so we wanted people to continue on downstairs, which is why I made this sign. I used Hannah Montana for the "welcome;" Stone Script for the "quilt show," and Country Life for the quilt and thread. I used Learning Curve for "book sale" and Everyday Paper Dolls for the book. I cut two of all of these for the two welcome signs. I used George and Basic Shapes for the "downstairs in the fellowship hall." The rest of the stuff I cut for these signs was cut three times. I used Gypsy Font for "craft sale" and Locker Talk for the scissors; Lovely Floral for "bake sale" and Everyday Paper Dolls for the cake; Ashlyn's Alphabet for "coffee cafe" and Lyrical Letters for the coffee cup; and Cricut Keystone for "restrooms" and Going Places for the man/woman sign.
I made four of these little 12"x12" signs for the book sale. They were just posted on the wall around where the books were being sold. I used All Mixed Up for "paperback," Don Juan for "hardcover," and Ashlyn's Alphabet for "antique." There was also a little coffee area for people to get something to eat and drink. Someone else had cut the "Coffee Cafe," but I knew that it was the Ashlyn's Alphabet font so I also cut "beverages" and "food" with that font and I used the icon feature for the coffee urn and cup. I used Sans Serif for to make the rest of the sign.
I heard that my signs received a lot of attention and I got a lot of compliments on them. :)