Showing posts with label Walk in My Garden. Show all posts

Thursday, May 03, 2012

Thinking of You Cards

I was flipping through a book of cardmaking that I have and was inspired by a couple of the cards. I made my own versions based on those cards and I thought I would share them today.
This was my first inspiration card. I really loved the buttons and wanted to make my own version. I did not like the pink though, so I went another way with it. Here is my take on the card:
My card is 4 1/4"x5 1/2" and made of ivory cardstock. The patterned cardstock is 4"x5 1/4" and I wrapped it with three layers of sheer ribbon. Each piece of ribbon is only adhered at the top so that the bottom of each layer is loose, which gives it a soft look. I stamped the sentiment and heat embossed it with a dark red embossing powder. I then added my buttons with glue dots.
This is my second inspiration card. I loved the look of the offset flower. Most cards put the image directly in the middle, but I thought this look was quite effective and I wanted to replicate that. However, I made my card using much brighter colors. This is my take on the card:
This card is also 4 1/4"x5 1/2." I used a dark pink cardstock for the card base. I used a double mat on this one, each layer 1/8" smaller than the previous. The first mat is a dark shimmery green and the next is the striped paper, which is actually a diagonal stripe that I cut to use vertically. My flower is from Serenade, cut at 4," and the stem is from Walk in My Garden, cut at 4 1/2." I placed the flower to the side and trimmed off the edge, then added a button, tied with some white twine, to the middle of the flower. I finished off the card with my sentiment, stamped in a dark green ink.

Saturday, October 01, 2011

Fabulous Fall

This fun fall card is 4 1/2"x6 1/4." I used a wonderful shimmery orange cardstock for the card base. I then cut some brown cardstock 1/2" smaller and some ivory cardstock 1/8" smaller than the brown. I cut the tree and all three pumpkins from Mini Monsters. The wheelbarrow is from Walk In My Garden. I gave two of the pumpkins Peachy Keen faces, the other one is how it comes on Mini Monsters (I just love that face). The leaves are punched. I pop-dotted the wheelbarrow, then layered in some leaves and the pumpkin. I then pop-dotted in the last layer of leaves. The other two pumpkins are on the ground with some leaves and I finished off the front by adding just a few leaves to the tree.

For the inside of the card I cut some brown cardstock 1/8" smaller than the card base, then some ivory cardstock 1/8" smaller than the brown cardstock. The "have a" part of the sentiment is stamped. I then drew over it with a shimmery orange pen. I used Straight From the Nest for the "fabulous fall" part of the sentiment. I finished it all off by covering the fall part in paprika Stickles.I made this card for the following challenges:
Sunday, March 20, 2011

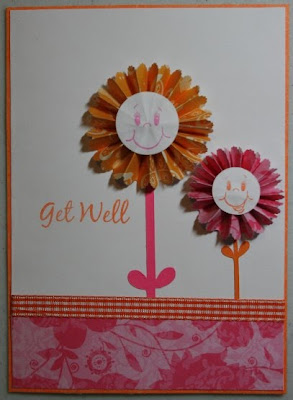
Simple Get Well


This is a 4 1/2"x6 1/4" card. I made it with white cardstock, then cut some orange mulberry cardstock the same size. I cut some more white cardstock 1/8" smaller and adhered it to the orange cardstock. The flowers are handmade, I used the tutorial from Splitcoast Stampers. I then cut white cardstock circles, one at 1" and one at 3/4." I then stamped them with some Peachy Keen faces, using tangerine and orchid pastel ink by ColorBox. The stems are cut from Walk in My Garden, the pink one at 2 3/4" and the orange one at 1 1/2." I adhered the stems to the card, then adhered the flowers. I cut a piece of patterned pink paper at 4 3/8"x1 1/2" for the bottom of the card, then wrapped a ribbon around it. I finished it off with my sentiment, which is stamped in tangerine ink by ColorBox.

I made this card for the following challenges:

Thursday, February 17, 2011

It's Your Birthday

This is a 6"x6" card. I used a striped cardstock from the Flower Shower Stack by DCWV, in fact all the patterned cardstock came from that stack. I cut a magenta rectangle, at 5 3/4"x2 3/4," and a patterned rectangle 1/4" smaller. I then wrapped the rectangle with two pieces of rick rack. I used Give a Hoot to cut some faux rick rack. The rick rack is cut to length of 6." I embossed the white layer with the Polka Dots folder. I cut a 2 3/4" circle from the green patterned cardstock and a 2 1/4" circle from a shimmery white cardstock. I then used Walk in My Garden to cut a 2" flower and a 1" ladybug. I then used some magenta Stickles to edge the flower. The ladybug is pop-dotted. I cut a rectangle from the same green patterned cardstock at 3"x2" and a white rectangle at 2 3/4"x1 3/4." I used Birthday Bash to cut the sentiment, also fit to length of 2 3/4." I pop-dotted the rectangle and added some gems to the corners.
I made this card for the following challenges:

Tuesday, February 15, 2011

Orange & Blue

This is a 5"x5" card. I used orange mulberry paper as my card base. I cut some blue cardstock at 4 3/4"x3 3/4." I used some lighter orange mulberry paper for the next layer, cut 1/4" smaller than the blue cardstock. I then embossed it with the Stars embossing folder. I adhered it to my card base, then wrapped it with a ribbon. I cut some more blue cardstock at 4"x3" and some orange paper at 3 3/4"x2 3/4." I added three star brads to the bottom of that piece. I then adhered it to the card. I cut some dark blue shimmery cardstock at 4 3/8"x1 5/8," some orange mulberry paper at 4 1/8"x1 3/8," and some cream cardstock at 4"x1." I stamped my image, from Hero Arts, and my sentiment onto the cream cardstock. I used pearlescent sky blue and pearlescent rust ink by Tsukineko to stamp my images. I used foam adhesive to adhere the stamped piece to the card. I cut the blue flower from Walk in My Garden at 2" and the glittery orange star from George and Basic Shapes, cut at 1." I finished it off with some light blue bling in the center of the star.
I made this for the following challenges:

Saturday, February 12, 2011

Card Creations & More Challenge #3

It is Saturday and that means another So Saturday Challenge at Card Creations & More! It is challenge #3 and for this time the challenge is to create a prject using black, white and one other color. Hope you pop on over and enter your creation.

I made a cute little birthday card for my creation. The scalloped circle card is cut from Birthday Bash at 4 1/4" as is the white layer. The beehive is from Walk in My Garden, cut at 3." The bee is from Create a Critter, cut at 3 1/2." I used pop-dots to adhere him to the card. I also used some black gems for his eyes. I stamped the sentiment on some white cardstock and then layered it with some yellow cardstock. The stamp is from Scrappy Moms Stamps. The sentiment on the inside of the card is from Birthday Bash, cut at 1 1/4." I used some yellow Stickles on his wings and black Stickles on his eyes, mouth and antennae.

So, that's my creation. I hope to see all of yours. Hop on over to Card Creations & More and join on in with challenge #3! Good luck with the challenge and have fun!!

Thursday, February 03, 2011

Rose

This is a tri-fold card that, when folded, is 4 1/2"x5 1/4." The larger fold is 2 3/4" wide and the smaller fold is 2 1/4." I trimmed some purple cardstock to fit onto the flaps. The larger piece is 2 1/4"x4 3/4" and the smaller piece is 2"x4 3/4." I then cut some floral purple paper at 3" and trimmed it to fit each flap. I used some lavender Stickles on the edge of the purple cardstock. The green and white label shapes and the scalloped circles are both Nestabilities. The rose is cut at 3" from Walk in My Garden. I used cotton candy Stickles on the top part of the rose, I also edged the larger scalloped circle with them as well. I stamped the sentiment in purple hydrangea ink, by Tsukineko, on the smaller scalloped circle. I then used a marker to draw around the smaller scalloped circle, to make it stand out more. I adhered the label only to the smaller flap. I finished the card off with some purple flat-backed pearls.
I made this card for the following challenges:

Thursday, September 16, 2010

Hydrangea

This week's Throwback Thursday challenge is basically an anything goes challenge. The only rule was to use an older cartridge of your choice. Since that was the case I decided to combine this one with some other challenges as well. I used the color inspiration from Crafty Hos' Challenge Blog, which were green, blue and yellow. The sketch is from CPS-Card Positioning Systems and I also used the challenge at Paper Sundaes, which is to use a minimum of three embellishments.
I chose to use the Walk in My Garden cartridge, and the hydrangea cut on it, to make a sympathy/thinking of you card. I like to make these in advance because it is so tough to make them on the spot. I used muted shades of the color scheme of green, blue and yellow. The card is 4 1/2"x6 1/4" and made out of some glittery yellow cardstock. I cut a piece of pale yellow cardstock 1/4" smaller and layered it on. The hydrangea is cut at 3 3/4." I used some Tim Holtz distressing ink to add some texture and dimension to the stem of the hydrangea. I cut a piece of pale green cardstock at 3 1/2"x1 1/4" and layered a piece of the pale yellow cardstock that was cut 1/8" smaller than the green. I then used a stamp from my stash for the sentiment. I put some bling embellishments in the centers of the lightest blue flowers on the hydrangea and some brad embellishements in the corners of the cardstock with the sentiment on it. I used three pale yellow brads that matched the color of the yellow very closely, and in one corner I put a green butterfly brad. I used some pop-dots to attach it to the card so there was some dimension. A very simple card, but I very much like the end result. Hope you do too!

Saturday, August 07, 2010

Friendship and Birthday Cards

I have been having some problems with my laptop lately. So, yesterday my husband wiped my whole computer and reloaded everything on it. That seems to be working so far. It just meant that I couldn't post anything I made yesterday. I made this cute little friendship card for My Sheri Crafts Challenge, but since I didn't have my computer I missed the deadline. I still want to share it though, because I really like it. I used A Child's Year for the image and some Fiskars stamps for the friendship sentiment and the sentiment on the inside.
Here is a birthday card I made today for a three challenges. I used the recipe from 365 Cards, which was: 5"x5" card, 2 3"x3" patterned papers, sentiment, 2 images, 2 buttons, and 4 blossoms. I made it into a birthday card for a teen for the Cricut Cardz challenge and used the colors from the Picture Perfect Creations challenge, which is to use the colors: melon pink, celery green, olive green and pacific blue. I cut the vase from Walk in my Garden and tied it off with a piece of white ribbon. The flowers are from my stash and I drew in their stems. The dragonfly and butterfly were in my stash of buttons. I then added the stamp, which I got in the dollar bin at Joann's. I think it would work as a card for a teenage girl.

Sunday, July 25, 2010

Boxed Set of Thank You Cards


This boxed set of gift cards was so much fun to make and it is for a bunch of challenges. I love how bright and fun it feels. I spent the day out on the lake kayaking and soaking up the sun. So when I came home I wanted to make something fun and cheerful and I think I succeeded with these cute little thank you cards. The challenge over at Just Us Girls this week is to use a template and create a 3D project. I found this template for a 4 1/2" box, for 4"x4" note cards, over at Mel Stampz and knew I wanted to make another little set of thank you note cards and put them in a matching box to give as a cute little gift. I made five of the same matching cards, using the sketch over at 365 Cards. I thought this sketch would be perfect for the little note cards I wanted to make. My inspiration for the theme came from Cupcake Inspirations. This week they had a cupcake with a beautiful shade of blue icing with a daisy on top. This was perfect for what I was thinking: bright, cheerful and fun. My final challenge that I incorporated was at Pile It On. This week's challenge over there was "stretch that plastic." I used some old plastic packaging and cut out all the bees so that their wings would be transparent. I then used black and yellow paper for their layers. All the cuts-bees, beehive, and daisies-come from Walk in My Garden. I used yellow rick rack up at the top and some black pearls to add some accent. I popped up the daisy on the card. All the centers of the daisies have yellow stickles to make it even more cheerful. For the inside of the card I stamped the sentiment, "many thanks," on yellow paper and matted it on black. I made the envelopes to match, using the same blue as the background of the cards and box top. I then placed a small daisy in the corner.

Friday, July 09, 2010

Summer Butterfly


Here's another card I made today. Another one that fulfills three challenges also. The first challenge was from Mojo Monday, this is their sketch. The second challenge was My Sheri Crafts with the summer theme. The third challenge was Fantabulous Cricut Challenge Blog and their theme of "creepy crawler with the color orange." I hadn't planned this challenge, I just thought the orange felt like summer to me, but when I finished I thought it was perfect for it. The card is 6 1/2"x5". The orange strip of paper is embossed with the Cuttlebug. The sunflowers are from Stretch Your Imagination, then I used black stickles on the center. The butterfly is from Walk in My Garden. I had the stamp and don't remember where it is from, but thought it fit the feeling of the card perfectly. I love all the colors on this card and how it all turned out.