Monday, September 30, 2013

Create a Critter 2 - Creation #1

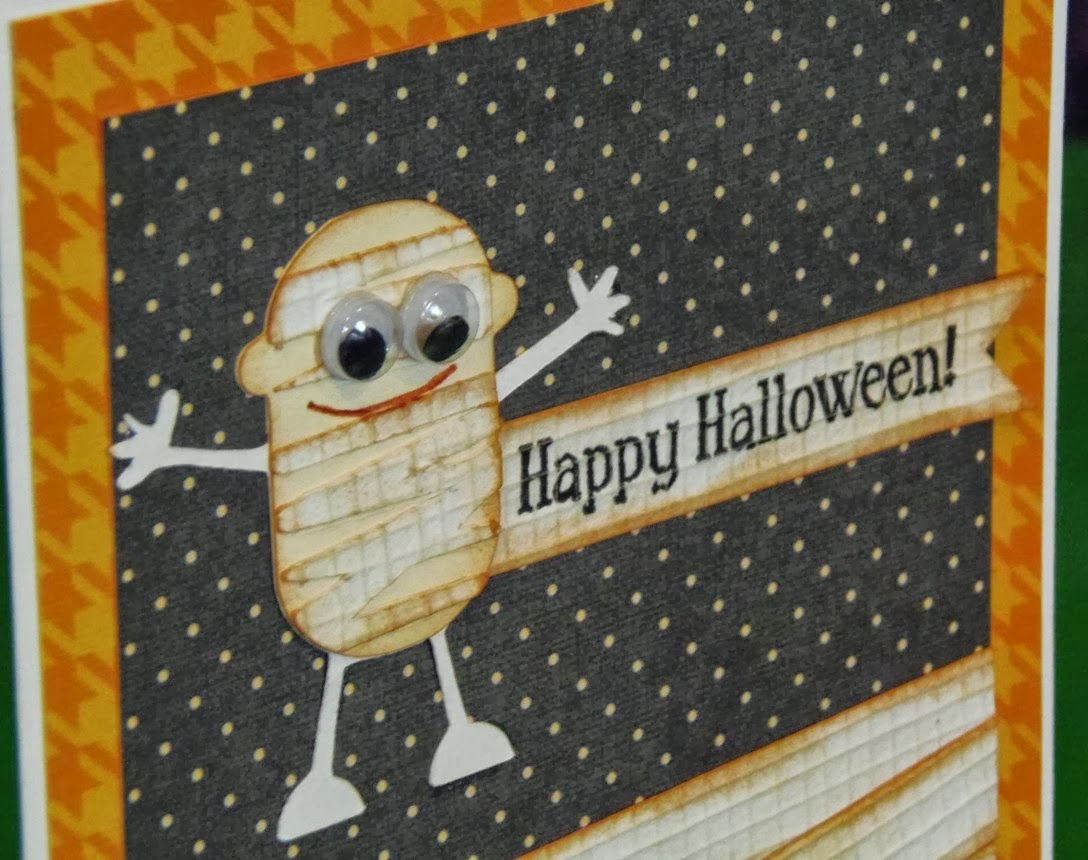
I may not be showcasing the "Mini Monsters" cartridge anymore, but I just couldn't get monsters off the brain apparently.  This cute little guy comes from the "Create a Critter 2" cartridge.  If you liked the first "Create a Critter" cartridge then you will love the second one.  This one has all those adorable little critters, but this time geared more towards holidays.  This monster is with all the other Halloween critters, but I made it work for a birthday.

The card is 5 1/2"x4 1/4."  I used dark brown card stock for the card base.  The monster patterned paper is from the DCWV Prints for a Year Ultimate Stack.  It is cut at 5 1/4"x4."  I created the mats with the Labels Two die by Spellbinders.  I cut one with the dark brown card stock and the next size smaller out of white card stock.  I then embossed the white label with the Dot Background embossing folder by Darice.


The monster can be found on page 61 of the "Create a Critter 2" cartridge.  It was cut at 2 1/2" from a yellow polka dot card stock from the Lemon Flower Stack by DCWV.  I wrapped his hat with twine and gave it a little bow.  I also gave him some googly eyes and colored in his mouth with a clear gel pen.  I adhered him with foam tape, using two pieces on his hat.  I then finished off the front of the card by tracing around the hat and the brown label with a shimmery brown gel pen.


I left the outside plain and finished the inside, which is where I put my sentiment.  I cut another piece of the yellow polka dot card stock at 5 1/4"x4."  I then cut some dark brown card stock at 4 1/4"x3" and some white card stock at 4 1/8"x2 7/8."  The sentiment is actually two separate stamps that I used to create my own unique sentiment.  Both of the stamps are from My Pink Stamper and they are stamped in rich cocoa ink by Tsukineko.  Since the sentiment isn't actually that specific it would work well for a birthday, but could also work for Halloween or just for fun.

I am entering this card in the following challenges:
365 Cards: "Day 273" - Must Have (I had to have the "Create a Critter 2" cartridge when it first came out because I loved the first one so much and knew this one would be just as fun)
Fantabulous Cricut: fall colors (brown, red, yellow)
Die Cuttin' Divas: fall colors

Sunday, September 29, 2013

Silhouette Sunday - Floral Bouquet

For today's Silhouette Sunday I am featuring a birthday card that I made for my grandmother's birthday.


The card is 4"x9" and made from white card stock.  I cut a piece of dark pink card stock at 3 7/8"x8 7/8" and a piece of white card stock at 3 3/4"x8 3/4."  I embossed the white piece with a Cuttlebug embossing folder called "Sweet as Honey."


The floral bouquet is the cut file I used on my Silhouette Cameo.  It is called "triple flower flourish" and is by Jennifer Wambach (#42107).  I cut it at 3 1/4."  I also added some tropical punch Stickles to the pink dots at the center of the flowers.


The sentiment was also created on my Silhouette Cameo.  I typed out "happy birthday" using the Curlz MT font on my computer.  I then sized a banner to fit around it.  I printed out the font on my printer, then ran it through the Cameo to cu the banner.  I adhered it to the card with a pop-dot in the center for some dimension.  I also curled up the ends of the banner.

This was a pretty intricate cut with the veins of the leaves and the fern-like pieces, but I think it turned out beautifully.  I know my grandmother will love it!  Enjoy!

Thursday, September 26, 2013

Mini Monsters - Creation #7

Today's project using the "Mini Monsters" cartridge is a birthday card that is perfect for a little girl.  See how versatile this cartridge really is?  I love it!  I haven't made an easel card in a while, so that is the fold I used for this particular card.


The card, when folded is 5 1/2"x4 1/4."  I used white card stock for my base.  I then cut two pieces of the pink/grey/black striped paper at 5 3/8"x4 1/8" and adhered them to the two pieces of my card base.  I used a Spellbinders Nestabilities die, called Label Ten, for my mats.  I cut a larger one in black and the next size down in white.  That is where I stamped my sentiments.  The top sentiment is from Scrappy Moms Stamps, "Happily Ever After" set.  The bottom sentiment is from My Pink Stamper and is a combination of two stamps.  I added some dark and light pink gems around the sentiments to give it a little bling.


The little princess is from "Mini Monsters."  I cut her at 4" and also used the shadow feature.  I used a Peachy Keen Stamp for her face.  It is from the "Sweet & Silly Face Assortment."  I used a chipboard button from Cloud 9 and tied it with some blossom twine from The Twinery.  I covered her boots in glossy accents and her hat streamers with some Stickles - cotton candy (light pink) and glam pink (darker pink).

Wednesday, September 25, 2013

Mini Monsters - Creation #6

With this project using "Mini Monsters" I have made another two versions of a card, this time using the same image.

I made a Halloween version with a witch hat and a birthday version with a wizard hat.

The cards are both 5 1/2"x4 1/4."  I used a shimmery black card stock for the Halloween card.  I cut a piece of purple starry paper at 5 3/8"x4 1/8."  

The border punch is from EK Success.  I used a stamp I found in my stash for the sentiment and added a couple of purple gems to the sides.  The sentiment is stamped using starlite black ink by Tsukineko.

The witch's hat is on page 68.  I cut it at 3 1/2."  It is adhered to the card with foam tape.  I also added some glossy accents to the purple star at the tip of the hat.  The spider is also from "Mini Monsters."  It is on page 74.  I cut it at 2 1/2" and trimmed off the web part so I would just have the hanging spider.

I used white card stock for the base of the birthday card.  I cut a piece of blue starry paper at 5 3/8"x4 1/8."  Both the starry printed papers are from K&Company.

The border punch is from EK Success.  The "birthday" part of the sentiment is from Fiskars and the "happy" part of the sentiment is from Lawn Fawn.  I stamped them using peacock feathers Distress Ink. 

The hat is again the cut found on page 68."  It is also cut at 3 1/2."  I just cut it using blues and whites to make it look more like a wizard's hat than a witch's hat.  I adhered it with foam tape and added glossy accents to the blue star at its tip.  I also added some of the stars that were left over from the border punch and covered them with crystal Stickles.

Tuesday, September 24, 2013

Mini Monsters - Creation #5

The thing I like about the "Mini Monsters" cartridge is that it can be quite versatile.  There are so many cute monsters on here - some are just generic monsters that you can use for anything, others are more Halloween specific, and then there are things like pumpkins for a more fall creation.  Anyways, this time I used a Halloween monster - the mummy for my card.


The card is 5 1/2"x4 1/4."  I used white card stock for the base, then trimmed a piece of orange hounds tooth card stock at 5 3/8"x4 1/8" for the matting.  The black polka dotted card stock is cut at 4 3/8"x3 1/8."  Both of the patterned card stocks came from the Bewitched Stack by DCWV.  I used some textured card stock from The Green Stack by DCWV and cut it into strips.  I inked the edges of the strips with some tea dye Distress Ink by Tim Holtz.  I adhered them to the bottom of my black piece of card stock to look like mummy wrappings.


My mummy is from "Mini Monsters."  It is on page 35 of the handbook and is cut at 1 3/4."  I used the same textured card stock for the wrappings and again inked them with tea dye Distress Ink.  I drew in the smile with a brown pen and used googly eyes to make it a little more cute.  The sentiment is from My Craft Spot's "Ghostly Greetings" stamp set.  I stamped it on one more piece of the textured and inked card stock.  I trimmed the end of it into a banner and adhered it behind my mummy.

I made this following the sketch at 365 Cards - "Day 265."

Sunday, September 22, 2013

Mini Monsters - Creation #4

I used the card feature on the "Mini Monsters" cartridge for today's project.


The card is 5 1/2"x4 1/4."  I used the pumpkin on page 60 and the card feature to cut my pumpkin from a brown card stock.  The orange layer is inked around the edges with some tea dye Distress Ink by Tim Holtz.  I cut two of the stem/leaf layers.  The first one is adhered to the card and the second is popped up with foam tape, but first I wrapped the stem with some orchid twine by The Twinery.


I used stamps from the "Stampin' Around Fall" set from My Craft Spot for my sentiment and the little pumpkin in the middle of the sentiment.  The sentiment is stamped in spring pansy ink and the pumpkin is stamped in pumpkin spice ink, both by Tsukineko.  The sentiment and the doilies were cut using my Cuttlebug and metal dies from My Craft Spot ("Tiny Doilies Metal Dies").  I adhered the top half of the doily to the stem and used foam tape on the bottom half.  I then tied a double bow with more orchid twine and adhered it at the top of the doily, where it meets the twine wrapped around the stem.

I made this card for the following challenges:
Color Throwdown: baked brown sugar, orchid opulence, pistachio pudding, tangerine tango
The Friday Mashup: fall/harvest food theme
{PIN}spirational Challenges: photo inspiration (color, fall theme)


Silhouette Sunday - Happy Cupcake

For this week's Silhouette Sunday project, I made a birthday card for a co-worker.


The card is 5 1/2"x4 1/4."  I cut some purple card stock at 5 1/4"x4" as a mat, then some pink polka dotted paper at 5 1/8"x3 7/8."  I added four purple gems in the corners and some doodling around the edges.  I adhered my cupcake and my speech bubble with foam tape for dimension.

I found the cupcake in the Silhouette Store, it is called "cupcake" by Miss Kate Cuttables (#48110).  Once it was all put together it measures about 3 1/4."  I added glossy accents to the cherry and her eyes.  I also added some glam pink and grape Stickles to the sprinkles.

My sentiment is a stamp from Scrappy Moms Stamps, "Hooray for Birthdays" set.  I stamped it in a speech bubble that I got from the Silhouette Store.  It is called "thought bubble" and is by Silhouette (#2956).  The speech bubble is about 1 3/4" tall.  I added a little doodling around the edges.

Friday, September 20, 2013

Mini Monsters - Creation #3

Today's creation using the "Mini Monsters" cartridge is a fun Halloween frame.


I used a wooden frame from JoAnn's.  I painted it black, then cut a piece of Halloween paper to fit the upper half of the frame.  On the bottom half I adhered a bunch of googly eyes in varying sizes.

For the picture in the frame I cut a piece of orange striped card stock at 3 7/8"x3 7/8."  I cut my monster and sentiment from the "Mini Monsters" cartridge.  This is the phrase feature of this cartridge and can be found on page 31.  It was cut at 2 1/2."  I used foam tape to adhere it to my striped square and gave him some googly eyes.


This isn't a difficult one, but it is quite time consuming to adhere all those little eyes down.  I really like the result though, so it was definitely worth it.  Enjoy!

Thursday, September 19, 2013

Mini Monsters - Creation #2

For today's "Mini Monsters" creation I made two birthday cards - masculine and feminine.


The cards are both 5 1/2"x4 1/4."  I used dark grey card stock for the bases, then cut mats for them at 5 1/4"x4."  I then used the Scalloped Circles Nestabilities by Spellbinders for the mats on which I placed my monsters.


The blue monster can be found on page 43.  I cut him at 2 1/2," also using the shadow feature.  I gave him a googly eye and covered his tongue and toenails in glossy accents.  I also gave him a bow tie.  It is actually the bow tie from the vampire (page 34), just sized to fit the monster.  I covered the tie with turquoise Stickles.


The pink monster is on page 40.  I also cut her at 2 1/2" and again used the shadow feature as well.  I gave her some googly eyes and popped her trunk/nose up to compensate for the depth of the eye.  I also covered her trunk/nose in glossy accents.  Her bows are also from the vampire, again sized to fit her.  I covered them with cotton candy Stickles.

The sentiments are a combination of two stamps.  The "have a monsterously fun" is from My Craft Spot, the "Ghostly Greetings" stamp set.  The full sentiment is "have a monsterously fun Halloween," I just masked off the "Halloween."  The "birthday" is from a "happy birthday" set I had in my stash.  I don't remember who it is by.

Wednesday, September 18, 2013

Mini Monsters - Creation #1

Since it is time to move on to a new Cricut cartridge to explore, I thought I would go with one for Halloween.  I chose to play with the "Mini Monsters" cartridge.  Here is my first project:


My card is 4 1/2"x6 1/4."  I used some shimmery black card stock for the card base.  I then cut some green glittery swirl patterned card stock, from K&Company, at 4 1/4"x6" for my mat.  I  adhered a variety of googly eyes across the card.  My little monster is from "Mini Monsters," page 38, and is cut at 2 1/2."  I used some face stamps from Peachy Keen for his eyes and mouth.  They are from the Make a Monster Face Assortment.  I also used a Peachy Keen stamp for the "eek" sentiment.  It is from the September 2012 Stamp of the Month kit.  I adhered the monster with two layers of pop-dots to lift it above the eyes, I also covered his spots in glossy accents.


I cut some more green swirly card stock at 6 1/8"x4 3/8" for a mat on the inside.  I then cut some shimmery black card stock at 5 1/8"x3 3/8" and some light purple card stock at 5"x3 1/2."  The sentiment is again from the September 2012 Stamp of the Month kit and the face is also from the Make a Monster Face Assortment.  I covered the eyes with glossy accents.

I made this following the current sketch challenge at Peachy Keen Stamps.

Monday, September 16, 2013

Campin' Critters - Creation #10

Wow!  Ten creations with the "Campin' Critters" cartridge.  I'm sure I could make even more, but this will be my last one, then I will be playing with another cartridge.  For today's project I used one of the 3D items that are available on this cartridge.  There are two types of tents, a backpack, and a journal.  I wanted to make a little camping scene for some home decor.


I made one of the tents, then I added a few more things to jazz it up a bit.  The tent can be found on page 68 and was cut at 9."  I pieced it together, and it stands about 2 3/8" tall.  I also cut the little peeping bunny found on page 57.  It was cut at 3 1/2," but I got rid of the tree.  I adhered the bunny so it looked like he was peeping out of the tent.  I used glossy accents on his eyes.  Finally I cut the directional sign, also found on page 57 (the sign feature), at 3 1/2."  I then cut three signs: campsites is on page 59 (sign feature on shift), trading post is on page 62 (sign feature), and outhouse is on page 62 (sign layer feature on shift).


There is my little bunny camping scene.  Enjoy!

I made this for the following challenges:
{Cupcake Inspirations}: cupcake photo (white, teal, orange color combo)
My Craft Spot: favorite technique (using die cuts)
Fantabulous Cricut: use at least one Cricut letter or number (sign post)

Sunday, September 15, 2013

Silhouette Sunday - Lego Card

One of the women I work with came to me with a card request.  Her son's 6th birthday is coming up and they are throwing him a Lego party.  She was wondering if I could make a card for her to give to her son, with a Lego theme.  I said I could probably come up with something and then proceeded to put my thinking cap on.  Eventually this is what I came up with:
 
The card is 5 1/2"x4 1/4."  I used white cardstock for the card base, then cut at 5 1/4"x4" black mat and a 5"x3 3/4" white mat.  The white mat was embossed with the Polka Dots Cuttlebug embossing folder.
 

I created the bricks and Lego man head with the drawing tools in the Silhouette Studio.  For the bricks I used the "draw a rectangle" and "draw an ellipse" tools.  I drew out my rectangle, then sized my circles to fit.  Once I had one basic brick that was the correct size I copied the circles and drew the other shapes around the circles, so that everything would be proportional (or as close as I can get).
 
For the Lego man head I used the "draw a rounded rectangle" and the "draw a rectangle" tools.  I had a little Lego minifigure in front of me while I was doing this so I could get its look right.  I think I did a pretty good job.  I used the "smiley face" cut by Silhouette (#2360) for the face.  I sized the eyes and smile on the head I had created.  I also made the size of the actual smile smaller because it was too tall and curved.  I used the cut called "3 thought bubbles" by Lori Whitlock (#7507) for my sentiment.  I used just one of them and sized it to fit on my card.  I then used a stamp from Scrappy Moms Stamps, the "Hooray for Birthdays" set for my sentiment.
 
The Lego head and thought bubble are adhered to the card with pop-dots.  The bricks are all adhered to the card, but the circles on them are adhered with pop-dots.  I think they look a little more realistic with the dimension.  I also added some accents with a white gel pen, it adds to the realism that much more.
 
When I showed this to my coworker she was quite impressed.  She said her son would just LOVE it!

Thursday, September 12, 2013

Campin' Critters - Creation #9

I made something a little different for today's creation using "Campin' Critters."  I have been making pretty much just cards, aside from the clock, with this cartridge and thought it was time for something new.  So I finally started making the pages for my paddle log which I actually started quite a while ago.  You can see that post here.
 
 
The first place my husband and I kayaked, with our own kayaks (not rented or borrowed), was a place called Boulder Lake.  It is near Island Lake, just outside of Duluth, MN.  We stayed a campground on the lake and one morning took out the kayaks.  It was after paddling here that I decided I should make a book logging all the places we paddled so that we could decide if we would ever want to go back.
 
For these pages, I covered them with some watery patterned paper from a K&Company stack called Happy Trails.  My pictures are all matted with some shimmery blue cardstock.  The title is a font I downloaded and printed and then cut with a banner using my Silhouette.
 
I used the paddling skunk from "Campin' Critters," he is found on page 48 of the handbook.  I cut him at 3."  I covered the yellow part of the boat with glossy accents and gave my little guy some google eyes.  The rocks are from "Dino Play," a lite cartridge.  I cut the stack of three rocks at 1 1/2."  The larger rock in the background is cut at 2 1/2."  It is actually supposed to say "you rock" on it, but I hid all the contours using Cricut Craft Room.  I inked around the edges of the lighter colored rocks with weathered wood Distress Ink by Tim Holtz.  The set of three rocks are adhered to the page with foam tape and the smallest of those three rocks is also adhered with foam tape.


I attached two of my pictures with washi tape so that you could lift them up.  I then adhered two smaller pictures beneath them.  This way I was able to put five pictures on these two pages, which are about 6 5/8"x10."