Showing posts with label A Child's Year. Show all posts

Thursday, April 16, 2015

Under the Weather

Here is the card I made today:


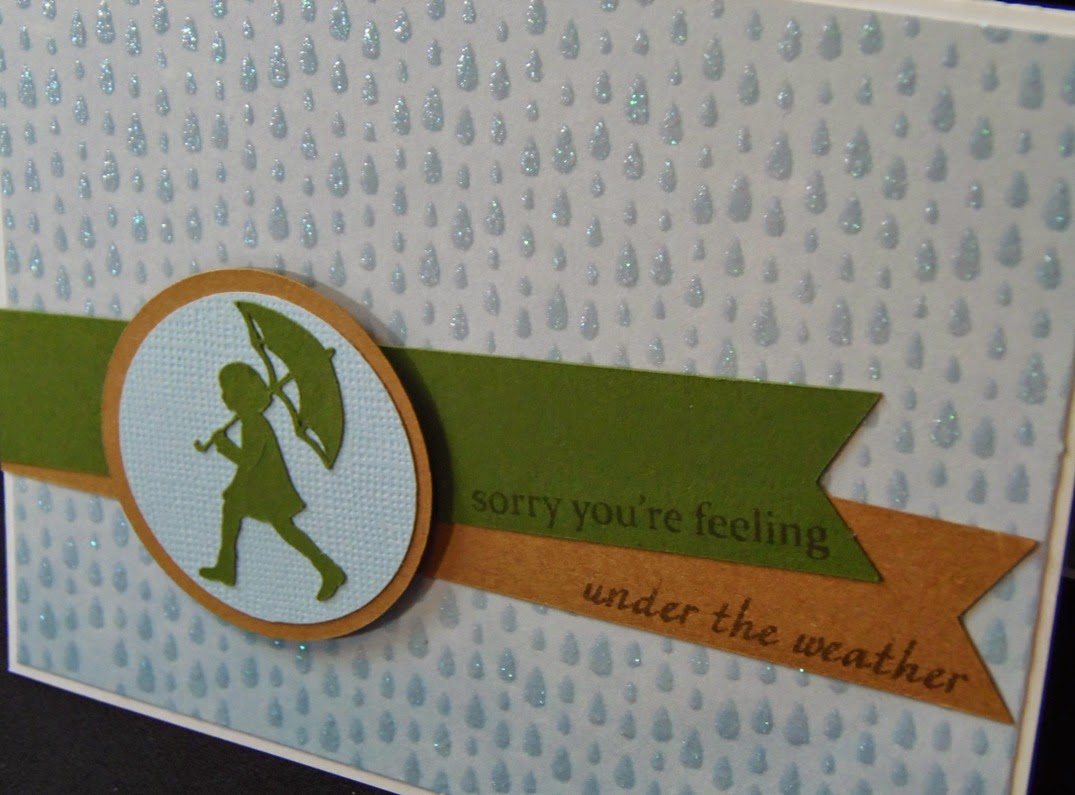
The card is 5 1/2"x4 1/4."  I used white card stock for the card base.  I then cut some rain patterned card stock at 5 3/8"x4 1/8" as a mat.


The banners are from "Bits and Pieces."  It is one cut and is 0.84" tall.  I kept the longer one straight and angled the shorter one a bit, then trimmed them at the left edge of the card.  The sentiment is from Scrappy Moms Stamps, the Sweet Somethings set.


The girl with the umbrella is from the Cricut cartridge "A Child's Year."  She is cut at 1 1/2."  I put her on a layered circles.  The blue circle is 1.7" and the kraft circle is 1.9."  They are adhered to the card with pop dots for some dimension.


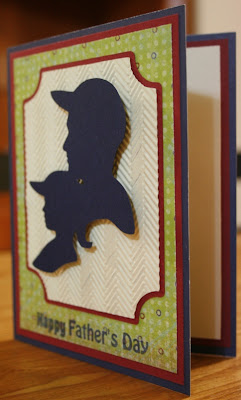
I finished the inside of this card as well.  The rain patterned card stock is cut at 5 1/4"x4."  The green mat is 4 1/4"x3" and the white mat is 4"x2 3/4."  I used another stamp from Scrappy Moms Stamps for the sentiment.  It is also from the Sweet Somethings set.  The umbrella is from "A Child's Year," and is cut at 1 1/4."  The rain is a digital image from Creativebug, called Raindrops.

I made this for the following challenges:

BBTB2: April showers - anything that has to do with rain

Color Throwdown: color combination

Fantabulous Cricut: a spring project

Friday, January 09, 2015

Sea Life Wall Art

I mentioned in my post yesterday, that I had been in Washington visiting my friends and their 9 month old baby.  I made a name sign for their son a while back, you can see that here, and gave it to them while we were visiting.  My husband hung the signs up and I decorated the wall next to it with some vinyl cut in sea life inspired shapes.


The name sign was made with "Extreme Fonts" and "Art Nouveau."  For more information, see the original post, here.

Here is a better look at the sea life wall.


The sea weed is from "Life is a Beach."
The fish is from "Four Legged Friends."  I just eliminated a couple of layers and flipped it.
The bubbles are from "A Child's Year."  I flipped them to work with the fish.

The sea weed is from "Word Builders 3: An Ocean of Words."
The fish and bubbles are from "This & That."  This is a Creative Memories cartridge.

The octopus is from "ZooBalloo."
The bubbles on the right are from "A Child's Year."  Like bubbles with the fish, they are flipped.
The bubbles on the left are from "Kate's ABCs."  They are just two of the bubbles in the bubble bath word title.


Thursday, May 24, 2012

Father's Day Card

I started making my Father's Day cards. I guess it is a little bit of a jump start, but I don't know how much time I am going to have, so I will work on them now. This is a 4 1/4"x5 1/2" card. The red mat is 4"x5 1/4" and the green mat is 3 3/4"x5." I used Elegant Edges to cut the label, using both the regular and shadow feature. It is cut at 4." I embossed the regular label with the Herringbone folder and my Cuttlebug. I used A Child's Year for the father/daughter cut, which is cut at 3 1/2." I then used some foam tape to adhere the cut to the card. I used a Scrappy Moms Stamp for the sentiment and stamped it using night sky ink by Tsukineko. It was a nice and simple one, but I like the look of it. Enjoy!

Monday, March 12, 2012

Boy Birthday Card

Here is a sweet and simple card for a little boy...or a boy at heart. :) The card is 5 1/2"x4 1/4." Both green patterned papers are from the Flower Shower Stack by DCWV. I used A Child's Year for the little boy on the scooter. It is cut at 2 1/2." The white label is a Nestabilities die. I wrapped the green mat with a black & white striped ribbon. I stamped my sentiment and finshed off the card with three buttons. I tied four pieces of black twine through the large green ribbon, one piece looked just too weird.
I made this card for the following challenges:

Friday, March 09, 2012

Friday Mashup Challenge #49

It is time for another Friday Mashup challenge. This week is challenge #49 and here it is:
1. Make a project using the colors green & yellow
2. Or make a 3D project that is a basket or treat pouch
3. Or "Mash it up" and create a treat basket/pouch using the colors green & yellow
I decided to "mash it up" and I created an Easter treat basket using green and yellow as my main colors. My basket is actually a wooden box that I found in my craft room when I was trying to decide what Cricut cartridge to use to cut my basket. Weird how things work like that huh? I covered it with some green and yellow patterned papers, all of which come from the Lemon Flower Stack by DCWV. The handle was created by cutting a strip of light-weight chipboard and covering it with some plaid ribbon. I used Holiday Cakes to cut the sentiment at 2 3/4." I then covered it with lime green Stickles. The flowers around it are from K&Company. I used A Child's Year for the boy and girl silhouettes. They are cut at 4 1/2" and I drew around the edges of them with yellow Stickles. The bunny medallion on the back is from Martha Stewart Seasonal Cake Art and it is cut at 4 1/2." I filled the basket with Easter grass and added my treats. They look good don't they? Actually, I created my treats as well! The eggs are wooden and I painted them with brown paints to make them look like chocolate, both milk and dark. I then "drizzled" them with white chocolate, which is actually white dimensional paint. I think they turned out quite well. I hope you enjoyed my project and I also hope you decide to join in the challenge at The Friday Mashup!

Sunday, January 01, 2012

Blue Snowflakes

This wintery card is 4 1/4"x5 1/2." I used a pre-made shimmery white card, by DCWV, for the card base. I then cut some blue snowflake patterned cardstock at 4"x5 1/4." The snowflake cardstock is from the Winter Magic Stack by DCWV. I cut some shimmery white cardstock at 4 1/4"x3" and then used a Martha Stewart border punch along the right edge. The snowflakes are from A Child's Year. The two dark blue ones are cut at 1 3/4" and the light blue one is 2 1/4." I adhered the two smaller ones to the card then covered them in dark blue Stickles. The larger one is adhered with pop-dots and I added some clear bling to the ends of the snowflake. I finished off the card with some dark blue bling in the corners of the shimmery white piece. A nice and simple one, but perfect for the current weather. We finally got our snow here in central Minnesota. We didn't have anything for Christmas, but now we do...now when I want it to start going away! Oh well, what can you do?

I made this card for the following challenges:

Saturday, June 18, 2011

Card Creations & More Challenge #12

Challenge #12 at Card Creations & More by C this week! The challenge this week is to create something patriotic. I decided to create a layout for some pictures of a 4th of July parade that I saw while living in North Pole, Alaska.

This is a double page layout, each page is 12"x12." I used a dark blue cardstock for the base layer, then cut some red and white plaid paper at 10 3/4"x10 3/4" for the next layer. I matted the four photos, which are all 4"x6," with white carsdtock, cut at 4 1/8"x6 1/8." The white are for the journaling is cut at 8 1/8"x4." I then matted it with some red cardstock cut at 8 1/4"x4 1/8" and blue cardstock cut at 8 1/2"x4 1/4." The title is from Graphically Speaking and actually cut at 3/4," turned out pretty large though. It's acutual measurements when cut is 2 3/16" (for the July at least). I added glossy accents to the "July" and x-mas red Stickles to the "fourth of." The three stars are from a Marvy Uchida punch, I used pop-dots to adhere them and x-mas red, midnight blue and crystal Stickles on them. I drew in my journaling lines with a dark blue marker, then actually journaled with a red marker. The Uncle Sam hat is from Independance Day, cut at 3." I used pop-dots to adhere it as well. The little boy on the firecracker is from A Child's Year and cut at 2 1/2." I cut the shadow layer with the dark blue cardstock, then the regular layer with white cardstock. I added some crystal Stickles to him.

Now it is your turn to create something patriotic! Get crafting and link up your project at Card Creations & More by C for your chance to win! I can't wait to see what you create!

Wednesday, April 13, 2011

Shaped Easter Card

Here is an egg shaped card for you today. The card base was made by welding two of the scalloped egg shapes from the Easter cartridge together. The eggs were 5 1/4." I then used Easter again to cut a plain egg shape from yellow cardstock at 5." I embossed it with the Spots & Dots embossing folder. I used a 3/16" hole punch to punch holes in the scallops of the teal egg. I cut two strips of cardstock, one from green at 3 5/8"x2" and one from black at 3 5/8"x2 1/4." I then used a Fiskars border punch to create the scalloped border. I embossed the green layer with the Polka Dots folder. The little boy is cut at 3" from A Child's Year. I cut him once regularly in teal cardstock and once in black cardstock using the shadow feature. I then adhered him to the card with pop-dots. For the inside of the card I cut two more plain eggs from the Easter cartridge, a green one at 5" and a yellow one at 4 3/4." My sentiment is from Hero Arts and I stamped it with moss green ink by ColorBox.
This card was made for the following challenges:


Monday, March 28, 2011

Flower Child

This card is 4 1/2"x6 1/4," made from white cardstock. I cut some green floral patterned paper at 4 1/4"x6" and adhered it to the card base. I then cut a strip of plaid patterned cardsdtock at 4 1/2"x2." I used George and Basic Shapes to cut the ovals. The striped one is cut at 5 1/2" and the white one is cut at 5." I stamped a flower image all around the white oval, using pink grapefruit ink by Tsukineko, and heat embossed it with clear embossing powder. The sentiment is stamped with hint of pesto ink by Tsukineko. The child with the flower is from A Child's Year, cut at 4." I used the shadow feature to cut the green layer, then the regular feature to cut the cream layer. I embossed the cream layer with the Swiss Dots folder. I then used some pop-dots to adhere the image to the card base. Enjoy!
I made this card for the following challenges:

Wednesday, March 16, 2011

May the wind...

I have been gone for the past week. I went to Los Angeles with my sister-in-law. We went on set tours of the TV shows "NCIS" and "NCIS: Los Angeles." It was really fun and we got to mee the actors as well. Now I am back and able to craft again. :) Here is my card for today!
This is a 5"x5" square card made using shimmery green cardstock. I then cut some gold cardstock at 4 5/8"x4 5/8" and embossed it with the Polka Dots embossing folder. I wrapped it with some twine and tied it off. The white scalloped circle is from Birthday Bash, cut at 4." I then stamped the Penny Black image on the circle and colored it with Prismacolor colored pencils. I added some crystal Stickles to the image for some sparkle. The shamrocks are cut from A Child's Year. I used two different colored greens and cut them in varying sizes, 1"-1 1/2." I mounted them to the card, using pop-dots on the dark green one. I hand wrote the sentiment, which is part of an Irish blessing. I then finished off the card with some green bling and a black pearl for the eye. Enjoy!!
I am entering this card in the following challenges:

Wednesday, March 02, 2011

St. Patty's Day Pig

A St. Patrick's Day pig? That's right! I made this cute little pig, who is all set to celebrate St. Patrick's Day! The card is 5 1/2"x4 1/4." I made it from a shimmery dark green cardstock. I then cut some green argyle patterned paper at 5 1/4"x4" and layered it on. I cut some glittery green cardstock at 5 1/2"x2." I then used an EK Success border punch along the bottom edge. I layered that with a piece of green polka dotted patterned paper, cut at 5 1/2"x1 1/4." My little pig is actually Hamm, from Toy Story. He is cut at 2." I then used my Gypsy to cut the hat, which came from A Child's Year. The hat was cut at 1.40." I also used my Gypsy so I could get the right size for the shamrock, which was cut at .60" from Give a Hoot. I used pop-dots to adhere Hamm to the card base. I stamped my sentiment, which is from My Pink Stamper, in pearlescent ivy ink by Tsukineko. I found the gold shamrock in my button stash and thought it was perfect. I then finished it off with two types of green bling.

This card is for the following challenges: