Showing posts with label Cindy Loo. Show all posts

Saturday, December 21, 2013

25 Days of Christmas - Gift Card Holder

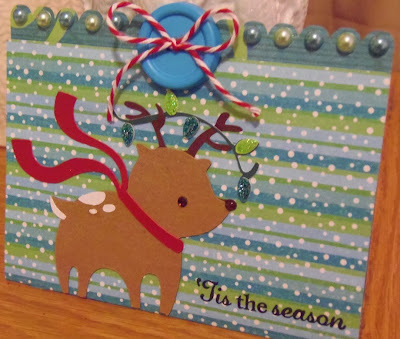
Today's project is a gift card holder.


I used "Cindy Loo" for the envelope, it is on page 77 of the handbook.  I cut it at 6 3/4."  This size perfectly holds a normal sized gift card.  I added some blue and green pearls to the top scallop.  I then tied some maraschino baker's twine, by The Twinery, through a blue button and adhered it on the tab that keeps the envelope closed.  The sentiment is a Fiskars stamp.


I used "Winter Frolic" for the reindeer.  It is on page 36 of the handbook.  I cut it at 2 3/4."  I covered the lights with firefly and aqua Stickles.  The nose is covered in glossy accents and I used a brown gem for the eye.  


For the inside of the envelope I cut a dark green mat at 2"x3 3/4," and a white mat at 1 7/8"x3 5/8."  I then used stamps from Scrappy Moms Stamps' "Winter Wishes" set for the sentiment and "Everyday Greetings" set for my to and from.

Wednesday, March 28, 2012

Wedding Day

My mother-in-law needed a wedding card for this weekend, so I decided to use a couple of challenges to help me create one for her. Now I just hope she likes it, although it is more important that the bride and groom like it!
The card is 5"x7." I used a white cardstock for the base, rounded the corners, then added a silver layer with rounded corners. The black frame is from Elegant Edges, using the oblong frame feature. I used my Gypsy to size it to fit the card perfectly. I used a piece of striped cardstock from the Formal Affair Stack by DCWV to layer inside the frame. My bride and groom are from the Wedding cartridge, cut at 4." I embossed the black layer with the Swiss Dots embossing folder. I adhered them to the card with some foam tape and gave the bride a pearl necklace. For the sentiment, I used Cindy Loo and the frame feature to create the label. I stamped my sentiment, which is from My Pink Stamper, and added some silver Stickles to the flourish and glossy accents to the frame. I added some sheer ribbon under the frame and used pop-dots to adhere it all to the card. I matted the inside of the card with black, silver and white. I cut a 1" flourish from Cindy Loo, using the border feature and covered it with silver Stickles. I then stamped my sentiment, which is by Rubber Stampede.
I made this for the following challenges:
  • BBTB2: "Cindy Loo" - any flourish
  • Cardz TV: "Cricut Cardz Challenge" - frame
  • 365 Cards: "Day 26" - peace, love, and happiness

Saturday, January 07, 2012

Owl

Today is the final of the "Pretty Pairs" challenges at 365 Cards. Today is "Day 313" and the challenge is paisley & yellow. My card for this challenge is 4 1/2"x6 1/4." I used yellow cardstock for the card base. I trimmed some shimmery purple cardstock to 4 1/4"x6" and then some paisley cardstock 1/8" smaller than that. The paisley cardstock is from the Rustic Stack by DCWV. I cut a strip of the shimmery purple cardstock at 4 1/8"x2" and used a Martha Stewart border punch on the bottom edge of it. I wrapped it with some yellow ribbon and adhered it to the card. The stylized owl is from Cindy Loo. It is cut at 2 1/2." I used some yellow Stickles on its eyes, beak and feathers. I used pop-dots to adhere it to the card. The tag is a pre-made one I found in my stash. The sentiment is a clear stamp by My Pink Stamper. I adhered the tag down with pop-dots on the left hand side and regular adhesive on the right hand side, so it angles down. The flowers are two Prima flowers that I sprayed with Tattered Angels Glimmer Mist. I used a shimmery purple brad to attach them together and put it on the middle of the ribbon.

Friday, November 04, 2011

With Gratitude

This card is 4 1/2"x6 1/4." I used purple cardstock for the base. I then cut some shimmery teal cardstock 1/8" smaller and some striped paper 1/8" smaller than the teal. I used a Martha Stewart border puch to create my loopy fringe. I didn't adhere the loops down, so it gives it some added dimension. The flourish is cut from Cindy Loo (at least I think so). I cut it a while ago for something else, but wound up going a different way so I don't know what size it is. The leaf is from Straight From the Nest. I used my Gypsy to size it to fit the card. I stamped my sentiment onto the leaf with some purple ink, then heat embossed it with some clear embossing powder. I finished it off with some bling. Enjoy!
I made this card for the following challenges:

Wednesday, October 26, 2011

Autumn Blessings

This is an 8"x10" wall hanging I made. The background paper is from Debbie Mumm. The scarecrow is cut from Celebrate with Flourish at 7 1/2." The owl is from Gypsy Wanderings. "Autumn" is cut from Lyrical Letters and "Blessings" is cut from Cindy Loo, both are cut at 4" using the cut to length feature.

I made this for the following challenges:

Friday, September 02, 2011

50 Years

This is a 12"x12" layout I did of my grandparents. They are my father's parents and this was taken at their 50th wedding reunion. That was quite a few years ago and they are still together. All the patterned paper is from The Rustic Stack by DCWV and all the solid paper is from The Shimmer Stack by DCWV. The piece of floral patterned paper is cut at 11 1/2"x9." The yellow patterned paper is cut at 11"x7." The circle is the same patterned paper as the 12"x12" background, it was cut using George and Basic Shapes at 9." The photo is 5 5/8"x4." I matted it twice, with pink patterned paper and the same yellow patterned paper as the large rectangle. The mats are 1/4" larger than the previous layer. I used Mother's Day Boquet for the flowers. The yellow one is made with layers that are 3," 2 1/2" and 2." I used some rust colored pearls for the center of the flower and pop-dots to adhere it. The blue-green flower is made with layers cut at 2 1/2," 2 1/4," 2" and 1 3/4." I embossed it with the Textile folder, used pop-dots to piece the layers together and a large gold pearls for the flower center. The orange flower is made from layers that are 3," 2 3/4," 2 1/2," 2 1/4" and 2." I embossed it with the Victoria folder and used some pale blue-green pearls for the center of the flower. I used some blue-green paper for the title, which is cut at 1 1/2" using Stone Script. I cut the leafy vine from Cindy Loo, at 5" and the fit to length feature, it is also cut using the same blue-green paper.


I made this for the following challenges:


Friday, April 22, 2011

Flaunt It Fridays Challenge #20

Today is challenge #20 at Flaunt It Fridays! This week's challenge is to use the Cindy Loo cartridge and you can choose to flaunt whatever cut you would like from this cartridge. If you don't have Cindy Loo, then choose cuts that are similar to what is on this cartridge.
I chose to make a gift card holder for my project. The actual gift card holder is cut from Cindy Loo at 6." I used a patterned cardstock from the Nana's Kitchen Stack by DCWV. The little deer is also from Cindy Loo and cut at 2." The patterned paper on the deer is also from the Nana's Kitchen Stack, everything else was in my stash. I used some pearls along the scalloped top and found a button in my stash (which I've had forever) to use on the closure for the gift card holder. I wrapped it with some blue ribbon before I adhered my deer to the holder. I stamped my sentiment using prussian blue ink by ColorBox. Both parts of the sentiment are Scrappy Moms Stamps, but the "you're" part of the sentiment is from one stamp and the "fawn-tastic" is from another. I trimmed the white cardstock to fit, then matted it with the green and blue cardstock and adhered it to the holder. Pretty simple, but I think it is pretty cute!


Now that you have seen my project head on over to Flaunt It Fridays and check out the rest of the design team! Get inspired and create your own project! I can't wait to see how you flaunt Cindy Loo!! :)


I also made this to fit the 365 Cards "spring cleaning" challenge; which is to use 2 pieces of patterned paper that are at least 1 year old (my patterned paper is over 2 years old), something/anything that you've had since you began scrapbooking (the button is from a stash I have had since I started...I have a LOT of buttons), and ribbon that is at least 2 years old (I know it is over that, I can't remember when I got it).

Saturday, April 09, 2011

Card Creations & More Challenge #7

It is time for another "So Saturday Challenge" at Card Creations & More by C! This week is challenge #7 and the challenge is to "create anything spring related." For this challenge I decided to create a fun spring layout. I thought it would be a perfect way for someone to showcase pictures from a garden. The layout it 12"x12." All the patterned cardstock and paper is from the DCWV Flower Shower Stack. I used the green patterned cardstock for the base of the layout. I then cut the flower cardstock at 10"x10" and adhered it in the middle of the green cardstock. I cut mats for three photos. The larger one is matted for a 4"x6" picture, with the green mat cut at 4 1/4"x6 1/4" and the blue mat cut 1/8" larger than that. The smaller ones are matted for 3"x3" photos. The green mats are cut at 3 1/4"x3 1/4" and the blue mats are 1/8" larger. The large sunflower is cut at 10" from the Bloom cartridge. I added some embossing to the center of the flower with the Swiss Dots folder. The mushrooms are from Cindy Loo. The larger one is cut at 2 1/2" and the smaller one was cut at 2." I used some glossy accents on the mushroom caps. The gnome is from Freshly Picked and cut at 5." The title, "Grow a Garden" is from Give a Hoot and cut at 2 1/4." I used the shadow feature on all my cuts to make them stand out. I adhered everything right to the scrapbook page, except the gnome and smaller mushroom...those are adhered with pop-dots for some dimension.


Wednesday, April 06, 2011

House Mouse Cards

Here are a couple of cards I made today using House Mouse stamps! The first one is a 5"x7" card. I used a shimmery blue cardstock for the base. I then cut a piece of white cardstock 1/4" smaller. I then embossed it in my Cuttlebug, using one of the Winter Frolic Companion folders and adhered it to the card base. The umbrella is from Pagoda, cut at 5." The sentiment is from Cindy Loo, cut at 3" using the fit to length feature. I just used the "get well" and tossed the "soon" part of the sentiment. I added glossy accents to the sentiment. My image was stamped on some white cardstock and colored with my Prismacolor colored pencils. I then trimmed it down and cut a mat from shimmery blue cardstock 1/8" larger. I adhered it to the card base using foam tape. I made this card for these challenges:
My other card for today is 4 1/2"x6 1/4" and made from kraft cardstock. I cut a piece of light blue cardstock 1/4" smaller than the card base and embossed it with the Cherry Blossoms folder. I cut another piece of kraft cardstock at 4 5/8"x3 3/8" and some orange cardstock at 4 3/8"x3 1/8." I layered them together to be the mat for my image. I stamped it on white cardsock and colored it with my Prismacolor pencils. I then trimmed it to 4 1/4"x3" and adhered it to the mats I created. I adhered that all down to the card base. I then wrapped it with some light blue ribbon and some orange ribbon. I then stamped my sentiement in pearlescent sky blue ink by Tsukineko onto some kraft cardstock. I cut it at 1 1/4"x5/8" and cut a mat for it from some orange cardstock, which is cut 1/8" larger. I used some pop-dots to adhere that in the middle of the ribbon.

I made this card for the following challenges:


Wednesday, March 30, 2011

New Home

My friends, who are getting married soon, just bought a new house and I thought I should send them a card congratulating them on that milestone. There were a couple of challenges that are perfect for that occasion so, I made this card, which is 5"x7." I used a white cardstock for the card base, then cut some red cardstock 1/8" smaller. I embossed the red cardstock with a Sizzix embossing folder, called Bricked. I cut a strip of glittery black cardstock, which is from Core'dinations, at 7"x1 1/2." I then used a Martha Stewart border punch on it. I wrapped it with some ribbon that I got at Michaels and added three rhinestones, which are from Bazzil. The flourishes are cut from Cindy Loo. The large black one is cut at 2" and the yellow one is cut at 1 1/2." The glittery yellow cardstock is from DCWV, the Glitter Stack. The plain cardstock is all from my stash, I don't know who the manufacturer is any more. I cut a mat from the glittery black cardstock at 3"x4 1/2, then cut some cream cardstock 1/4 smaller. The house is cut from Hoot 'n' Holler at 2 1/2." I embossed the roof with the Cuttlebug Tiny Mosaic folder. The sentiment is actually two seperate stamps from Close to My Heart. I used some foam adhesive to adhere that all down to the card. I made this for the following challenges:

Tuesday, December 21, 2010

Coaster Set

I made this coaster set today as a Christmas gift for my brother's girlfriend. I have never met her, so I don't really know her likes and dislikes, so I am really hoping that she will like it.

The coasters are a pre-made wooden set that I found at a Ben Franklin. I painted all the coasters in, what the bottle said was ivory, but I think looks more like a buttery yellow. I then cut some felt about 1/2" smaller than the coasters for the bottoms. I used George and Basic Shapes to cut circles out of the yellow floral patterned paper that were the same size as the coasters. I then decorated the coasters with flowers and birds from Lovely Floral. The only flower not from that cartridge is the one on the top left, it is from Cindy Loo. I added some grape Stickles to every coaster, somewhere and then sealed them all with satin ModPodge. I painted the base the same ivory/yellow color as the coasters, but I did the sides in a light purple. I then added some gingham ribbon around the sides of the base. The base looked really plain at that point so I added some purple and green gems to match the purple/green color scheme I did on the coasters. I finished it all off by tying the set together with the same gingham ribbon I used on the edge of the base.


Friday, September 24, 2010

Being Sick Stinks

One last card for the night, I had to take a break from packing. I made this cute little card at 6 1/4"x4 1/2." The skunk is cut from Create a Critter at 2 3/4." I used the hide contour feature on my Gypsy to hide the face so that I could stamp the face with a Peachy Keen stamp. The flower is from Cloud 9 and I used a jeweled brad as the center. I used pop dots to raise the skunk and the flower up for some dimension. The stem of the flower is also from Create a Critter. The stamp is from my stash and I matted it on white and black cardstock. The inside "get well soon" sentiment is from Cindy Loo.

I made this card for the challenge at 365 Cards. The challenge today was "quite a pair." The rules were to use one blossom and one brad, and they must be used together; they must be in the center of your card; and anything else goes as long as you meet those requirements. I am also making this for the challenge at Paper Cutz. Their challenge this week is to make a card, layout or craft project with a digital, hand stamped, or Cricut image of a critter.

Thursday, September 16, 2010

Picture Frame

I've posted the engagement card and wedding card I've made for my cousin. This is part of my wedding gift to her. I have this cute picture of her and her fiance, so I wanted to make a picture frame for the picture. This way they can change out the picture if they want or keep it if they like it. I found the frame at Michael's for $2.00 and I painted it white. I then cut out the images of the flower and the swirl from white cardstock. They are both from Cindy Loo; the flower is cut at 3 1/2" and the swirl is cut at 2 1/4." I glued them onto the frame and then added a couple more coats of paint so it looks like the images are etched into the wood. I cut the quote out of black cardstock from Lyrical Letters. I used my Gypsy to weld the letters. Once I glued the letters on I used some glossy Mod Podge to seal the frame and the cardstock on it. Once the sealer was on I put some dark red flat-backed gems to add just a little punch of color into the "etched" designs. The colors are very similar to the colors I used on the wedding and engagement cards. I really like how it all turned out, I just hope she does as well. Enjoy!!

Monday, September 06, 2010

Peace

This is a 4 1/2"x6 1/4" card. I mostly used scraps from my stash for this one. It is nice to use up some of that stuff and make even a little bit of space for more. :) The blue striped piece is cut at 4 1/4"x6." The purple piece is 6"x2 1/2" and embossed with the Plum Blossoms folder. The pink piece is 1"x6" and I glittered it with some Martha Stewart glitter. I used Cindy Loo for the the doily and the sentiment. The doily is cut at 3," the navy blue was cut using the shadow feature and the light blue was cut normally. The sentiment, "peace," was cut at 1."

This one is for the color challenge at 365 Cards and I used the sketch from 2 Sketches 4 You. Hope you enjoy this one, I thoroughly enjoyed making it!