Showing posts with label Wedding. Show all posts

Friday, October 03, 2014

Rustic Wedding Card

My cousin is getting married on Saturday and this is the wedding card I made for her.


The card base is 5 1/2"x4 1/4" and is made from brown card stock.  I then cut some shimmery green card stock at 5 1/4"x4" and the patterned card stock at 5"x3 3/4."  The patterned card stock is actually from their wedding invitation.  The invite was inside a pocket style envelope that was made with this card stock, I took it apart and used it as the background paper.


The hearts are from the "Wedding" Cricut cartridge.  They are both using the blackout feature, the layer is the blackout-shift feature.  They were cut at 3 1/2" from a wood patterned card stock.  I inked the edges with walnut stain Distress Ink by Tim Holtz.  I used an alphabet stamp set called Chunky Alphabet from My Craft Spot for the sentiment.  It was heat embossed with ivory colored embossing powder.  The heart with the sentiment is adhered with foam tape.


I used the same sizes for the mats on the inside of the card as on the outside.  However, instead of the patterned card stock, I used ivory.  I then stamped my sentiment using stamps from Paper Smooches.  The "congratulations" and "best wishes" sentiments are from the Simply Said set.  The "ampersand" is from the Chit Chat set.


I also used more of the envelope card stock to create a pocket for a gift card.  I also cut more hearts for the inside.  These are the same ones as on the outside, from the "Wedding" cartridge.  These ones are all the blackout-shift feature.  The one on the pocket is 1," the one with the K is 1 1/4" and the one with the G is 1 1/2."  The G and K are also from the Chunky Alphabet set by My Craft Spot, and again they are heat embossed with ivory embossing powder.

Wednesday, March 28, 2012

Wedding Day

My mother-in-law needed a wedding card for this weekend, so I decided to use a couple of challenges to help me create one for her. Now I just hope she likes it, although it is more important that the bride and groom like it!
The card is 5"x7." I used a white cardstock for the base, rounded the corners, then added a silver layer with rounded corners. The black frame is from Elegant Edges, using the oblong frame feature. I used my Gypsy to size it to fit the card perfectly. I used a piece of striped cardstock from the Formal Affair Stack by DCWV to layer inside the frame. My bride and groom are from the Wedding cartridge, cut at 4." I embossed the black layer with the Swiss Dots embossing folder. I adhered them to the card with some foam tape and gave the bride a pearl necklace. For the sentiment, I used Cindy Loo and the frame feature to create the label. I stamped my sentiment, which is from My Pink Stamper, and added some silver Stickles to the flourish and glossy accents to the frame. I added some sheer ribbon under the frame and used pop-dots to adhere it all to the card. I matted the inside of the card with black, silver and white. I cut a 1" flourish from Cindy Loo, using the border feature and covered it with silver Stickles. I then stamped my sentiment, which is by Rubber Stampede.
I made this for the following challenges:
  • BBTB2: "Cindy Loo" - any flourish
  • Cardz TV: "Cricut Cardz Challenge" - frame
  • 365 Cards: "Day 26" - peace, love, and happiness

Friday, March 23, 2012

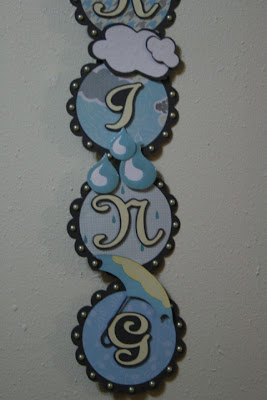
Spring Wall Banner

It was time to make another banner for the wall between my front door an window. This time I made one for spring! I didn't initally like how this was looking when I started. I chose the colors based on the inspiration of the patterned papers. They all came from The Spring Stack by DCWV. Once I had all the scalloped circles and letters put together I thought it looked a little dark, but once I added everything else to it I actually loved it!
The scalloped circles were cut at 4" and the inner circles are cut at 3 1/2," both are from Cricut Essentials (pre-loaded on the E2). The letters are cut at 3" from the Songbird cartridge. I used both the shadow and regular feature. I used foam adhesive to attach the letters to the scalloped circles. The sun and clouds are cut from Pooh and Friends, the rainbow is cut from Hello Kitty Greetings, The rain is from Indie Art, and the umbrella is from the Wedding cartridge. I added some Glimmer Mist to the sun, I embossed the cloud on the rainbow with the D'vine Swirls embossing folder, I flocked the clouds and added glossy accents to the rain for some added dimension. I finished off the banner with some pale yellow pearls and tied a bow around a loop of ribbon and attached it to the back of the banner to hang it on the wall.
I made this for the following challenges:

Monday, May 02, 2011

Girl's Baptism Card

My mom needed another baptism card, this time for a little girl. It is for the cousin of the boy getting baptised and since they are being baptised on the same day I thought I would make it the same way, just with pink instead of blue. You can see the boy's baptism card here. :) The card is 5"x5," made of white cardstock. I then cut some light pink cardstock at 4 3/4"x4 3/4" and some glittery white cardstock 1/8" smaller than the pink. I wrapped it all with some pink ribbon. I cut the cross at 4" from the Wedding cartridge and the letters at 1 1/4" from Winter Woodland. I used white cardstock to cut both the regular and shadow layers. I then used pink cadillac Glimmer Mist to spray the regular layers and give them a slight shimmer and color. I adhered everything to the card and finished it off with two white pearls. The letters are her initials. :) Enjoy!

Friday, April 22, 2011

Baptism Card

My mom recently asked me for a baptism card for my cousin's son. So here is my stab at a baptism card. I used sketch #111 from Card Patterns for the layout of my card. The card is 5"x5." I used white cardstock for the base, then cut some light blue cardstock at 4 3/4"x4 3/4" and some glittery white cardstock at 4 5/8"x4 5/8." I wrapped the card with some blue ribbon. The cross is cut from the Wedding cartridge at 4." I used white cardstock for both the shadow and the regular layer. I then sprayed the regular layer with sea glass Glimmer Mist. I used Winter Woodland for the monograms (those are his initials). I again used white cardstock for both the shadow and regular layers and then sprayed the regular layer with the same Glimmer Mist. I adhered everything down to the card base and finished it off with two large white flat-backed pearls. I think it works as a baptism card. Enjoy! :)


Sunday, April 17, 2011

Basket of Flowers

This is a 4 1/2"x6 1/4" card. I used a textured black cardstock for the base. I wrapped it with an aqua ribbon. The flower basket is from the Wedding cartridge, cut at 3" from kraft cardstock. I added some dimension to it with markers and chalk. I added a couple of gems to the blue flowers with my iRock and pop-dotted it to the card. The labels are Nesties, I embossed the aqua one with the Swiss Dots folder. I stamped my sentiment onto the kraft label and adhered them to the card. The rest of the flowers are Primas and I sprayed them with coral reef Glimmer Mist. I then added blue pearls to the centers of them and adhered them to the card and flower basket. I thought it would make a nice springtime birthday card. :)
I made this for the following:

Wednesday, February 02, 2011

Hearts

This card is 4"x6." I used some black and white patterned cardstock for the base. I cut a piece of black cardstock at 4 1/2"x2 1/2," pink cardstock at 4 1/4"x2 1/4" and some white cardstock at 4"x2." I layered them all together and then mounted them to the card. The four hearts in the corners are from the Wedding cartridge and the heart border is from Stamping. The two hearts at the top are cut at 1 1/2" and the two at the bottom are cut at 1 1/4." The heart border is cut at 1 1/2." I used the shadow feature on all of them. I adhered the corner hearts with pop-dots for some added dimension. I finished off the card with a sentiment stamp.
I made this for the following challenges:

Sunday, August 22, 2010

Wedding Wishes

I absolutely love how this card turned out. I wanted it to be simple, elegant and beautiful and I think I achieved that. This card is for my cousin who is getting married in early October. I just found out today and I immediatly sat down and created this for her.
I used today's "Super Sketchy Sunday" sketch from 365 Cards. I made the card 5"x5" out of plain white cardstock. I then cut the black cardstock 1/8" smaller. I then used some shimmery white cardstock and embossed it with the Lace embossing template from Fiskar's. I cut a small slit in the side of the card to thread the ribbon through and then I tied it in a knot. I added some flat back pearls to the ribbon for some more elegance. I then used the Wedding cartridge to cut the cross. I cut it at 2," first out of black cardstock using the shadow feature, then out of plain white cardstock and the final layer is cut out of the shimmery white cardstock. I stamped the inside with a wedding sentiment stamp from Inkadinkado. Enjoy!

Wednesday, August 18, 2010

Bookworm

Here is another one for today using the Create a Critter cartridge. I really do like that one, I guess it shows. ;) I made it for the ABC Challenge, which is "B is for Blue" and for Cuttlebug Challenges, which is to make something relating to or featuring books. I started off with the open book, which came from the Wedding solutions cartridge. It is cut at 3" and I then embossed the pages with the Script Texture embossing folder. I ran some ink over the script for added dimension. The stack of books is from Cursive 101 and cut at 3". I used a similar color paper as the background, I didn't want them to stand out too much, but I did ink the edges. The worm is from Create a Critter, cut at 4." Both layers of the worm are the same color paper, I just ran the top layer through my Cuttlebug with the Swiss Dots folder. The white paper on the inside is also embossed with the Script Texture folder and then I stamped "Happy Birthday!" over the top of the embossing with a stamp from my stash. I made it a birthday card because I already know the perfect bookworm to give this card to.