Showing posts with label Winter Frolic. Show all posts

Tuesday, December 16, 2014

Oh Christmas Tree

Today's project is a very Christmas-y gift bag.


The bag is from the "Once Upon a Princess" cartridge.  It is on page 65 of the handbook.  I cut it at 6.95"x11.52."  This is as large as I could cut it and still fit on a 12"x12" mat.  When it is all assembled it stands 4 11/16" tall.  I used card stock from the DCWV Evergreen Stack for the bag.  I used some ribbon I found in my stash to make the handles of my bag.


The snow at the bottom of the bag is hand cut from white card stock.  I then covered it in white glitter.  The tree is from "Winter Frolic," page 50 of the handbook.  It was cut at 4."  I covered the ornaments in Stickles, lime green and holly.  I also added a gem to the center of the bow.  The base of the tree was adhered with glue, but the rest of it is popped up on foam tape.


I used an ornament from "Holiday Cakes" to create my tag.  The image is on page 46 of the handbook and is actually supposed to be three ornaments.  I hid all the contours except the one ornament I wanted to use for my tag.  It was cut at 2.63."  I added some lime Stickles to the center star part of the ornament.


I made this for the following challenges:
Cupcake Inspirations: winter wonderland
BBTB2: ornament
Fantabulous Cricut: anything goes
CARDZ TV: create a gift bag
My Craft Spot: bags & boxes
Stuck On U Sketches: anything Christmas
Die Cuttin' Divas: carol inspired (Oh Christmas Tree)

Saturday, December 21, 2013

25 Days of Christmas - Gift Card Holder

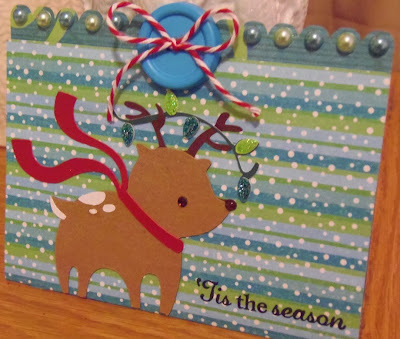
Today's project is a gift card holder.


I used "Cindy Loo" for the envelope, it is on page 77 of the handbook.  I cut it at 6 3/4."  This size perfectly holds a normal sized gift card.  I added some blue and green pearls to the top scallop.  I then tied some maraschino baker's twine, by The Twinery, through a blue button and adhered it on the tab that keeps the envelope closed.  The sentiment is a Fiskars stamp.


I used "Winter Frolic" for the reindeer.  It is on page 36 of the handbook.  I cut it at 2 3/4."  I covered the lights with firefly and aqua Stickles.  The nose is covered in glossy accents and I used a brown gem for the eye.  


For the inside of the envelope I cut a dark green mat at 2"x3 3/4," and a white mat at 1 7/8"x3 5/8."  I then used stamps from Scrappy Moms Stamps' "Winter Wishes" set for the sentiment and "Everyday Greetings" set for my to and from.

Wednesday, December 05, 2012

Santa Gift Bag and Tag

I love making fun wrapping for gifts and this one is no exception.  I made a cute little gift bag and tag for a Christmas gift to give to someone this year.
I had a plain white gift bag that I covered with some red cardstock, cut just smaller than the bag.  I ripped some white carsdtock into a strip to fit down the middle of the red cardstock to make it look like fur trim.  I cut a stirp of black cardstock to run across the bag.  Finally, I cut a yellow square with a square cut out of the middle.  When all these pieces are assembled they look like Santa's belly!  If you want to do this, just pick sizes that go with your bag size. 

For my tag I used Winter Frolic to cut the tag shape.  It is cut at 2," which is actually the width of this tag.  I then used Jolly Holidays for the pole.  It is cut at 2" as well.  I covered the snow on the tag with star dust Stickles.  I then used a stamp from My Craft Spot for the word "Christmas" on the sign.  It is supposed to say North Pole, but since my tag was so small the words didn't cut very well.  I decided to stamp something on it instead.  I also covered the back of the tag with white cardstock and stamped "To" and "From" using stamps from My Craft Spot.  This was a super quick and super easy one to make, but I think it is a really cute way to package some small gifts.
 
I made this for the following challenges:

Sunday, December 02, 2012

Ornament Shaped Card

I guess I am in a Winter Frolic mood, since this is my second card today that uses this cartridge!  :)  I used Cricut Craft Room and Winter Frolic to create this fun shaped card.  I welded two shadow images of the ornament together.  They were cut at 6 1/4" tall.  I then cut my layers and added them to the card.  I used limeade glitter by Martha Stewart on the green stripes, turquoise Stickles on the burst, and glossy accents on the ornament hanger.  I used a My Craft Spot die to cut the circles and also a stamp from the "Jingle All the Way" set for the sentiment on the front.  I used two thicknesses of foam tape to adhere the circles and added some turquoise baker's twine tied in a bow to the top of the circles.
I finished the inside as well on this one.  I cut the regular ornament shape again.  Then I used George and Basic Shapes to cut the ovals.  I then used another stamp from My Craft Spot for the inside sentiment.  This time the stamp came from the "Tis the Season" set.  Both sentiments are stamped in turquoise gem ink by Tsukineko.
 
I made this card for the following challenges:

Ski Bunny

Here is a fun, wintery card for you all!  This one is 5 1/2"x4 1/4" and I used a pale blue polka dotted cardstock for the card base.  I cut some dark blue cardstock at 5 1/4"x4" and then trimmed the bottom of it with a scalloped border punch.  I then cut another piece of the polka dotted cardstock at 5 1/8"x3 7/8" and some snowflake patterned cardstock at 4 7/8"x3 5/8."  I wrapped the layers with some white rick rack.  I cut the skiiing bunny from Winter Frolic at 3 1/2."  I flocked the white part and added glossy accents to the ski poles and all the black.  I used a stamp from My Craft Spot for the sentiment and matted it twice.  I adhered the bunny with foam tape.
I made this card for the following challenges:

Thursday, October 11, 2012

Perfect Sentiments: "Christmas Critters"

Hello everyone and welcome to the third day of our one year birthday/anniversary challenge celebration at The Perfect Sentiment!  We have four fun challenges planned for you that we will spread out over the next few days. We have sponsors who have donated generous prizes for each challenge and since we are doing this blog hop style, there are hidden prizes along the way. The good news is you will have 3 full weeks to complete all the challenges and blog hops. There will also be a grand prize that you will be eligible for if you complete all the challenges! You can see the Grand Prize and add you name to the inlinkz here once your complete all four of the challenges.
 
This challenge is "Christmas Critters"
The challenge: create a card with a sentiment for Christmas
The twist: include a critter somewhere on your card
 
Here is my card for the challenge:
 My card is 5 1/2"x4 1/4."  I used white cardstock for the base, then trimmed some red cardstock 1/8" smaller.  I printed a digi stamp from Floppy Latte's Digital Designs, called "North Pole," on some white cardstock.  I cut the cardstock down to 5 1/4"x4."  I colored in the image with my Spectrum Noir markers and stamped my sentiment from Scrappy Moms Stamps.  I then ran it through my Cuttlebug with the Swiss Dots folder to make it look like it was snowing.  I used Winter Frolic for both my snowman and mouse.  The snowman was cut at 2 1/2" and the mouse at 1 1/2."  I used red flocking powder on both scarves and the snowman's hat.  I also gave the snowman a Peachy Keen face.  I adhered them to the card with foam tape for some dimension.  I finished off the card with some Stickles - x-mas red on the bow of the package, holly on the tree, and gold on the pole's globe.  
 
Now head on over to Sam's blog to see what she created for this challenge.  Then be sure to link up your project at The Perfect Sentiment.  I can't wait to see what you create!

Wednesday, December 07, 2011

Christmas Mouse Card & Tag

Here is a matching card and tag, featuring a Christmas mouse! The card is 5"x5" and I used white cardstock for the card base. I rounded the corners with a punch. The large green polka dots is cut at 4 3/4"x4 3/4" and I rounded its corners as well. I cut another piece of white cardstock at 4"x4" and some small green polka dotted paper at 3 3/4"x3 3/4" and rounded both of their corners. The mouse in the present was cut from Birthday Bash at 3." I used some white flocking on the mouse, candy apple glitter (Martha Stewart) on the package lid, diamond Stickles on the bow, x-mas red Stickles on his ear, black enamel on his nose and black pearls for his eyes. I used green microbeads for the dots on the present. After I had finished putting them on the present I was grabbing them to put away when I knocked the bottle of them over and my floor was covered in green microbeads!! I got them all cleaned up, but what mess it was! I don't tend to use microbead a lot and I think I may have figured out why. ;) The speech bubble was cut using George and Basic Shapes at 1 1/4." I stamped my sentiment, which is from Scrappy Moms Stamps, then pop-dotted it to the card.


I also made a matching tag for the card. It is cut from Winter Frolic. I used my Gypsy to hide the cuts on the inner part of the tag. I cut the tag from white cardstock and the large polka dotted green paper. The mouse is cut at 2 1/2." I flocked the mouse, added diamond Stickles to the bow, pearls for his eyes and black enamel for his nose. The tag is pretty simple, but I like how it complements the card.


I made these for the following challenges:

Thursday, July 21, 2011

Ice Museum

This is a 12"x12" layout that I created for the scrapbook I am making for my mother. She came to visit us when we were living in Alaska, so I wanted to make her a scrapbook to remember her visit. It will be slow going, as I have all kinds of projects in the works, but I will get it done eventually. I promise, Mom!


I used a silver cardstock for the base of the layout. I then cut six 1/2" strips of white cardstock. I then ran them through my Xyron and sprinkled each one with glitter. I adhered them to the page, three going vertical and three going horizontal. My largest picture, which is the one in the middle, is 4"x6," and double matted with orange and purple cardstock. My other three are 3 1/2"x5" and single matted with purple cardstock. All the mats are 1/8" larger than the picture (and the previous layer in the case of the largest picture). The title is cut from Cricut Keystone at 1 1/2." I covered it all with glossy accents and use pop-dots to adhere part of it down. The igloo is from Create a Critter, cut at 3." The penguin is from Winter Frolic, cut at 2 3/4." I used Cuttin' Up to cut the martini glasses. The one the penguin is holding is cut at 1/2" and the larger one is 2 1/2." I covered the igloo with glossy accents as well. I used pop-dots to adhere the penguin and the martini glass. I also gave the penguin google eyes.


I made this for the following challenges:


  • BBTB2: Jolly Holidays penguing (I don't own it, so I used Winter Frolic)


  • Color Throwdown: rainbow color pallete


  • Fantabulous Cricut: cool treat (what could be a cooler treat, literally and figuratively, than an apple martini served in a glass made entirely of ice)


  • The Paper Variety: every color of the rainbow