Sunday, December 16, 2012

Gilded Ornament

This card is 5 1/2"x4 1/4" and made from white cardstock.  I then cut some red argyle cardstock at 5 3/8"x4 1/8."  I cut three strips of ribbon at different lengths and wrapped them around the left side of the card.  I stamped my sentiment, which is from My Pink Stamper, on white cardstock and placed it over the left side of the ribbons.  I also added some red gems to it.  I cut the ornament at 3 1/2" from the Christmas cartridge.  I covered the red layer in garnet glitter by Martha Stewart.  I adhered the ornament using foam tape.

I made this for the following challenges:

Adorable Snowman

Isn't this snowman just the cutest?!  I think he is and here are the details on the card:
The card is 5"x5" and made of white cardstock.  I cut some green snowflake cardstock (from DCWV's Merry Christmas Stack) at 4 3/4"x4 3/4."  I used Create a Critter 2 for all my cuts.  The snowflakes are cut at 3" and then covered with sugar cube glitter by Martha Stewart.  The snowman is cut at 3" as well and I used Cricut Craft Room to hide his face.  I then gave him a Peachy Keen face.  I flocked his mittens and scarf and added glossy accents to the buttons and his eyes.  I paper-pieced the pipe since it stamped off his face a little.  I added him to the card with pop-dots.  I then stamped my sentiment on some white cardstock and cut it into a banner.  I then wrapped the banner around a toothpick and added that to the card with some pop-dots.
 
I made this for the current sketch challenge at Peachy Keen.

Friday, December 14, 2012

Christmas Stocking

One more for you tonight and I really like this one too!
 I created this cute shaped card using Jolly Holidays and Cricut Craft Room.  I welded two 5" stockings together in Cricut Craft Room and cut them out.  I then cut all my layers.  I flocked the white parts of the stocking and added x-mas red Stickles to the red balls.  I adhered the white parts of the stocking and the balls with foam tape.  I love the look of the plaid cardstock and didn't add the stipes that the cut is supposed to have.  The plaid cardstock is from the Evergreen Stack by DCWV.  I used a stamp from Scrappy Moms Stamps for the sentiment and matted it with some dark green cardstock.  I also adhered the sentiment with foam tape.

 I made this after being inspired by the current photo on {PIN}spirational Challenges.


Snowman Card

I am almost done making all the Christmas cards I need to send out to my friends and family.  Here are just a couple more:
I used a premade card from DCWV for the card base.  I cut some blue cardstock at 3 1/2"x2 1/4" and some white cardstock at 3 3/8"x2 1/8."  I stamped the snowman onto the white cardstock with embossing ink and heat embossed it with some dark blue embossing powder.  I then used some stamps from My Craft Spot for the sentiments. 

These ones were clean and simple, and I actually made two of each style.  That means I have four more to add to my pile to send off.
 
 
I made these for the following challenges:

Wednesday, December 12, 2012

Jingle Bells

All right, this is my final one for the night!
The card is 5 1/2"x4 1/4" and the fold is at the top on this one.  I used a red polka dotted cardstock for the card base.  I cut some white cardstock at 5 1/4"x4," some shimmery green patterned cardstock at 5 1/8"x3 7/8," and some joy patterned cardstock at 5"x3 3/4."  I cut some shimmery green patterned cardstock at 4 1/8"x2 7/8" and some more white cardstock at 4"x2 3/4."  I stamped my sentiments in the two opposite corners.  The stamps are from My Craft Spot, the "Jingle All the Way" set.  I used Jolly Holidays for the bell.  It is cut at 4 1/2."  I flocked the bow and added glossy accents to the light green parts of the bell, then adhered it to the card with pop-dots.
I made this for the "bell" challenge going on over at Fantabulous Cricut.

Ho Ho Ho

Got another one done tonight...yea!!
I made this card 4"x9" and used a green polka dotted cardstock for the card base.  I cut some white cardstock at 3 3/4"x8 3/4" and used it to mat a 3 5/8"x8 5/8" piece of striped cardstock.  I used Christmas Cheer to cut my "ho ho ho" ornaments.  They were cut at 5."  I used foam adhesive to adhere them to the card and added glossy accents on the ornament holders.  All the patterned cardstock came from the Evergreen Stack by DCWV.
I made this for the ornament/bauble challenge going on at BBTB2.

Hot Cocoa

I am in a card making fenzy right now because I am a few cards short of all the people on my Christmas card list.  So here is the first in a bunch that I am going to be crazily making the next few days!
The card is 5 1/2"x4 1/4."  I used a white cardstock for the card base.  I then trimmed some dark blue cardstock at 5 1/4"x4" and some snowflake patterned cardstock at 5 1/8"x3 7/8."  I cut some dark brown cardstock at 4 1/2"x3 1/4" and some more dark blue at 4 3/8"x3 1/8."  I ran the dark blue cardstock through the Cuttlebug with the Swiss Dots embossing folder.  I used Christmas Cheer for the mug and steam.  It is cut at 4."  I added glossy accents to the hot cocoa and star dust Stickes to the steam.  I then used a snowflake punch for both snowflakes.  I added midnight blue Stickles to the snowflake on the mug.
For the inside of the card I cut some dark blue cardstock at 5 1/4"x4" and white cardstock at 5"x3 3/4."  I used some stamps from My Pink Stamper for the sentiments.  They are stamped using coffee bean ink by Tsukineko.  I trimmed them down and matted them with some dark brown cardstock.
I made this for the following challenges:

Perfect Sentiments: "Anything Goes with Christmas"

Who's ready for another Perfect Sentiments challenge?  I hope you are, because I know I am!  Here are the details of this week's challenge.
The challenge: include a Christmas sentiment on your project
The twist: create anything you want as long as it has a Christmas theme and sentiment
Here is what I created for this week's challenge:
I got a gold charger plate at work and decided to dress it up.  I used some white, red holographic, and green holographic vinyl to create the sentiment and images on the plate.  The sentiment is from the Phrases cartridge, cut at 3."  The holly are from A Quilted Christmas and cut at 2."  It is really pretty simple, but I absolutely love the look of that holographic vinyl.

Now it is your turn!  Head on over to The Perfect Sentiment, check out what everyone else has created for even more inspiration and link up your creation.  I can't wait to see what you create!

Tuesday, December 11, 2012

Gingerbread Ornament

Here is an adorable Christmas ornament for you today.  And, it is super easy to make!  :)
I used Create a Critter 2 for the gingerbread man.  I opened it in Cricut Craft Room so that I could hide the face.  I wanted to be able to stamp a face on it so I didn't want the face cutting out.  I cut out one regular and one flip, with one white layer.  I then adhered the three layers together with the white one in the middle so the "icing" would show through.  I inked the edges lightly with some tea dye Distress Ink by Tim Holtz.  I used a red metallic cardstock for the buttons and bows.  I used star dust Stickles on the icing parts for a little more sparkle.  I used a Peachy Keen face for the face and colored in the nose and hearts with a red Zig pen.  I punched a hole in his head (which actually sounds fairly violent) and ran some red and white baker's twine through.  I tied the ends of the twine off and hung it on the tree.  Quick, easy, and soooo cute!
 
 
I made this for the following challenges:

Elf Gift Box & Card

I just loved the Christmas cracker box I made for my brother the other day that I wanted to make another one to have on hand.  I don't know if it will get used this year, but it is such a cute box and fairly easy to assemble so I just had to make another.  I made a matching card for it as well.

The box is cut using Tags, Bags, Boxes, & More 2 at 9."  I assembled it, but didn't glue the ends, I just tied them with ribbon.  That way if it does get used I can just untie the ends, slip in the gift and tie them back up!  The green striped cardstock is from the Evergreen Stack by DCWV.  I used Jolly Holidays for the little elf.  He is cut at 2 1/2."  I pieced him all together and added green flocking to his overalls and hat.  I also used diamond Stickles on his hat trim and gave him a Peachy Keen face.  The face didn't have a nose, so I gave him one by using one of the eyebrows.  The presents in his wagon are also from Jolly Holidays and cut at 1."  The presents are glued onto the box and the elf was adhered with pop-dots.  I used two stamps from My Craft Spot for the sentiments on the box.

The matching card is 5 1/2"x4 1/4."  I used white cardstock for the base.  I trimmed some metallic red cardstock at 5 1/4"x4" and then more green striped cardstock at 5 1/8"x3 7/8."  The metallic red cardstock is from the Gilded Orchard Stack by DCWV.  I cut a strip of metallic red cardstock at 4"x2 1/2" and ran it through the Cuttlebug with one of the embossing folders from the Christmas Set.  I used Jolly Holidays for my elf.  He is cut at 3."  I used green flocking on his overalls and hat and diamond Stickles on his hat trim again.  I also added glossy accents to his shoes and buttons.  I used x-mas red and green Stickles on the lights.  He also has a Peachy Keen face and is adhered to the card with pop-dots.  I used another stamp from My Craft Spot for the sentiment and matted it with some more metallic red cardstock.  I finished off the front of the card with red gems, three on each side.
For the inside of the card I cut some metallic red cardstock at 5"x3 3/4" and some white cardstock at 4 3/4"x3 1/2" and adhered them in the card.  I then cut a strip of metallic red cardstock at 4"x1 1/4" to mat the green striped cardstock, which is cut at 4"x1."  I adhered it near the bottom of the inside of the card, just above where you would sign.  I then used a My Craft Spot stamp for the senitment.
 
I made these for the following challenges:


Monday, December 10, 2012

Penguin Card

This is the card I made for my brother for Christmas.
The card is 5 1/2"x4 1/4" and made from black cardstock.  I then cut some metallic red cardstock at 5 1/4"x4" and white cardstock at 5"x3 3/4."  I embossed the white cardstock with a Darice snowflake embossing folder.  I cut a strip of metallic red cardstock at 4 1/2"x 1 1/2" and trimmed the ends into a banner.  I used a Spellbinders Nestabilities for the black lacy circle and the white regular circle.  I used Create a Critter 2 for the penguin.  I decided to use the bow tie from the gingerbread man instead of the scarf.  I used some black pearls for his eyes and added diamond Stickes to the white parts of the hat.  I used a stamp from My Craft Spot for the sentiment and trimmed the cardstock into a banner.  The penguin and the circle are adhered with foam adhesive.
I made this for the following challenges:

Sunday, December 09, 2012

Christmas Gift Box

My brother is a helicopter pilot in the Navy and is currently in Bahrain.  He is going to be there over Christmas, so I have to send his presents over there.  Since he isn't home I decided to get him a gift card so he can use it there or save it for when he gets home, whatever is easier.  But I am a crafter, so I got busy making a fun gift box for the gift card.  I think it turned out pretty cool!
I used Tags, Bags, Boxes, & More 2 to create the gift box.  It was cut at 9."  I assembled it all except one side, wrapped the gift card in some tissue paper and slipped it in the box, and finished off the final side.  I then tied the ends with some dark green ribbon.  The cardstock I used for the box came from the Evergreen Stack by DCWV.  I used Christmas Cheer for the snowman.  It is cut at 2 1/2" using the blackout feature.  I adhered all the pieces of the snowman together, then used some black pearls for eyes and buttons.  I cut a strip of white cardstock at 4 1/2" wide, then ripped it to create the look of drifted snow.  I used a stamp from My Craft Spot for the sentiment and adhered the snow to the box.  I added my snowman, adhering it with foam tape for some added dimension.

 
I made this for the following challenges:

Friday, December 07, 2012

Floral Birthday

I have another birthday card today.  This one is for my mother-in-law.  Her birthday is coming up soon, and when I asked my husband what her card should look like or have on it, he just said, "flowers."  So, this is what I came up with:
The card is 5 1/2"x4 1/4."  I used ivory cardstock for the card base, then cut some coral cardstock at 5 1/4"x4" and some mint green cardstock at 5 1/8"x3 7/8."  I ran the mint green cardstock through my Cuttlebug with the Swiss Dots embossing folder.  I cut a strip of floral cardstock at 4 1/4"x1 1/2," some more mint green cardstock at 4 1/4"x1 5/8," and some coral cardstock at 4 1/4"x1 3/4."  I adhered those three stips together and adhered that to the left side of the card.  I used Bloom to cut my floral frame.  It is cut at 3."  I placed some ivory cardstock behind the opening in the frame, then stamped it with the sentiment.  I used pop-dots to adhere the leaves and flowers to the frame and then used some more pop-dots to adhere the frame to the card.  I finished off the card with some large yellow gems for the centers of the flowers, because it just had to have a little bling!  Simple, but quite pretty.  Enjoy!
I made this for the challenge at The Friday Mashup, which is to follow the sketch and use some bling.

Wednesday, December 05, 2012

Santa Gift Bag and Tag

I love making fun wrapping for gifts and this one is no exception.  I made a cute little gift bag and tag for a Christmas gift to give to someone this year.
I had a plain white gift bag that I covered with some red cardstock, cut just smaller than the bag.  I ripped some white carsdtock into a strip to fit down the middle of the red cardstock to make it look like fur trim.  I cut a stirp of black cardstock to run across the bag.  Finally, I cut a yellow square with a square cut out of the middle.  When all these pieces are assembled they look like Santa's belly!  If you want to do this, just pick sizes that go with your bag size. 

For my tag I used Winter Frolic to cut the tag shape.  It is cut at 2," which is actually the width of this tag.  I then used Jolly Holidays for the pole.  It is cut at 2" as well.  I covered the snow on the tag with star dust Stickles.  I then used a stamp from My Craft Spot for the word "Christmas" on the sign.  It is supposed to say North Pole, but since my tag was so small the words didn't cut very well.  I decided to stamp something on it instead.  I also covered the back of the tag with white cardstock and stamped "To" and "From" using stamps from My Craft Spot.  This was a super quick and super easy one to make, but I think it is a really cute way to package some small gifts.
 
I made this for the following challenges:

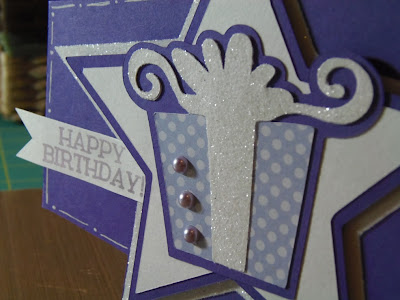
Purple Birthday Card

My cousin's birthday is coming up in a little over a week, so I decided to make her a birthday card and this is what I came up with:
I used Birthday Bash for the shaped card base.  I cut it at 5 1/4."  I then cut the layer, which is the white star.  I covered the star with some white glitter and adhered it to the card base.  I then cut two more stars.  One out of purple cardstock at 4 3/4" and another one out of white cardstock at 4 1/4."  I adhered the white star to the purple one, then adhered the purple one to the card with pop-dots.  The present is from Cricut American Alphabet, cut at 2 1/2."  I covered the white tag in glitter and added three purple pearls to the package.  The polka dotted cardstock is from the Nana's Nursery Baby Boy Stack by DCWV.  I used a Peachy Keen stamp for the "happy birthday" sentiment.  I stamped it on a strip of white cardstock and hand cut it into a banner.  I then adhered one end of it under the purple star.  I finished off the card with a little doodling around the edges, using a white gel pen.

I made this for the following challenges:

Perfect Sentiments: "Let It Snow"

Time for another challenge with The Perfect Sentiment!  Here is our challenge for you today:
 
The challenge: use a sentiment for the occasion of your choice
The twist: incorporate some form of snow on your card
 
Here is the card I made for this challenge:
The card is 5 1/2"x4 1/4."  I used white cardstock for the base.  I then cut some glittery black cardstock at 5 1/4"x4" and some more white cardstock at 5 1/8"x3 7/8."  I rounded the corners on all layers.  I embossed the white layer with the Large Snowflakes embossing folder, making sure to leave the bottom portion un-embossed for my sentiment.  I used a stamp from My Craft Spot, from the "Tis the Season" set, for the sentiment.  I wrapped the white layer with some white ribbon, just above the sentiment and adhered the whtie layer with foam tape for more dimension.  I used Winter Lace for the snowflake, which is cut at 3 1/2."  I adhered it to the card with foam tape and added a glittery white sticker to the middle.
 
Here is the inside, with another sentiment from My Craft Spot, this one from the "Merry Christmas" set:
 
Now it is your turn to make something for the challenge.  Come on over to The Perfect Sentiment, see what my DT sisters have created and then link up your creation.  I can't wait to see what you create!

Sunday, December 02, 2012

Ornament Shaped Card

I guess I am in a Winter Frolic mood, since this is my second card today that uses this cartridge!  :)  I used Cricut Craft Room and Winter Frolic to create this fun shaped card.  I welded two shadow images of the ornament together.  They were cut at 6 1/4" tall.  I then cut my layers and added them to the card.  I used limeade glitter by Martha Stewart on the green stripes, turquoise Stickles on the burst, and glossy accents on the ornament hanger.  I used a My Craft Spot die to cut the circles and also a stamp from the "Jingle All the Way" set for the sentiment on the front.  I used two thicknesses of foam tape to adhere the circles and added some turquoise baker's twine tied in a bow to the top of the circles.
I finished the inside as well on this one.  I cut the regular ornament shape again.  Then I used George and Basic Shapes to cut the ovals.  I then used another stamp from My Craft Spot for the inside sentiment.  This time the stamp came from the "Tis the Season" set.  Both sentiments are stamped in turquoise gem ink by Tsukineko.
 
I made this card for the following challenges:

Ski Bunny

Here is a fun, wintery card for you all!  This one is 5 1/2"x4 1/4" and I used a pale blue polka dotted cardstock for the card base.  I cut some dark blue cardstock at 5 1/4"x4" and then trimmed the bottom of it with a scalloped border punch.  I then cut another piece of the polka dotted cardstock at 5 1/8"x3 7/8" and some snowflake patterned cardstock at 4 7/8"x3 5/8."  I wrapped the layers with some white rick rack.  I cut the skiiing bunny from Winter Frolic at 3 1/2."  I flocked the white part and added glossy accents to the ski poles and all the black.  I used a stamp from My Craft Spot for the sentiment and matted it twice.  I adhered the bunny with foam tape.
I made this card for the following challenges: