Showing posts with label Art Nouveau. Show all posts

Saturday, August 02, 2014

Poppy


This shaped card was created with the "Elegant Edges" and "Art Nouveau" cartridges.  The card base was created by welding two of the shadow (shift) features of the shape on page 29 of the "Elegant Edges" handbook.  It is sized at 5 1/4."  I then used the oblong (shift) feature for the black layer, again at 5 1/4."  The white layer is the same as the black, just 5."


The poppy image is from "Art Nouveau," page 22.  It is cut at 4 1/2."  I inked the edges of the lighter green leaves with peeled paint Distress Ink.  The flower is inked with tea dye Distress Ink and the black center is flocked.  I also added a little dimension by adhering the front petal with foam tape at the top part.


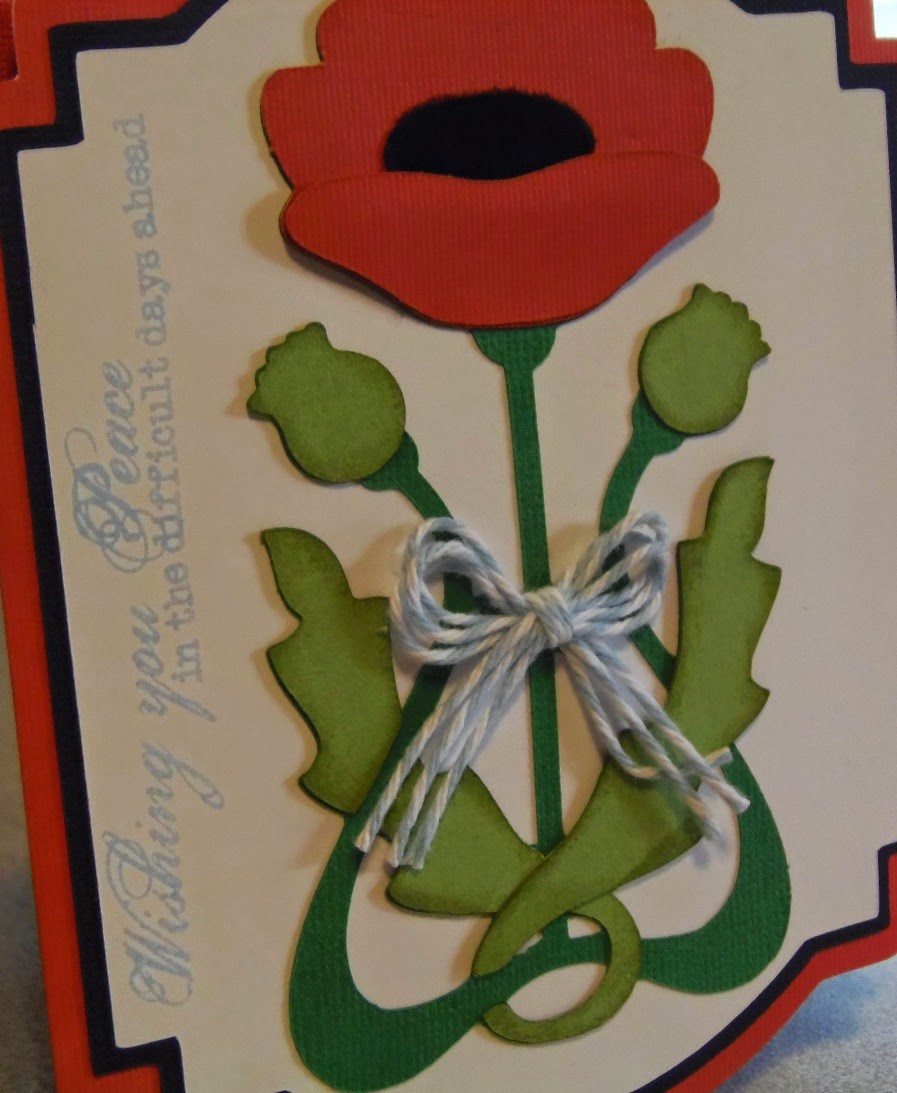
The sentiment is from My Craft Spot, the With Deepest Sympathy set.  It is stamped with summer sky ink by Tsukineko.  I tied three pieces of baker's twine into a bow and added it to the flower to finish off the card.


I made this for the following challenges:
My Sheri Crafts: shaped cards

Color Throwdown: photo inspiration (colors)


Friday, August 01, 2014

Nautical Name Sign

My friends had a baby boy in March and have a sort of nautical/underwater theme for him.  I made a name sign to go in his room, since that is what I do.


I used separate 8"x10" canvases for each letter and the image.  I will also be doing two more images, once I settle on two that I like and work with the silhouette idea I went with.  I just really wanted to use the "Art Nouveau" jellyfish.  I was stung by a jellyfish when we were in Belize for their wedding.


The letters are from "Extreme Fonts," the Little League feature.  They were cut at 8."  The jellyfish is from "Art Nouveau," page 61, and was cut at 7."

Thursday, July 31, 2014

Moth Shaped Card

I love shaped cards and thought that the moth in the "Art Nouveau" cartridge would lend itself very nicely to a shaped card.  I don't think I was wrong.


The moth is on page 55 of the handbook.  I cut it at 4 3/4" for all the layers.  I used Cricut Craft Room to weld two shadows of the image together to create the card base.  I then cut another shadow and used that for the card top for all my layers.


I covered the dark orange pieces with some dark orange glitter, then covered them in diamond glaze.  The lighter accent pieces are covered with tattered rose Distress Stickles.  The sentiment is one I found in my stash.  It is stamped in rich cocoa ink by Tsukineko.

Wednesday, July 30, 2014

Nouveau Bee


Today's card is 4 1/4"x5 1/2."  I used dark brown card stock for the card base.  The hexagonal print mat is 4"x5 1/4."  I wrapped the bottom part with some dark brown ribbon and tied a bow with the same ribbon.


The circle is cut at 2 1/2" and is from the "Cricut Craft Room Basics" digital cartridge (basic-shift and shadow-shift).  I popped it up with foam tape.


The bee is from the "Art Nouveau" cartridge (page 56).  It was cut at 2 1/2."  I pieced it all together and added it to the circle.  I then covered the ivory part of the wings with star dust Stickles and the brown stripes with cinnamon Stickles.  The yellow parts are covered with glossy accents and the eyes are brown gems.  The entirety of the wings are also covered with glossy accents.

The sentiment is from my stash and stamped in rich cocoa ink by Tsukineko.


I made this for the following challenges:

BBTB2.: Cricut cut bee

Die Cuttin' Divas: anything goes

Cupcake Inspirations: cupcake photo inspiration (ribbon)

Sunday, July 27, 2014

Heron

I decided to make some new wall art for my bathroom.  This is what I made:


I used "Art Nouveau" for the heron image.  It was cut at 7 1/2" wide, and whatever its corresponding height would be.  I inked the light blue wing layer with summer sky ink by Tsukineko, then popped it up for dimension.  I flocked the dark blue wing layer and also popped it up.  I added glitter and diamond glaze to the bill and used a dark grey enamel dot for the eye.


Sunday, May 25, 2014

FCCB Guest Designer Wrap-Up

For the past week I was a guest designer at the Fantabulous Cricut Challenge Blog.  Today's post is my wrap-up for the past week.

I just want to thank everyone at the FCCB for allowing me the opportunity to be a guest designer for their fantastic challenge blog.  I've always enjoyed entering their challenges as a participant and to be asked to give some inspiration for a challenge was pretty awesome.

Anyways, on to the project for the day:


I made a large framed picture of a swan.  I used the "Art Nouveau" cartridge for the swan.  I also used this cartridge for my guest designer project.  You can see that card here.    The frame is matted for a picture of 11"x14."  Since I don't have any patterned card stock that is larger than 12"x12," I used two pieces of patterned card stock, overlapped, as my background.  The swan is on page 64 of the handbook and it was cut at 8 1/4."  I popped up all layers of the wing, except the final cream layer.  I added a little color to the mat with a purple marker.


Monday, May 19, 2014

Guest Designer at Fantabulous Cricut Challenge Blog

This week I have been asked to be a guest designer at the Fantabulous Cricut Challenge Blog.  I have been asked to design something for this week's challenge, which is "May Flowers."  So, create something with flowers.  Here is my card:


I made it for Mother's Day, and gave it to my mother-in-law, who happens to be a gardener.


I used Cricut Craft Room to create this card.  I welded two shapes from the "Elegant Edges" cartridge to create my card base.  The shape I used can be found on page 27 of the hand book.  I cut it all at 5," the pale shimmery purple is the shadow feature, and what is welded to create the base.  The dark purple is the basic layer on shift and the glittery white is the basic layer.


The pansy is from "Art Nouveau" and can be found on page 31 of the handbook.  I cut it at 4" and it fit perfectly inside the white circle of the card base.  I adhered the base to the card with foam tape.  I also adhered part of the flower's layers with foam tape.  The yellow layer and the dark purple layer were adhered with foam tape, for some added dimension.


I finished off the inside of this card as well.  I cut the dark purple and white layers again, still at 5."  I then cut the pansy again, this time at 2."  I only cut the full flower, not the stem or buds.  This flower was adhered down, no foam tape.  The sentiment is from My Craft Spot, the "Happy Easter" set.  I stamped it in dusty concord Distress Ink by Tim Holtz.

I hope you decide to join in with Fantabulous Cricut's "May Flowers" challenge.  I can't wait to see what you create!

Tuesday, April 02, 2013

Perfect Sentiments: "Sympathy/Thinking of You"

Here is The Perfect Sentiment challenge for this week:
The challenge: create a card with a sentiment of sympathy or thinking of you
Just make sure to remember that your sentiment needs to be on the front of your card.
Our sponsor this week is Robyn's Fetish.  The winner will receive 5 free digis.

Here is the card I made for our challenge.  I hope it provides some inspiration.
My card is 5 1/2"x4 1/4."  I used white cardstock for the base and cut some pink and green mats for my card.  The pink mat is 5 3/8"x4 1/8."  The green mat is 5 1/8"x3 7/8." 

I cut some white cardstock at 4 7/8"x3 5/8."  I stamped my sentiment is a pink pearlescent ink in the lower right hand corner.  The sentiment is from My Pink Stamper.  I then embossed the white cardstock with the D'vine Swirls folder.

The flower is from Art Nouveau.  I cut it at 3 1/2."  I then used a Martha Stewart punch to cut some butterflies.  I folded up their wings and adhered them just by their bodies.  It gave the card some nice dimension.

Make sure to check out the rest of the inspiration provided by the design team at The Perfect Sentiment.  Then be sure to link up your own card.  I can't wait to see what you create!


Thursday, October 25, 2012

Jungle Love

This layout is going to be part of an 8"x8" scrapbook that I am putting together to go with my friends' wedding album.  After the wedding and all of the beach pictures the photographer took some pictures of the bride and groom in the jungle.  I wanted to incorporate those pictures, but they didn't work in the wedding album I made, so I am making an 8"x8" album to go along with it.  I think it should work well since there aren't many of the jungle pictures.  This will be the first page in that album.
It is 8"x8" (obviously) and I used some patterned cardstock from the Anthology stack by Colorbok.  I matted the photo, which is 4"x6," with some tan cardstock also from the Anthology stack.  It is cut at 4 1/4"x6 1/4."  I used Art Nouveau for the word "Jungle."  I welded it using Cricut Craft Room and cut it at 1 1/4" from some glitter cardstock.  I used Country Life for the "love" banner.  It is cut at 1 1/2."  I glued it to some twine and wrapped the twine around the page.  I used Life is a Beach for my leaves.  The palm leaves are cut at 2 1/2" and 2" and I flipped the 2 1/2" leaf.  I cut the tall vine leaf at 6" and also flipped it.  I adhered the small palm leaf and the word "Jungle" to the page with foam adhesive.

I used the sketch from Stuck On U Sketches to create this layout.

Saturday, May 19, 2012

Hummingbird Clock

Well, I have been having some computer difficulty, okay it's more like computer failure. My computer froze on me the other day and now it won't even boot up. It is slightly frustrating to say the least. I am using my husband's computer to check email, but I don't have access to my normal stuff. I hope we get this computer thing figured out...soon!
I got some crafting in this afternoon and made a clock for my new craft room. We are remodling our basement and in doing so I get a new craft room, which is exciting. It is slow going, but we are working on it so I know it is coming. Anyway, this is the clock that I will hang on my wall. My current craft room doesn't have one, so this will be nice. I got the clock at Target, it was on clearance for about $3. I then used Art Nouveau to spruce it up a bit. The numbers are all cut at 1" and I used my Gypsy to weld the 10, 11, & 12. The hummingbird is cut at 5." I popped up the wing and used a purple pearl for the eye.

Wednesday, April 25, 2012

"B"ee Wall Decor

Wow...it has been about a week and a half since I last posted a project! School has been taking up so much of my free time. I have had a lot of tests recently for my EMT class and I have been working on all my skills necessary for passing the national registry exam. I am nervous about it, but I have been doing well, so I think I will be okay. I have two more weeks of classes, then I will be done and hopefully able to craft and post more regularly. I have really missed crafting on a regular basis. Anyways, that aside, here is the project I made today:
I have been wanting to make something like this for a long time now. I just didn't have an exact idea in mind. All I knew was that I wanted our monogram, the letter "B" and some bees. Well, the challenges at Bitten by the Bug 2 and My Sheri Crafts were the perfect incentive I needed to create my wall decor. I used a patterned background paper, but wanted a little more texture and definition behind my features, so I created a honeycomb background using Garden Soup and my Gypsy. The letter "B" is cut at 8," the bee on the lower left is 4" and the bee on the upper right is cut at 3 1/2." I used a lot of pop-dots and foam adhesive for my bees. I then put it in a white shadowbox frame and hung it on my wall. I love it and so does my husband!
Supplies used:
  • Patterned paper: K&Company
  • Cardstock: Core'dinations and The Paper Company
  • Cartridges: Letter Envy - letter "B," Art Noveau - bees, Garden Soup - honeycomb
I made this for the following challenges:

Friday, March 02, 2012

Friday Mashup Guest Designer

I am so honored to have been asked to be a guest designer for the month of March at the Friday Mashup challenge blog. If you have never seen their challenge blog, check it out, they are always so fun! So, now onto the challenge:


Challenge #48

So here is the "Mashup" Challenge :

Make a project for "St. Patrick's Day".

Or Make a project using "at least 2 Punches".

Or "Mash it Up" and create a project for "St. Patrick's day using your Punches

This is the project that I made...a St. Patrick's Day banner! I think it turned out so cute!! I didn't have any punches that were just screaming to be used, so I just went with the St. Patrick's Day project. I started with the shamrocks, they are from Paper Doll Dress Up, cut at 3." The letters are cut from Art Nouveau at 2." The pots of gold are cut from Simply Charmed at 5." The leprechauns are also from Simply Charmed and also at 5." I cut all pieces from chipboard first, then layered my papers on. I used pop-dots to adhere both the letters to the shamrocks and the shamrocks to the pots of gold. I used glossy accents on the pots (it takes FOREVER for that much surface are to dry, by the way) and also on the buckles of the leprechauns' hats. I also used some bling for their buttons, yellow Stickles on the gold and gave the leprechauns some slightly rosy cheeks with chalk. I punched some holes on each side of each piece and added some eyelets, orange on the leprechauns and black for the pots. I linked them all together using jump rings, which are primarily used in jewelry-making. I used some green ribbon to tie off each end of the banner.

I hope you enjoyed my project and I hope that you decide to join along in this challenge!