Tuesday, December 23, 2014

Christmas T-Shirt

Since I have to work on Christmas Eve I thought I would make a Christmas t-shirt to wear to work instead of my normal JoAnn's polo shirt.  You know, to get into the spirit.

I got the t-shirt at work and used my Cricut to cut some iron-on vinyl to dress it up.


The caribou is from "Teresa Collins Holiday Silhouettes," cut at 9" from glittery black iron-on vinyl.  The snowflakes are from "Teresa Collins December 25th."  The smallest one (upper left) is cut at 3," the middle sized one (bottom) is 3 1/4," and the largest one (upper right) is 3 1/2."  The bow is from "Rock Princess."  It can be found on page 45 of the handbook.  I only used the layer 1 (shift) feature and cut the bow at 2.15."

Here is the back of the t-shirt:
The sentiment on the back of the t-shirt is also from "Teresa Collins December 25th."  It was cut at 7."

I also added a little something to the sleeve:

This is also from "Teresa Collins December 25th."  It was cut at 2 1/2."

I am entering this in the following challenges:
BBTB2: anything Christmas
Scrappy Moms Stamps: anything shiny or glittery


Wednesday, December 17, 2014

Silver Snow

Here is a nice wintery card for you today:


The card is 5 1/2"x4 1/4."  I used white card stock for the base.  The dark silver piece of card stock is 5 1/4"x4."  I stamped snowflakes from the Fresh Snow set, by Paper Smooches, all over the front in silver ink.  I then heat embossed them with silver embossing powder.


The sentiment and banner are both from My Craft Spot.  The banner is metal die from a set called Ribbon Banners - Straight.  The sentiment is from the Winter Wonderland stamp set.  I stamped it in starlite black ink by Tsukineko.  The ends of the banner are adhered down with glue dots, but the middle is popped up with pop-dots.

I made this for the following challeges:
CASology: cue card - "snow"
The Friday Mashup: create a project using the colors silver & grey, with some embossing


Tuesday, December 16, 2014

Oh Christmas Tree

Today's project is a very Christmas-y gift bag.


The bag is from the "Once Upon a Princess" cartridge.  It is on page 65 of the handbook.  I cut it at 6.95"x11.52."  This is as large as I could cut it and still fit on a 12"x12" mat.  When it is all assembled it stands 4 11/16" tall.  I used card stock from the DCWV Evergreen Stack for the bag.  I used some ribbon I found in my stash to make the handles of my bag.


The snow at the bottom of the bag is hand cut from white card stock.  I then covered it in white glitter.  The tree is from "Winter Frolic," page 50 of the handbook.  It was cut at 4."  I covered the ornaments in Stickles, lime green and holly.  I also added a gem to the center of the bow.  The base of the tree was adhered with glue, but the rest of it is popped up on foam tape.


I used an ornament from "Holiday Cakes" to create my tag.  The image is on page 46 of the handbook and is actually supposed to be three ornaments.  I hid all the contours except the one ornament I wanted to use for my tag.  It was cut at 2.63."  I added some lime Stickles to the center star part of the ornament.


I made this for the following challenges:
Cupcake Inspirations: winter wonderland
BBTB2: ornament
Fantabulous Cricut: anything goes
CARDZ TV: create a gift bag
My Craft Spot: bags & boxes
Stuck On U Sketches: anything Christmas
Die Cuttin' Divas: carol inspired (Oh Christmas Tree)

Sunday, December 14, 2014

Merriest Wishes Tag

Today's project is a quick and simple tag.  I needed a tag for a Christmas present for my sister-in-law.  I had a gift bag that was the perfect size for her gift.  So I whipped up a tag that coordinates perfectly.  The bag is in blues, whites and silvers with snowflake patterns on it.  Here is the tag:

I used stamps and metal dies from My Craft Spot to create this tag.  The two scalloped circles and the plain circle are all from the Tiny Doilies Metal Dies set.  The snowflakes are from three different stamp sets: Think Snow, Mistletoe, and Stampin' Around Christmas.  They are stamped in silver and the sentiment is stamped in black.  The sentiment is from the Jingle All the Way stamp set.


For the back I used another plain white circle from the Tiny Doilies Metal Dies set.  I then used stamps from the Stampin' Around Christmas set for the "to" and "from."  I finished it off with a loop of blue and white baker's twine.


Wednesday, December 10, 2014

'Tis the Season for Shopping

Today's project is another gift card holder.  Well, the cut file is actually for a treat holder, but I am going to use it as a gift card holder.


This one is in the shape of a shopping cart.  The shopping cart is a cut file form SVG Cutting Files, it is called Shopping Cart Treat Holder.  


I made the holder all "Christmas-y" by adding a wreath and some lights.  Both the wreath and lights are from the Silhouette Store.  The wreath is called holly wreath and is by Sweet Afton (#22264).  I just did not use the berries.  The lights are from a set called Christmas light strands and is by Miss Kate Cuttables (#69589).  The wreath is just over 2 1/2" square and the light strands are just over 1" tall.  The bow is from a file called evergreen wreath by Snapdragon Snippets (#36508).  The bow is a little larger than 3/4," I basically sized it to fit the wreath.


I added some red flocking to the light red part of the bow.  The lights all have glossy accents on them for a little added shine.  I added some glittery red brads through the middle of the wheels.


The tag is from a My Craft Spot metal die set called Tiny Tags Metal Dies.  I stamped it with a sentiment from Tiny Tags Christmas.  The tag is tied on to the cart with gold shimmer twine from The Twinery.

I am entering this into the current challenge st Scrappy Moms Stamps, which is to use a tag.

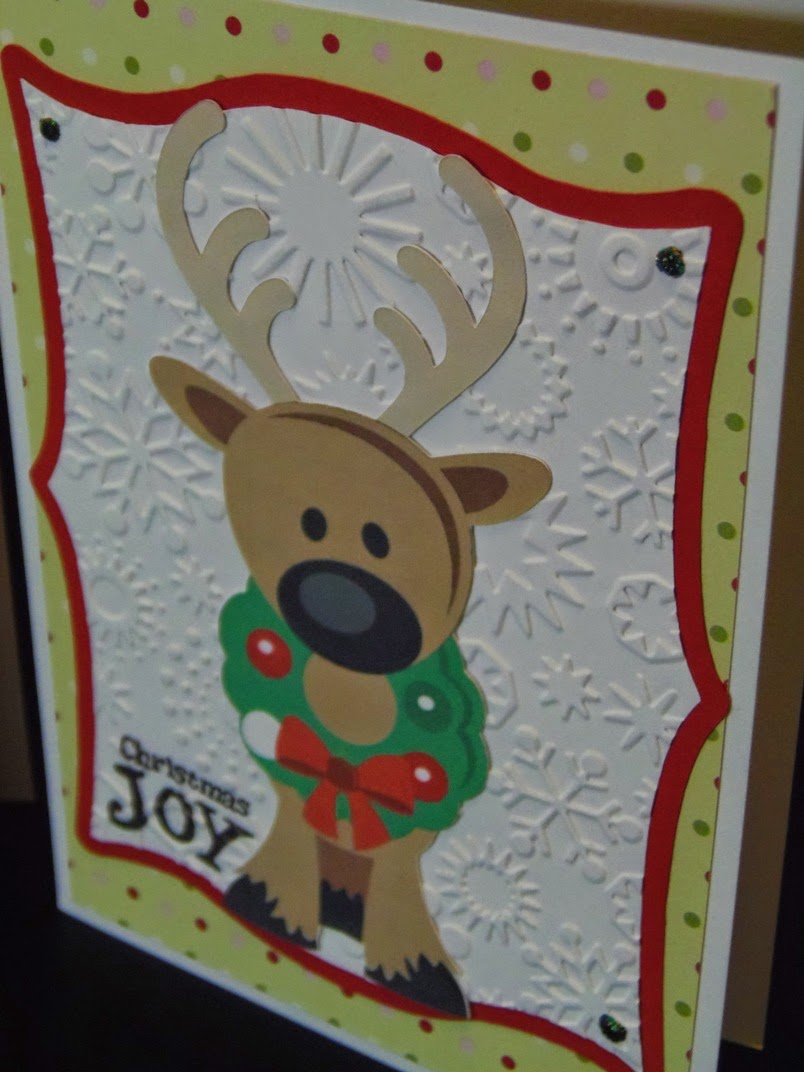
Christmas Joy

Today I am sharing with you the card I decided to make for sending out to my family and friends.  I went with two variations of the same design.  The only thing I changed up were the colors of the backgrounds, but otherwise I used the same images and sentiments.


The card is 4 1/2"x6 1/4" and made from white card stock.  I used a polka dot patterned card stock for the background, it is cut at 4 1/4"x6."  The patterned card stock is actually double sided, so one side is the red and the other side is the green.  I loved both sides, which is why I made two variations of this card.

The image of the reindeer is from the Silhouette Store.  It is called Reindeer with Christmas Wreath and is by PPbN Designs (#52530).  I used the print and cut feature to make this simpler to create since I made 60 of these cards.  It would have taken so much longer to piece everything together, so the print and cut feature is fantastic for something like this!  The reindeer is just shy of 5" tall.


I used "Elegant Edges" to create the shaped label on which the reindeer is placed.  It is found on page 51 of the handbook and cut at 5," using the oblong and shadow-shift features.  I used a stamp from My Craft Spot for the sentiment, it is from the Merry & Bright set, and stamped all the labels before I embossed them.  They were embossed with a Cuttlebug folder called Snowflakes.


I used the same patterned card stock for the inside as well.  They are cut at 4"x5 3/4."  I used the same label as the front, just the basic feature so that it cut square.  This time it is cut at 3."  The sentiment is from My Craft Spot again, this time the Christmas Chalkboard set.  I finished off both the front and inside with some Stickles, 

I am entering this into the current challenge at Tuesday Throwdown.  The challenge is a family appropriate Christmas card or project.  I figure what is more family appropriate than the card I am sending out to all my family?


Monday, December 01, 2014

Winter Wine Wrapping

Today's project is a fun way to wrap a bottle of wine!


The wine box is from the Silhouette Store.  The cut file is called "Wine Bottle Gift Box" and is by Megan Hardy Designs (#50699).  I did not change the size, just cut it as is and it fits most standard wine bottles.  It cuts slots for ribbon and I ran some white ribbon through them to seal off the package.


I used "Winter Wonderland" for the tree and "When I Was a Kid" for the scalloped label on which I placed it.  The tree was cut at 5" and the label is 5 3/4"x3 1/4."  I turned off the aspect ratio to get that size for the label.  I ran the silver layer of the label through the Cuttlebug with the Diamond Tree embossing folder.  I added some glittery white brads to the corners of the label and adhered it to the box with foam tape.


The label is part of the box cut.  I added a snowflake I cut with the "Holly and Ivy" cartridge.  It was cut at 2 3/4" and adhered to the tag with foam tape.  I also added a silver gem brad.  The sentiment and "to," "from" are from stamps by My Craft Spot.  They both come from the White Christmas set.


To finish off the box I made a paper bow for it with the "3D Bows" digital cartridge.  It was cut at 8."

I made this for the following challenges:
BBTB2: Christmas tree
Fantabulous Cricut: Christmas project without red or green
My Sheri Crafts: Christmas tree
The Friday Mashup: weather inspired project with metal embellishment
Stuck on U Sketches: into the woods

Sunday, November 30, 2014

Cowboy Penguin

Over the weekend I got a Cricut Explore and this is the first thing I have made using it.

 A cute shaped card for a birthday.


The card base is made from the map image on "Life's a Party," found on page 44 of the handbook.  I hid the cuts that make the trail and cut it twice, at 5," to create the card base.  I also used the pens to draw the word "wanted" on the scroll.  I used the "Old West" cartridge and the flourish feature for the font.  I then colored in the letters afterwards.


The penguin and cowboy hat are stamps from Peachy Keen Stamps.  The penguin and cowboy hat are from the new Faceless Cowboy Hat Snowman & Penguins.  I paper pieced the bandanna and hat band.  I then used some Distress Markers by Tim Holtz to color in the feet (spiced marmalade) and hat (vintage photo).  The face is from Happy Penguin Couples Face Assortment.  I used more Distress Markers on the eyes (tumbled glass) and beak (spiced marmalade).  I then used a white gel pen to accent the eyes.  I added some pale gold gems to the hat band.  I adhered the penguin with foam tape.


I used the Peachy Keen Holiday Sentiments set for the sentiment on the inside of the card.

I made this for the current challenge at Die Cuttin' Divas, which is shaped cards.


Friday, November 28, 2014

It's Sweater Weather

I have another gift card box for you today!


This one is meant to look like a sweater tucked into a box.  I cut it with my Silhouette Cameo, using a cut file by Kristen Magee called "Argyle Sweater Gift Card Box" (#35378).  I did not alter the size in any way, just cut it as is.


I wanted the packaging to be simple, kind of old school.  I wrapped the top of the box with red and white baker's twine and then tied two pieces in a bow to finish off the box.


I made the argyle sweater look like a Christmas sweater.  I used paper I had in my stash and covered the dark red diamond and the collar of the sweater with dark red flocking powder.  


You lift the sweater up to reveal the gift card.