Showing posts with label Jasmine. Show all posts

Saturday, February 09, 2013

Simple Love

I guess today is all about clean and simple cards for me!  Here is another one:
 
 The card is 5 1/2"x4 1/4."  The card base is made from white cardstock.  I cut a grey mat at 5 3/8"x4 1/8" and a white one at 5 1/4"x4."  I used Jasmine to cut the word "love" at 3 1/4."  The hearts are from George and Basic Shapes, cut at 3/4."
 
That is all there is to this one, nothing fancy, but since I think this is the card I am going to give my husband for Valentine's Day, it doesn't need to be fancy.
 
I made this for the following challenges:

Wednesday, July 13, 2011

More Christmas in July

Here is another Christmas in July card, this time a shaped card. I used Preserves for the card base, it is the label for the loquat cut. I used two of the labels, at 5 1/2" wide and welded them together on my Gypsy to create the card base. I then cut a smaller version in white as my next layer. I embossed the white layer with my Cuttlebug and the Sizzix snowflake embossing folder. I wrapped the top and bottom with some red mini rick-rack. I then ran some red and white twine around it to "hang" my mittens on. The mittens are cut from Joys of the Season at 2 1/2." The red cuff on the mitten is flocked with some red flocking powder. I added two white buttons to the top and bottom, over the rick-rack. I added some white pearls to the curves of the card and finished it off with some doodling on the mittens.
For the inside of the card I cut a red label at 5 1/2" wide, the same as the card base. I then cut a white label slightly smaller. I left it on the mat and used my Cricut markers to add the sentiment. I used my Gypy again to line it all up. The sentiment is from Jasmine, and is 2 1/2." A nice wintery card in the middle of July! Enjoy!! I made this card for the following challenges:
365 Cards: "Day 134" - buttons, rick-rack, pearls
BBTB2: Joys of the Season - mittens
Celebrate the Occasion: shaped Christmas card
Cooking with Cricut: Cricut markers or pens
Scrappy Moms Stamps: Preserves cartridge

Wednesday, May 18, 2011

Graduation Album

I guess these are usually called "word books," but since this creates the number 2000, I will call it a number book. It is a mini album for pictures from my graduation and grad party. I found these pictures in an old album and thought they needed something a little more special.


I created the book using my Gypsy. I welded the numbers to squares and rectangles. The numbers came from Robotz and the squares/rectangles the make up the pages are from George and Basic Shapes. The book is 5" tall and made from chipboard. The grad cap on the front is from Locker Talk, cut at 2 1/2." I flocked the tassle and used glossy accents on the button. The title is Cricut Keystone, cut at 1" for "Central" and 3/4" for "graduation." I then embossed it with Swiss Dots. Each page was covered with red cardstock and the numbers were covered with white glitter cardstock. I used an EK Success punch for the star border and all the small stars. The one larger star is a Fiskars punch.This title is from Jasmine, cut at 1 1/2."

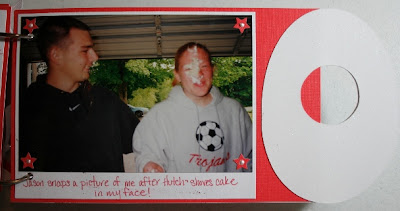
I added Stickles to the stars on this page.

The banner and font are both from Birthday Bash. The banner is cut at 1 1/4" and the font at 3/4." I then used some white glitter on the font.

I made this for the following challenges:


Wednesday, December 15, 2010

Christmas Tree Card

This card was made using the sketch from Tuesday Morning Sketches, I just flipped it on its side. I also used the theme challenge from Cricut Cardz, which was to make a Christmas card with a mini banner on the front of it. The final challenge that I made this for was at 365 Cards. Their challenge was to use texture in three different ways: 1-heat or dry embossing, 2-glitter or flocking, 3-fabric or lace.
The card is 4 1/2"x5 1/4." I embossed the card base using the polka dots folder and my Cuttlebug. I cut a circle at 3 1/2" using a circle cutter and the red rectangle is cut at 3 3/4"x3 1/2." The white rectangle is 1/4" smaller than the red one and then I used a border punch from EK Success on one edge. I adhered them all to the card. I used a stamp and glue pad to stamp the tree onto the white rectangle. I then used some Martha Stewart aquamarine crystal glitter on the stamped image. I used some fabric twine to tie around the folded edge of the card for my third type of texture. I used some foil paper and cut the banner from it using Christmas Cheer and the fit to length feature. The letters are from Jasmine and cut at 1/2," using the real dial size feature. I added to silver brads to each end of the banner and attached it to the card with pop-dots.

Tuesday, September 07, 2010

Think BIG

The challenge today at 365 Cards is "All Creatures Great and Small." The challenge is to use one small creature and one large creature on your card. I also just found a challenge that the Cricut Couple is hosting, which is to make a project with a cat theme. I figured I could combine the two and this is what I came up with, a little cat looking in the mirror and seeing a tiger.

The card is 5"x7." I used some paw print paper that I found in my stash for the matting. It is cut 1/4" smaller than the card base. The ovals were cut from George, the brown one at 5" with a 4 1/2" smaller one inside, to create a frame and the white one was cut at 5" as well. The tiger is from Animal Kingdom and cut at 4." The cat is also from Animal Kingdom and cut at 2 1/2." I used a marker to add some shading and added Stickles for the eyes and glossy accents on the nose. The word "dream" was cut from Jasmine at 1" and the word "BIG" was cut from Cricut Keystone at 1 1/4." I used my Gypsy to strech the letters to make them wider. The ribbon is from my stash.