Showing posts with label Wearable Art. Show all posts

Saturday, July 02, 2016

Patriotic T-Shirts

My brother's wedding is on the Fourth of July.  The day before, they are having their rehearsal dinner and it is a red, white, and blue theme.  I made my husband and I some t-shirts to wear for the fun times: 


I cut the striped United States, using the "Stand and Salute" cartridge, from freezer paper and ironed on the image.  I then painted in the stripes red.  Once they were dry I ironed on the negative of the image and the stripes that had been removed from the image.  I then painted it blue.  Once it was all dry I ironed on the sentiment, which was cut with silver glitter iron-on vinyl.  I used the "Holidays Through the Year Iron-On" cartridge for the sentiment.


I tie-dyed my husband's shirt.  I did the bulls-eye technique where you gather it up in the middle and put your rubber bands or zip ties (which is what I used) where you want them.  You then add the color to each section.  So, in my case the outer section was blue, the next red, the next was left white, then red again, and I did the rest of the shirt in blue.  Once it was all dried and cleaned, I cut a star from the "Hannah Montana" cartridge, sized to fit in my blue circle, from freezer paper and ironed on the negative.  I then painted the star with white fabric paint.  Voila!  Captain America tie dye t-shirt!


Thursday, June 30, 2016

Headbands

My brother is getting married in a few days, Fourth of July actually, and I got a dress for the wedding, it is black with red accents.  When I was trying to figure out what I was going to do my hair (I am not a "hair" person), I remembered that I had a plain red headband.  However, it isn't the exact shade of red and looks to plain, so I spruced it up!

Before:

After:


I used to black lace and fabric glue to make it a little more unique.

The day before the wedding they are doing a red, white, and blue themed dinner so I thought I would make a headband for that as well.  This is just a cotton fabric I picked up at work (JoAnn Fabric & Crafts).  The pattern says to use two different fabrics to make it reversible, but I just used the same fabric on both sides.


It is held on with a piece of red fold over elastic.


Wednesday, May 04, 2016

May the Force Be With You

In honor of May the 4th, I decided to do some Star Wars crafts.  I know that I am eking it out a bit on timing, but I had to do some studying this morning and only got to crafting in the afternoon.  And the t-shirt took a while to dry.


I found a super cool image of Kylo Ren from a side view and turned it into a cut file.  I then cut it out at about 14" tall from freezer paper.  I used that as a stencil and ironed it on to a black t-shirt.  I then used grey fabric paint to paint the shirt.  It looks more white in the photo, but the light wasn't great.


I then made a cute birthday card featuring BB-8.  The card is the Trapezoid Card Base from SVG Cutting Files.  The sand is from the "Best of Pixar" Disney Cricut cartridge.  I inked all the edges with vintage photo Distress Ink, then popped up the front layer.  I also trimmed the edges to fit the curve of the card.  BB-8 is an svg that I got from Krafty Nook.  Doesn't he look awesome?!  I used foam tape on his head for a little more dimension.


The sentiment is from the Robotastic stamp set by Jaded Blossom.

Wednesday, October 28, 2015

No-Sew Halloween Costume

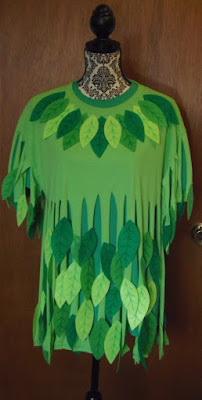
We are allowed to wear costumes at work on the weekends in October and on Halloween.  However, you have to have either bought the costumes there or made them using supplies from there.  Since, I am not much of a sewer, especially of apparel, I looked for something made from a t-shirt.  I can usually modify a t-shirt easily enough.  I found this link on Pinterest and thought "I could make that."  And, a few weeks later (since homework and studying take precedence, I can only work on it occasionally), here is my result:


I cut up the t-shirt from the bottom up and did the sleeves the same way.  I then traced two different sized leaves onto felt and cut them out.  I would have loved to use the Cricut or Silhouette, but when I started to work on the leaves I realized that I didn't have enough stabilizer to iron-on the felt.  So, I did it the old-fashioned way.  Let me tell you, that was a lot of cutting!  I then drew the veins on the leaves with marker.  I used a hot glue gun to adhere them to the strips of the shirt.  I used the smaller leaves on the sleeves, and both sizes everywhere else.

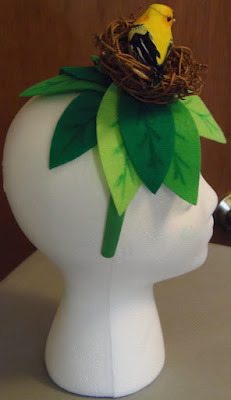
I also made a headband to go with the shirt.


I hot glued leaves to the headband.  I then used a piece of wire, already attached to the bird, to attach the bird to the nest.  The nest came on a twig, but I removed it first.  I then hot glued the nest to the headband.

I got all my supplies at work, JoAnn Fabrics & Crafts.  Since it took me so long to create, I will only be able to wear it on Halloween, but I think it will be worth it.  


Tuesday, December 23, 2014

Christmas T-Shirt

Since I have to work on Christmas Eve I thought I would make a Christmas t-shirt to wear to work instead of my normal JoAnn's polo shirt.  You know, to get into the spirit.

I got the t-shirt at work and used my Cricut to cut some iron-on vinyl to dress it up.


The caribou is from "Teresa Collins Holiday Silhouettes," cut at 9" from glittery black iron-on vinyl.  The snowflakes are from "Teresa Collins December 25th."  The smallest one (upper left) is cut at 3," the middle sized one (bottom) is 3 1/4," and the largest one (upper right) is 3 1/2."  The bow is from "Rock Princess."  It can be found on page 45 of the handbook.  I only used the layer 1 (shift) feature and cut the bow at 2.15."

Here is the back of the t-shirt:
The sentiment on the back of the t-shirt is also from "Teresa Collins December 25th."  It was cut at 7."

I also added a little something to the sleeve:

This is also from "Teresa Collins December 25th."  It was cut at 2 1/2."

I am entering this in the following challenges:
BBTB2: anything Christmas
Scrappy Moms Stamps: anything shiny or glittery


Thursday, October 16, 2014

A Halloween Getup

My latest Halloween craft isn't really a costume, more just some wearable art with a Halloween theme.

I made a t-shirt, a bow tie, and a hat (which can only be worn when attached to a headband).


First the t-shirt:

I used a black t-shirt and some white iron-on vinyl.  I used the "skeleton rib cage" cut file (#14073), by Silhouette, from the Silhouette store for my image.  I cut it at about 11" tall and ironed it on to the t-shirt.


Now the bow tie:

The bow tie was created with some felt and card stock.  The Silhouette store cut file for the bow tie is "3d blood drips with hand bow" and is by Jamie Cripps (#67647).  I cut it without the tails to make it a bow tie.
  The hand in the center of the bow is 3."  The largest part of the bow is about 2" tall and was cut from felt.  The cut file shows the drippy part of the bow cut in red to look like blood, but I went with green to look like slime.
  I covered the green drippy slime with glossy accents and the white part of the skeleton hand with crackle accents.


Finally, the hat:

The hat is made from card stock and a few embellishments I had on hand.  The cut file for this one is called "mourner's 3d top hat," and is by Snapdragon Snippets (#67665).  I re-sized the file a little so the hat wouldn't be quite as large.  This one is about 6" tall when assembled, the original cut file makes the hat about 8" tall.
I made it out of black card stock.  The hat band is from the Bewitched Stack by DCWV.  Both the lime and fuchsia card stock came from the Halloween Countdown Stack, also by DCWV,  I inked up the edges of the hat with some cloud white ink by Tsukineko.

The felt flowers are from Jolee's Boutique and the white brads are from Spare Parts.  I also covered the skull in crackle accents.  There is also a bow for this hat, but I decided not to use it with all the other embellishments I had added.  Now, I just have to attach it to head band so that it can be worn with the rest of the outfit.

I am entering this in the current Stuck On U Sketches die cut challenge, which is to use a top hat, tea cup, tea pot, or an "Alice in Wonderland" theme.  I obviously wen with the top hat.