Showing posts with label B is for Boy. Show all posts

Wednesday, July 22, 2015

Elephant Shaped Card

Today I have a cute shaped card for you:


I used the "B is for Boy" cartridge to cut the elephant shape at 5" wide, which makes it a little shy of 4 3/4" tall.  I pieced it all together, using a dark grey enamel dot for the eye.  I cut the elephant shape twice.  I adhered them at the top, scoring the back side 1/2" down to fold open.  I also cut a straight line across the bottom of the ball so that it would stand on its own.


The sentiment is a stamp from Jaded Blossoms, the So Many Birthdays set.


I made this for the following challenges:
BBTB2: shaped card
Color Throwdown: color combination

My Sheri Crafts: child's birthday

Wednesday, June 18, 2014

Airplane!

Here is a fun card for you today!


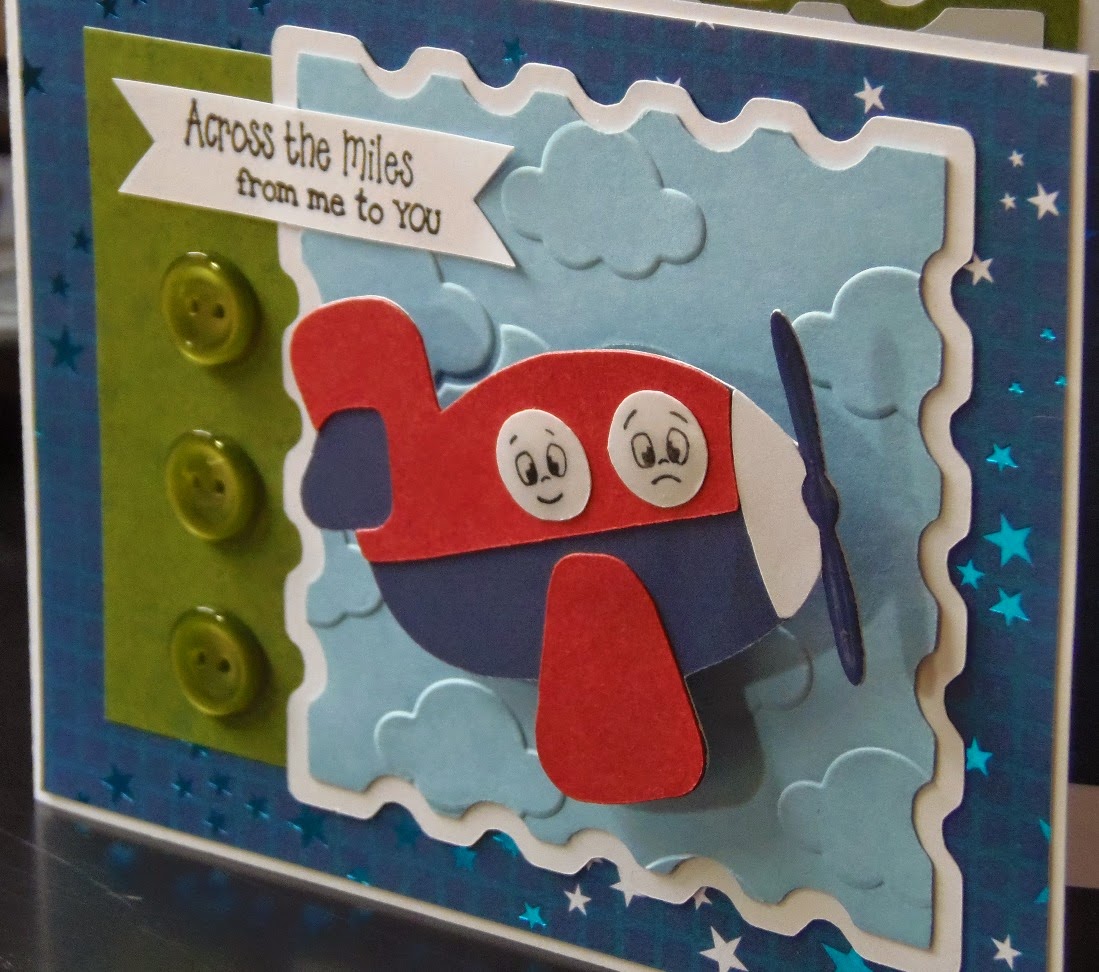
The card is 4 1/4"5 1/2" and I folded it at the side instead of top, which is usually how it is folded.  The card base is white card stock.  The gridded star paper is from the Cosmic Whammy Stack by The Paper Studio.  It was cut at 4 1/8"x5 3/8."  The green paper is 3 1/4"x4."  The stamp shape is from the "Elegant Edges" cartridge (page 37).  I cut the shadow at 3 1/2" from white card stock.  The regular stamp shape was cut at 3 1/4" from a pale blue card stock.  I then embossed it with the Clouds embossing folder by Darice.


The airplane is from the "B is for Boy" cartridge (page 72).  I cut it at 2 1/4."  I then added a couple of faces in the plane's windows.  They are from The Cornies Face Assortment by Peachy Keen.  I covered the windows and plane prop with diamond glaze for a little shine, then adhered the plane with an action wobble.


The sentiment is also from Peachy Keen.  This one is from the February 2014 Stamp of the Month kit.  I stamped it on some white card stock that I had trimmed into a banner shape.  I then finished off the front of the card with some green buttons.


For the inside of the card I cut a strip of the star card stock at 3 1/4"x5 1/4."  I then cut the stamp shape again.  This time the shadow was cut out of the green paper at 4" and the regular shape was cut at 3 3/4" from white card stock.  I used two different stamps to create the sentiment.  The "sending" is from the February 2014 Stamp of the Month kit and "birthday wishes" is from the Birthday Sampler set by Paper Smooches.

I made this for the following challenges:

Cupcake Inspirations: for the boys


My Craft Spot: fancy edges (stamp edge)

Die Cuttin' Divas: things with wings

Peachy Keen: photo/color inspiration (colors-all but the pink)

Tuesday, April 12, 2011

You Rock!

This is a cute little pop-up card I made today. The card is 4 1/2"x6 1/4." I used a dark brown for the card base. I then cut a piece of cream cardstock at 4"x5 3/4" and rounded the corners. I embossed it with a Fiskars texture plate, called basketweave. I adhered it to the card base, then wrapped it with an orange ribbon. My mushroom is cut from Sugar & Spice at 2 3/4" and the hedgehog is from B is for Boy, cut at 1 3/4." I used pop-dots to adhere the hedgehog. I stamped the senitment in coffee bean ink by Tsukineko. On the inside I cut some more of the dark brown cardstock at 8"x5 3/4" and created my pop-up part. I also cut some cream cardstock at 4"x5 3/4" and adhered it to the inside of the card. The fox is cut from Birthday Bash at 2 1/2." I gave him a Peachy Keen face and adhered him to the pop-up part of the card. I stamped my sentiment, which is from Fiskars, in coffee bean ink by Tsukineko.
I made this for the following challenges:

Sunday, February 20, 2011

Zebra Thank You

Click here for the Sensational Scenes Blog Hop!!
This card was created using Saturday's sketch at 365 Cards. The card is 5 1/2"x4 1/4" and I used the zebra print cardstock for the card base. I then used a Nestabilities for the label. I then cut some black cardstock at 2 9/16"x3 7/8." I used a corner punch to round out the corners. I then ran it through my Xyron machine to give it some adhesive and then covered it with black glitter. I then cut some white cardstock 1/8" larger than the black cardstock and I rounded its corners as well. I adhered the rectangles to the card base and then used some foam adhesive to adhere the label to the card. I stamped my sentiment onto the label, the stamp is by Fiskars. The zebra is from B is for Boy and cut at 2." I pop-dotted it onto the label. I then wrapped the card with a black and white polka dotted ribbon and added three white pearls to the center to finish it off.

Friday, January 14, 2011

Flaunt It Fridays Challenge #7

The challenge this Friday is to use the skull and crossbones on the Mini Monsters cartridge, on page 65 of the handbook, in a non-Halloween project. The first thing I thought of for this cut was to make something pirate related. As I mulled it over more this layout idea came up and I put it all together. It actually turned out pretty much how I envisioned it, which is always nice. This layout is 12"x12." I used Debbie Mumm paper for the background. I cut the map paper in the background from Old West, at 8 1/2." I then inked the edges in gingerbread ink by Tsukineko. I left room for a 4"x6" photo. The blue paper is also Debbie Mumm, cut at 4 1/4"x6 1/4" and the tan paper is cut at 4 1/2"x6 1/2" and I also inked it with the gingerbread ink. The little pirate boy is from B is for Boys and he is cut at 5." The sentiment, "Little Buccaneer," cut at 1 1/2," and "Treasure Map," cut at 1," is from Blackletter. I welded the title on my Gypsy before cutting it out. The palm tree is cut at 2," and the tikis are cut at 3/4," 1" and 1 1/4" and are all from Life is a Beach. The treasure chest is also from Life is a Beach, cut at 2." I cut the gold from Simply Charmed. I used my Gypsy to figure out what size would work for the treasure chest. I cut them out twice and put them in the chest. The skull and crossbones is from Mini Monsters and cut at 1 1/2." I finished off the layout with doodling on the map (for the trail) the tikis, the chest and the title. I added some yellow Stickles to the gold to make it shine.I hope you enjoyed my little layout and I can't wait to see what you come up with for this week's challenge! Come on over to Flaunt It Fridays to play along!

Wednesday, November 03, 2010

Baby Boy Dinosaur

I made this cute little card the other day for my cousin's baby shower. I feel pretty limited when I don't have all my usual craft tools. I miss my embossing machine and folders, my glitter and Stickles and different embellishments. The only paper I have on hand now is some solid paper that my mother-in-law had in her stash, she is a quilter not a papercrafter. I made this card using what I have on hand, which isn't much in my opinion. I think it still turned out cute, it is just really simple compared to what I usually do. It is a 5"x5" card, using brown cardstock for the base. I used some green cardstock to cut a square 1/4" smaller than the brown. I then cut two circles at 4 1/2" and 4 1/4," using George and Basic Shapes and some brown and yellow cardstock. The dinosaur is from B is for Boy and cut at 4." I used Mickey Font for the "baby boy" sentiment. Baby is cut at 3/4" and boy is cut at 1," both are cut out of black cardstock.

Sunday, August 15, 2010

I'm NUTS about you!


Managed to make a second card today. This one is inspired by this week's Cupcake Inspirations. It is a wonderful cupcake tree with squirrels, owls, trees, mushrooms, flowers and some wonderful colors. The layout is using Card Patterns sketch #77. I used Give a Hoot for the tree and the cute little kissing squirrels. The acorns are from B is for Boy. The base paper for the card and the blue cloud paper is from the Flower Shower stack from DCWV. I can't believe I almost didn't buy this stack, I have been using it so much. I did wait until it went on clearance though. ;) The inside says, "I'm NUTS about you!" I thought it would a cute litte card for an anniversary or Valentine's Day or something like that.

Saturday, July 03, 2010

Baby Shower Gift Bag


My friend just had her baby on the first day of summer. She is one of the rare few who waited to find out the sex, so when I bought the gift bag I didn't know if it was a boy or a girl. I got yellow because I knew I could make it work either way. Her baby shower is on the 4th of July, because that is when her family will finally be able to come on up here to Alaska (from Wisconsin). I used the the Cricut Lite cartridge, B is for Boy. I love this cartridge because there are so many cute cuts on it. And I really like how the bag came out, plus I finished it just in time. Yeah me!