Wednesday, October 31, 2012

Christmas Holly

I have another Christmas card to add to my pile for this year.
 
This one is 5"x5."  I used some teal patterned cardstock from the Peppermint Forest Stack by DCWV for the card base.  In fact, all the patterned cardstock is from that stack.  My next layer is some white cardstock that is 4 3/4"x4 3/4."  I then cut some striped cardstock at 4 5/8"x4 5/8."  I cut some more of the teal cardstock 4 1/4"x4 1/4."  The polka dotted cardstock is cut at 4 1/8"x4 1/8."  I cut more teal cardstock at 3 3/8"x3 3/8."  My final layer is white cardstock cut at 3 1/4"x3 1/4."  I used two different stamps for my sentiment.  I stamped them both in pearlescent  poppy ink by Tsukineko.  I don't know who the stamps are from though.  I added three light green gems under the word "merry."  I used Teresa Collins - December 25th for the holly cut.  I cut it at 3" and used Cricut Craft Room to hide the cuts in the center of the holly and berries.  I used another patterned cardstock for the holly and some gilded red cardstock for the berries.  I used pop-dots to adhere the holly to the card for some added dimension.
I made this for the following challenges:


Perfect Sentiments: "Think Pink for Christmas"

Time for another Perfect Sentiment challenge, and while I hope everyone enjoyed our Birthday/Anniversary celebration it is time to get back to our regular format for challenges, so here it is:
 
"Think Pink for Christmas"
 
The challenge: create a card with a sentiment for Christmas
The twist: use some pink on our card in honor of the last day of Breast Cancer Awareness month
 
Here is what I came up with for this challenge:
My card is 5 1/2"x4 1/2."  I used kraft cardstock for my card base.  I rounded the two bottom corners and inked the edges with some white ink.  I used a stamp from Close to My Heart for the strings of my ornaments.  Once those were stamped I added my buttons in various sizes in the colors red, green, and pink.  I finished off my card with a sentiment that is also from Close to My Heart.
 
It is a pretty clean and simple one, but I like the effect.  So, now that you have seen my interpretation of the challenge it is your turn.  Head on over to The Perfect Sentiment and play along.  I can't wait to see what you create!

Sunday, October 28, 2012

Apple Shaped Card

I just got Folk Art Festival recently and tried it out by making a shape card with it.  I used Cricut Craft Room to weld two apples, using the shadow feature.  They were cut at 5."  I then cut another apple using the shadow feature at 4 3/4."  I cut a regular blackout apple from some glittery cardstock and the regular apple with the cut-outs, both at 4 3/4."  I created a tag from some ivory cardstock and used a Fiskars stamp and pearlescent crimson ink by Tsukineko to stamp my sentiment.  I adhered it to the card and finished off the card with three pieces of baker's twine, tied in a bow.  Just a quick and simple one today.  Enjoy!
I made this for the challege at Celebrate the Occasion, which is to use an apple on your project.

Thursday, October 25, 2012

Jungle Love

This layout is going to be part of an 8"x8" scrapbook that I am putting together to go with my friends' wedding album.  After the wedding and all of the beach pictures the photographer took some pictures of the bride and groom in the jungle.  I wanted to incorporate those pictures, but they didn't work in the wedding album I made, so I am making an 8"x8" album to go along with it.  I think it should work well since there aren't many of the jungle pictures.  This will be the first page in that album.
It is 8"x8" (obviously) and I used some patterned cardstock from the Anthology stack by Colorbok.  I matted the photo, which is 4"x6," with some tan cardstock also from the Anthology stack.  It is cut at 4 1/4"x6 1/4."  I used Art Nouveau for the word "Jungle."  I welded it using Cricut Craft Room and cut it at 1 1/4" from some glitter cardstock.  I used Country Life for the "love" banner.  It is cut at 1 1/2."  I glued it to some twine and wrapped the twine around the page.  I used Life is a Beach for my leaves.  The palm leaves are cut at 2 1/2" and 2" and I flipped the 2 1/2" leaf.  I cut the tall vine leaf at 6" and also flipped it.  I adhered the small palm leaf and the word "Jungle" to the page with foam adhesive.

I used the sketch from Stuck On U Sketches to create this layout.

Wednesday, October 24, 2012

Sparkly Ornament

This Christmas card is 4 1/4"x5 1/2."  I used a glittery white cardstock for the card base.  I then trimmed some striped paper at 4"x5 1/4."  I used Christmas Cheer to cut the ornament at 4."  I used the white glittery cardstock for the shadow and shimmery green for the base of the ornament.  I added some red glitter and covered it with glossy accents for the red part of the ornament.  I also added some icicle Stickles to the white dots on the ornament.  I also flocked the bow on top of the ornament.  I adhered the ornament with pop dots and finished it off with a sentiment.
 
I made this for the following challenges:
Friday Mashup: use an ornament and/or add some sparkle

Christmas Lights

This card is 4 1/2"x6 1/4."  I used a dark green cardstock for the card base, then cut some white cardstock 1/8" smaller and some polka dotted paper at 4 1/4"x6."  I used Create a Critter for the string of lights.  I then gave them Peachy Keen faces and added some Stickles around the edges of the lights.  I adhered them to the card with foam adhesive.  I used Phrases for the sentiment and added red glitter to the word "Christmas."  I finished off the card with three white pearls int he top right corner.

I made this for the following challenges:

Pumpkin Treat Box

Today I have a cute little Halloween treat container.  I used Tags, Bags, Boxes & More 2 for my pumpkin-shaped treat bag.  I cut it at 9."  I used some patterend cardstock from The Bewitched Stack by DCWV for both the bag and the handle.  I inked the edges and contours of the pumpkin bag with some orange ink.  I used A Frightful Affair for the pumpkin's face.  I used Cricut Craft Room to hide all the contours except the face I wanted.  I sized the face to fit the pumpkin, which was about 3."  I covered the face with black diamond Stickles.  I used Mini Monsters for both the raven and the little grim reaper.  Both were cut at 2 1/2."  I added grape Stickles to the hat band on the raven, glossy accents to the beak and crackle accents to the legs.  I covered the blade of the grim reaper's scythe with flourescent grey glitter by Martha Stewart then covered it in glossy accents.  I also added glossy accents to his eyes.
 
I made this for the following challenges:

Thursday, October 18, 2012

Thanksgiving Turkey

I made this card 5 1/2"x4 1/4" with the fold at the top.  I used brown cardstock for the card base.  The patterned paper is 5 1/4"x4" and is from the Fall & Halloween Stack by DCWV.  The turkey is a stamp from Peachy Keen that I paper pieced together.  I used pop-dots to adhere the body of the turkey to the rest and also to adhere the turkey to the card.  I added glossy accents to the liquid coming from the baster, also along the length of the baster, to his eyes and his legs.  I used a Fiskars scallop border punch for the three pieces at the bottom of the card.  I then used a Fiskars stamp for the sentiment and stamped it in coffee bean ink by Tsukineko and added a couple of green gems.

For the inside of the card I cut some green cardstock at 5 1/4"x4" and then the other three pieces 1/8" smaller than the previous layer.  I used stamps from Peachy Keen for my inside sentiment.  I stamped them in coffee bean ink by Tsukineko.
I made this card for the following challenges:

Wednesday, October 17, 2012

Alien Birthday

Here is a birthday card that is out of this world!!  :)
 
The card is 8"x4" and the card base is made with a shimmery blue cardstock.  I then cut some white cardstock at 7 3/4"x3 3/4" and some patterned blue paper at 7 1/2"x3 1/2."  I cut a piece of white cardstock at 4 1/2"x2 1/2" and adhered it near the right side of the card.  I used Space Party to cut my alien at 3 1/2."  The stars are all from Cricut American Alphabet and are cut at various sizes: 1," 1 1/2," 3" and 3 1/2" from glittery white and yellow cardstock.  Most of the stars are adhered to the card, but a few were adhered with pop-dots and the alien was also adhered with pop-dots.  My sentiment is a stamp from Fiskars.

 
I also finished the inside of the card.  I cut some more white cardstock at 7 3/4"x3 3/4" and more patterned blue paper at 7 1/2"x3 1/2."  The large glittery white star is 3 1/2" and the glittery yellow star is cut at 3" and the plain white star is 2 1/2."  I used Cricut American Alphabet for all of them again.  I used a stamp from Scrappy Moms for the inside sentiment.

 I made this for the following challenges:


Monday, October 15, 2012

Boo to You!

I have a really simple Halloween card, but I think it is really cute too!
The card is 5 1/2"x4 1/4" and folds at the top.  I used white cardstock for the card base, then cut some black cardstock at 5 3/8"x4 1/8."  Using my Cuttlebug and the Seeing Spots embossing folder I embossed the black cardstock.  I cut some green polka dotted cardstock at 4 1/2"x3 1/4."  I then inked the edges of the polka dotted cardstock with some black ink.  My cute little ghost guy was cut from Paper Doll Dress Up at 4."  I adhered him to the card with pop-dots.  I used glossy accents on his shoes and ran some star dust Stickles around the edge of the ghost.  I also gave him some googly eyes because I think they just make thing so much more cute.  I used a stamp from Scrappy Moms for my sentiment.  I stamped it on white cardstock and trimmed it to fit.  I cut some more green polka dotted cardstock 1/4" larger and adhered it to my ghost, to make it look like he was holding it.  I then finished off the front of the card with black pearls. 
I also finished the inside of the card.  I cut some black cardstock at 5 3/8"x4 1/8" and the green polka dotted cardstock at 5 1/4"x4."  The white cardstock is cut at 3 1/2"x4 3/4."  I used stamps from My Craft Spot for the interior sentiments and the ghosts.
 
I made this card for the following challenges:
 
365 Cards: "Day 229" - Favorite Things: favorite color (green), favorite craft tool (Cricut or Cuttlebug), favorite patterned paper (polka dots)
My Sheri Crafts: Halloween
My Craft Spot: embossing
Paper Playtime: "Welcome to Boo-ville"

Sunday, October 14, 2012

Elegant Reindeer

I made another Christmas card today and I think this one turned our really elegant!  The card is 4 1/2"x6 1/4."  I used cream cardstock for the card base.  I cut some shimmery green cardstock at 4 3/8"x6 1/8," some gilded cardstock at 4 1/4"x6" and some green patterned cardstock at 4"x5 3/4" and layered them all together.  I used George and Basic Shapes to cut the three ovals.  The cream oval is cut at 5," the shimmery green oval is cut at 5" using the shadow feature and the gilded oval is cut at 5 1/4" using the shadow feature.  I embossed the cream oval with the stripes folder from James' Set and my Cuttlebug.  I adhered my ovals to the card and then added some strips of shimmery green and cream cardstock.  The green one is 1 1/8"x4" and the cream one is 1"x4."  I stamped the sentiment in coffee bean ink by Tsukineko and added a gold pearl in each corner of the cream strip.  I used Christmas to cut the reindeer.  It is cut at 4" and adhered to the card with pop-dots.  I added some gold Stickles to part of the harness.
 
 
I made this for the following challenges:
52 {Christmas} Card Throwdown: green, brown, cream, metallic gold color combo  

Friday, October 12, 2012

Witching You

I made this cute little Halloween card for this week's Peachy Keen color challenge.
The card is 5 1/2"x4 1/4."  I used dark purple for the card base.  I then cut some black cardstock at 5 1/4"x4" and some green diamond paper at 5"x3 3/4."  I wrapped it with some blue ribbon and added black faux stitching.  The scalloped oval mats are from Elegant Edges, cut at 3 1/4."  The witch is a stamp from Peachy Keen that I paper pieced together.  I stamped my sentiment, which is from Scrappy Moms Stamps, then double matted it.  I used some yellow glitter on the middle layer.  I finished off the card with yellow Stickles on the star and buckle and some blue buttons.  The sentiment is adhered with one layer of foam tape and the witch is adhered with a double layer of adhesive.
 

Thursday, October 11, 2012

Perfect Sentiments: "Christmas Critters"

Hello everyone and welcome to the third day of our one year birthday/anniversary challenge celebration at The Perfect Sentiment!  We have four fun challenges planned for you that we will spread out over the next few days. We have sponsors who have donated generous prizes for each challenge and since we are doing this blog hop style, there are hidden prizes along the way. The good news is you will have 3 full weeks to complete all the challenges and blog hops. There will also be a grand prize that you will be eligible for if you complete all the challenges! You can see the Grand Prize and add you name to the inlinkz here once your complete all four of the challenges.
 
This challenge is "Christmas Critters"
The challenge: create a card with a sentiment for Christmas
The twist: include a critter somewhere on your card
 
Here is my card for the challenge:
 My card is 5 1/2"x4 1/4."  I used white cardstock for the base, then trimmed some red cardstock 1/8" smaller.  I printed a digi stamp from Floppy Latte's Digital Designs, called "North Pole," on some white cardstock.  I cut the cardstock down to 5 1/4"x4."  I colored in the image with my Spectrum Noir markers and stamped my sentiment from Scrappy Moms Stamps.  I then ran it through my Cuttlebug with the Swiss Dots folder to make it look like it was snowing.  I used Winter Frolic for both my snowman and mouse.  The snowman was cut at 2 1/2" and the mouse at 1 1/2."  I used red flocking powder on both scarves and the snowman's hat.  I also gave the snowman a Peachy Keen face.  I adhered them to the card with foam tape for some dimension.  I finished off the card with some Stickles - x-mas red on the bow of the package, holly on the tree, and gold on the pole's globe.  
 
Now head on over to Sam's blog to see what she created for this challenge.  Then be sure to link up your project at The Perfect Sentiment.  I can't wait to see what you create!

Wednesday, October 10, 2012

Perfect Sentiments: "Bingo"

Hello everyone and welcome to the second day of our one year birthday/anniversary challenge celebration at The Perfect Sentiment!  We have four fun challenges planned for you that we will spread out over the next few days. We have sponsors who have donated generous prizes for each challenge and since we are doing this blog hop style, there are hidden prizes along the way. The good news is you will have 3 full weeks to complete all the challenges and blog hops. There will also be a grand prize that you will be eligible for if you complete all the challenges!You can see the Grand Prize and add you name to the inlinkz here once your complete all four of the challenges.

The challenge this time is "Bingo"
The challenge: create a card with a sentiment for an occasion or holiday of your choice
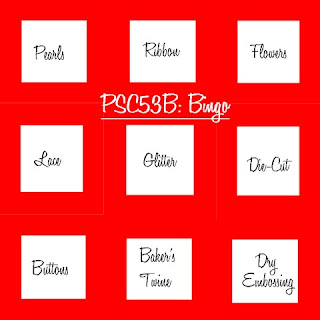
The twist: use three items across, down, or diagonally from the Bingo chart
Here is the bingo chart:
My "Bingo" is diagonally - pearls, glitter, and dry embossing.
My card is 4 1/4"x5 1/2."  I used black cardstock for the base.  I cut some orange cardstock at 4"x5 1/4" and then ran it through my Cuttlebug with the Skeleton Scroll embossing folder.  I cut a strip of pumpkin patterned paper at 2"x5 1/4" and some black cardstock 1/8" larger and adhered it to the middle of the card.  The pumpkin patterned paper is from the DCWV Fall and Halloween Stack.  I used Teddy Bear Parade for my cute little pumpkin teddy bear.  He is cut at 3 1/2."  I flocked the bear with some brown flocking powder.  I added orange glitter to the pumpkin treat bag and green Stickles to the green parts of the pumpkin outfit.  I also added some glossy accents to the bear's nose and eyes.  The senitment is from Scrappy Moms Stamps and I hand cut the banner.  I finished off the front of the card with some black pearls on the treat bag and in the corners of the card.

 I also finished the inside of this card.  I cut some orange cardstock at 4"x5 1/4," and the pumpkin patterned paper at 3 3/4"x5."  I cut a piece of white cardstock at 2 1/2"x3 1/2."  I stamped another sentiment on the inside as well, again from Scrappy Moms Stamps.

Now head on over to Sam's blog to see what she created for this challenge.  Then be sure to link up your project at The Perfect Sentiment.  I can't wait to see what you create!    

Tuesday, October 09, 2012

Perfect Sentiments: "Anniversary or Birthday"

Hello everyone and welcome to the first day of our one year birthday/anniversary challenge celebration at The Perfect Sentiment! We have four fun challenges planned for you that we will spread our over the next four days. We have sponsors who have donated generous prizes for each challenge and since we are doing this blog hop style, there are hidden prizes along the way. The good news is you will have 3 full weeks to complete all the challenges and blog hops. There will also be a grand prize that you will be eligible for if you complete all the challenges!

The first challenge is "Anniversary or Birthday" 
The challenge: create a card with a sentiment on the front
The twist: the sentiment must be for an anniversary or birthday
 
Here is the card I made for this challenge:
 I went with a birthday card.  I used Wild Card 2 for the shaped card, it was cut at 6."  I cut the card base in black, then the card layer in white.  I covered the white with star dust Stickles.  I cut the present in polka dotted cardstock, the ribbon in teal cardstock, and the bow in light green cardstock.  I then covered the bow in bright green flocking powder.  I used a stamp from Scrappy Moms for the sentiment.  I attached the present to the card with some foam tape for added dimension.  I think it turned out looking pretty cool! 
 
Now head on over to Vickie's blog to see what she came up with for this challenge.  Then link up your creation at The Perfect Sentiment!  I can't wait to see what you create.

Wednesday, October 03, 2012

Perfect Sentiments: "Fall or Halloween with a Pop of Color"

Another Wednesday and time for another challenge at The Perfect Senitment!
This week the challenge is "Fall or Halloween with a Pop of Color"
The challenge: create a card with a fall or Halloween sentiment
The twist: use all neutral tones and add just a pop of color
 
Here is the card I created for this challenge:

My card is 4"x8 1/2."  I used brown cardstock for the card base.  I then trimmed some brown striped cardstock at 3 3/4"x8 1/4."  I cut another piece of brown cardstock at 3 1/2"x8."  Finally, I cut some pale tan houndstooth cardstock at 3 1/4"x7 3/4."  I used the Thanksgiving cartridge and Cricut Craft Room to cut the pumpkin and sprig of wheat.  The wheat was cut at 3" and the pumpkin at 2."  I covered the pumpkin in crackle accents.  The sentiment and the curly frame around it are both Peachy Keen stamps.  They are stamped in rich cocoa ink by Tsukineko.  I cut around the frame and adhered it to the card with pop-dots.  I finished off the card with three pale orange pearls.
 
 
Hope you join us at The Perfect Sentiment for our challenge.  I can't wait to see what you create!    


Monday, October 01, 2012

Sold Out

This is a 12"x12" layout for my scrapbook of my trip to Sweden.  This one has been slowly coming together, since I only work on it every once in a while.  This particular layout is of a side trip the group of us in Sweden took for a BBQ by a lake.  And, no, the title is not pronounced how you think!  ;)  It is a Swedish word that means "sold out." 
All the cardstock, other than the brown and white, came from the Summer Days Stack by DCWV.  The shimmery blue cardstock is 8"x4" and the plaid strip is 12"x3 1/2."  The star cardstock is 6 1/4"x8."  The photo is 4"x6" and the white cardstock is 3 1/2"x5 1/2."  I used Indie Art for the ice cream cone and it is cut at 6 1/2."  I embossed the light pink layer with the D'vine Swirls folder and added glossy accents to the dark pink layer.  I used Plantin Schoolbook for the title, and cut it at 1 1/2."  The swirls and the butterfly were printed on the cardstock, and I covered up a dandelion with the ice cream cone. 

I made this for the following challenges: