Saturday, November 05, 2016

Monster Bash

I created a cute little monster-themed birthday card!


The card is 5 1/2"x4 1/4" and made of white card stock.  I used the Card Mat Dies to cut the orange polka dot card stock, then I used the Border Dies 2 to cut the mat to make it look like a balloon.  Both dies are from Jaded Blossom.  I then used a light blue baker's twine for the string of the balloon.


The adorable little monster is from Lettering Delights.  He is part of the Mini Monster cut set.  I used the Dot Fade stencil by Tim Holtz to give my little monster some texture to his body.  I used old paper Distress Ink for the coloring.  I used a Peachy Keen face stamp for his face instead of the cut pieces.  It is part of the Quick and Simple Emojis Face Assortment.  I added him to the card, then curled his fingers around the twine to make him look like he is holding the balloon.


The sentiment is from Paper Smooches.  It is part of the Happy Birthday stamp set.

I made this for the following challenges:
Color Throwdown: color combo
Addicted to CAS: monster

Tuesday, November 01, 2016

Log Cabin Card

My sister-in-law's birthday is coming up and my husband asked me to make her a card.  I said I would, but he had to decide what he wanted for a theme for it.  He said it should have a log cabin and a dog sitting on the porch.  I decided to make it into a log cabin shaped card.


The card base is made from a cut file from KaDoodle Bug Designs.  It is part of the Woodsy Winter set.  I pieced the base together, then cut off the part that looked like snow since I didn't want to make this winter-themed.  I did a lot of inking on this card.  I used tea dye Distress Ink on the logs, ground espresso Distress Ink on the dark brown planks of the door and porch, iced spruce Distress Ink on the trees, and weathered wood Distress Ink on the chimney stones.  I added some crackle accents to the chimney and glossy accents to the windows.  I also used foam tape on the bottoms of each layer of trees for dimension.  I used a metallic brown brad for the door handle and finished off the base of the card with some doodling on the logs to make them look a little more realistic.


The dog is from SVG Cutting Files.  It is part of the Silly Dogs cut set.  I used wild honey Distress Ink on its ears and tail and mustard seed Distress Ink on the rest of the body.  I adhered it with foam tape by the door to make it seem like it was waiting to come inside.  I also put a little bone on the stoop with the dog.  The bone is from the Cricut cartridge Home Organization.  I tied a red twine bow around the bone to make it into a little present.


I used Jaded Blossom products for the inside of the card.  The mat is made from the Scallop Rectangle Dies 1 and Rectangle Dies 1.  I used a paw print stamp from Kitty Kitty and a sentiment from Dog-gone Awesome.

Thursday, October 27, 2016

Autumn Owl


I love making 3D and home decor items, but I just don't do it all that often.  I am going to try and change that.  I started last week by making the pumpkin.  This week I made an autumn owl-shaped lantern, which I am going to put on display with my pumpkin.


I used a cut file from Dreaming Tree.  It is called Hoot Owl Lantern.  It stands at just under 11 1/2" tall.  I used a tea light to light it up, but I think I will get a slightly larger candle for the future (I just didn't have any larger ones that were electric).


I put vellum behind the open grid-work on the body of the owl to soften the light.  I also did it because my card stock had a white back and I didn't want that to be seen.  I also chose to use a solid card stock for the eyes, rather than vellum.  If you were to use a vellum the light would show through the eyes as well.  


I added pop-dots to the undersides of the wings and then curled them for dimension.  I added a lot of gems and sparkly enamel dots as well.  I also used some Liquid Pearls for more detail.

Tuesday, October 25, 2016

Make a Wish

Here is a fun, whimsical birthday card for you today:


The card is 5 1/2"x4 1/4" and made of purple card stock.  The silver mat is cut from gilded silver card stock, using the Card Mat Dies by Jaded Blossom.  The scallop oval and regular oval are both from Jaded Blossom as well, the Scallop Oval Dies and Stitched Oval Dies respectively.  The black star patterned card stock is from the Stardust Stack by DCWV.


The images and sentiment are all from Lawn Fawn, the Critters Ever After stamp set.  I also used the coordinating dies to cut out the unicorn and castle.  I used silver Stickles on the unicorn's horn and hooves.  I also added a little Wink of Stella on the mane and tail for more added sparkle.


I adhered the unicorn with foam tape for dimension.  I stamped the sentiment, also from the Critters Ever After stamp set, with white ink and heat embossed it with glittery white embossing powder.


The notched banner in the background is made using one of the dies by My Craft Spot.  I also used the Scenic Die from Jaded Blossom for the stars in the corners.  I added a little Wink of Stella to them as well.


The patterned star mat is cut at 5 1/4"x4."  The purple mat is 4 1/4"x3" and the white mat is 4 1/8"x2 7/8."  I used another stamp from Critters Ever After, then a stamp from So Many Birthdays by Jaded Blossom.

I made this for the current challenge at Lawnscaping Challenges.  It is a color scheme: black, purple, and color of your choice (I went with grey/silver)


Friday, October 21, 2016

Tropical Birthday

Here is a fun tropical birthday card for you today!  I used only Jaded Blossom stamps and dies for this.


The card is 5 1/2"x4 1/4" and made of white card stock.  I cut a white mat with the Card Mat Dies and then stamped it with the solid leaf from the Hibiscus stamp set.  The leaves are inked with cracked pistachio, lucky clover, and evergreen bough Distress Inks.


The hibiscus is from the same set as the leaves.  I used squeezed lemonade, candied apple, and aged mahogany Distress Inks to achieve my coloring of the flower.  I fussy cut the image out once colored.  The stamen is covered with yellow and fruit punch Stickles and the top part of it is adhered with foam tape for a little added dimension.


The "happy birthday" sentiment is from So Many Birthdays 2.  Instead of putting a sentiment like "let's party," I decided to do something in the tropical vein.  I added "let's luau" from the Aloha stamp set.

I made this for the "lots of leaves" challenge at Seize the Birthday.

Thursday, October 20, 2016

3D Autumn Pumpkin

I decided I wanted to make some sort of 3D project today, so I made this cute little pumpkin from SVG Cuts.  It is part of the Bedtime Stories kit.


I inked up all the pieces with Distress Ink.  The leaves with peeled paint, the stem with vintage photo, and the pumpkin with carved pumpkin.

Wednesday, October 19, 2016

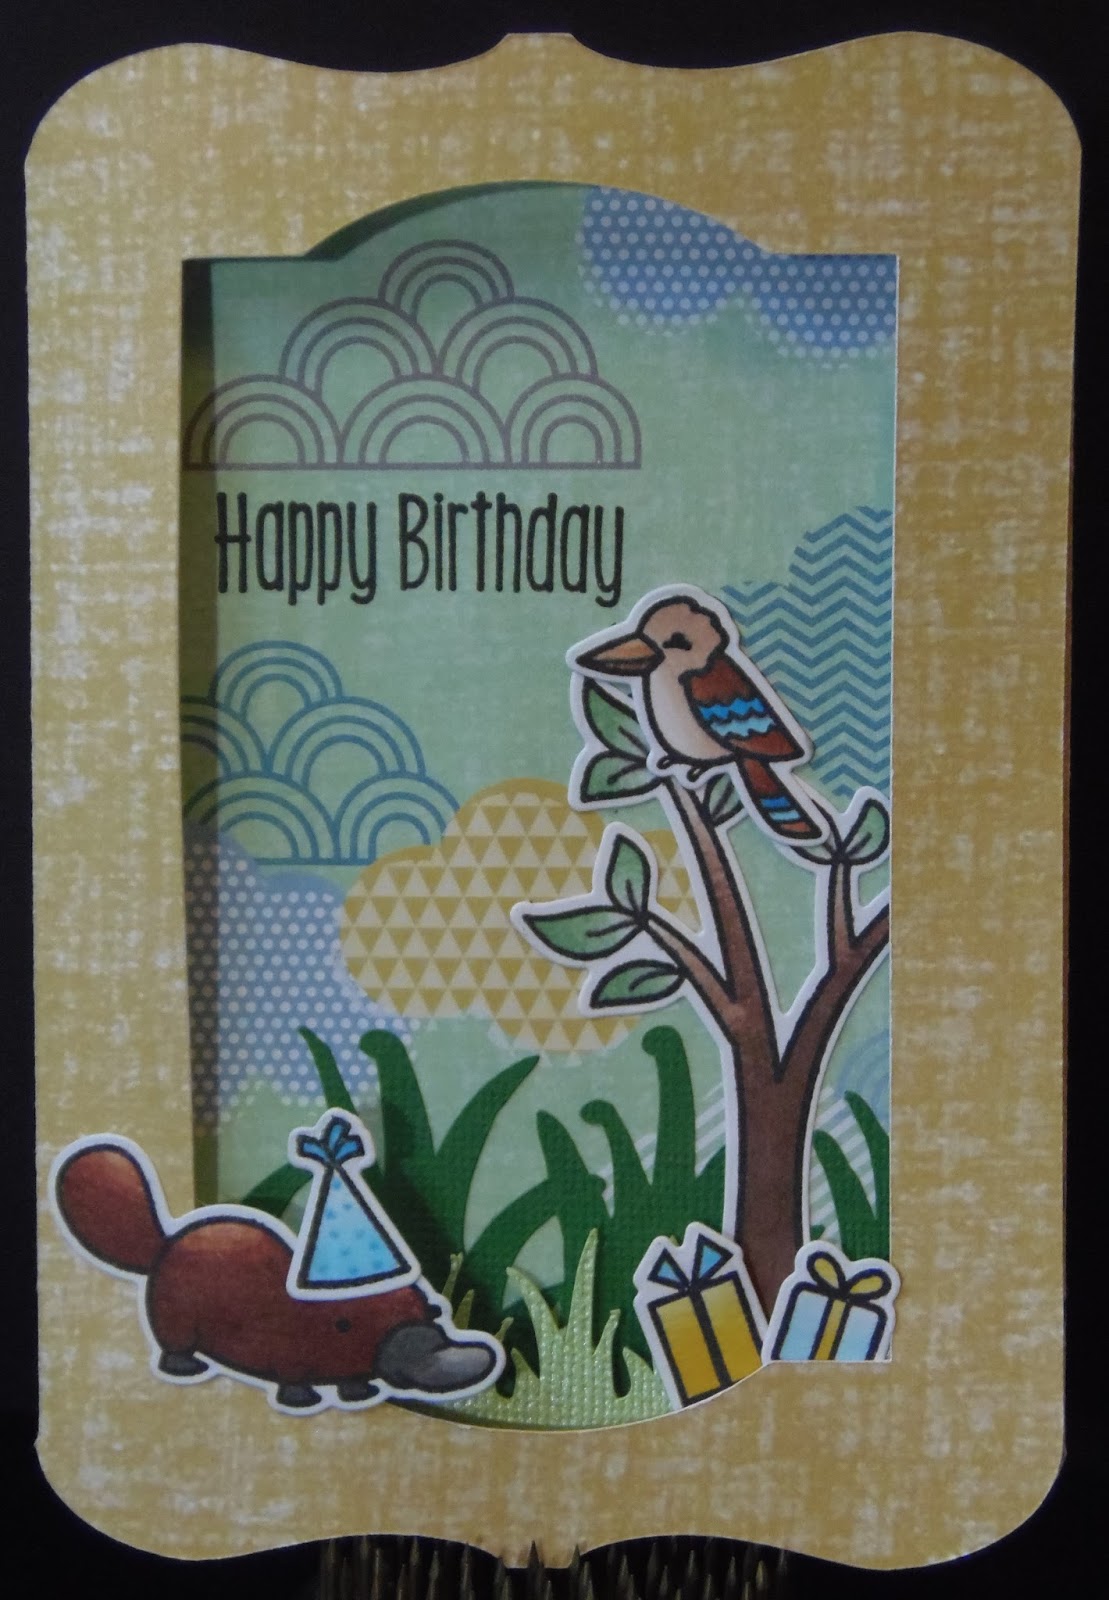
Happy Birthday Mate!

Here is a fun birthday card for you today:


The card base is from "Creative Holiday Cards."  I used patterned card stock for the base and background from the Sky's the Limit Stack by DCWV.  The grass is from "ZooBalloo."  I colored all my images with Chameleon Color Tones markers.


The image stamps are all from Lawn Fawn.  The tree, kookaburra, and platypus are all from the Critters Down Under set.  I cut them all out with the coordinating dies.  The party hat on the platypus is from the Lovable Legends set.  The presents are from the Beep Boop Birthday and Year Five stamp sets.


The sentiments are all from Jaded Blossom.  The one on the front is from So Many Birthdays.


Both sentiments on the inside are from the Go Wild set.


I added a little coloring to the "go wild" sentiment.

Sunday, October 16, 2016

Spooky Spider Treats

Today I did a little more crafting and made this fun Halloween treat bag.


I used the Jaded Blossom Goody Bag Die to create the treat bag.  I then used one of the dies from Rectangle Dies 1 to cut the lime green mat for my treat bag.


I used the Jaded Blossom stamp set, Pick Your Poison, to stamp the sentiment.  I then used the Spider Stew Cuttlebug folder to emboss the mat.  Once embossed I inked up the lines with twisted citron Distress Ink.


My image is from SVG Cutting Files.  It is the Kawaii Spider Eyeball Cupcake.  I hid the face and used a stamp from Peachy Keen instead.  It is from the Itchy Stitchy Face Assortment.  I used the mouth from the largest face and the eyes from the next largest face.  I then colored in the mouth with a grey marker and used white gel pen on his fangs.  I also chalked his cheeks.  I added some red marker doodling to the eyes, to make them look bloodshot, and also used black enamel accents to make the pupil.  The blood icing and eyeball are covered with glossy accents.  I adhered the spider with foam tape in the middle and glued down the edges for some dimension.

I made this for the following challenges:
Jaded Blossom: Halloween

Saturday, October 15, 2016

Dragon

Wow, it has been a long time since I have been able to craft.  I have been up in Duluth, MN for the last month.  I was asked to help set up a new JoAnn Fabrics & Crafts store in that location.  It was full of long days, stress, and of course a lot of fun.  The grand opening was a fantastic success, but I am glad to be back home.  I missed my bed and I really missed my craft room.  So, here is what I created as my first project in a month.


The card is 5 1/2"x4 1/4" and made of light grey card stock.  I used a dark grey card stock for the mat, which I cut using one of the Card Mat Dies from Jaded Blossom.


The green and aqua panels are also cut from the Card Mat Dies.  I used the Stitched Circle Dies from Jaded Blossom for the light grey circle.  The sentiment is from Jaded Blossom's So Many Birthdays stamp set.


The dragon is from the Critters Ever After stamp set by Lawn Fawn.  I used the coordinating die to cut it out.  I colored it with some Distress markers by Tim Holtz.  I then added some firefly Stickles to the ridges on the back of the dragon, glossy accents to its belly, and Wink of Stella to its horns and wing.


I used foam tape to pop up the dragon.  I then added some glittery washi tape behind the dragon.  I finished off the card with some aqua gems.

I made this for the following challenges:
Color Throwdown: color combo
City Crafter Challenge Blog: something that doesn't exist
Cute Card Thursday: recipe - 3 brads/gems, 2 papers, 1 ribbon/washi
Pile It On: sparkle
Seize the Birthday: anything goes