Thursday, December 29, 2011

Coffee

This masculine card is 5"x7." I used brown cardstock for the card base. The script patterned background paper is from the Tattered Time Stack by DCWV. It is cut at 4"x7." The coffee cup is cut from Designer's Calendar at 3." I adhered it to a 3 1/2"x4 1/2" piece of light brown cardstock that I embossed with the Script Texture folder and my Cuttlebug. I matted the light brown cardstock with some dark brown cardstock which is cut 1/8" larger. I stamped my sentiment, using jumbo java ink by Tsukineko, on some light brown cardstock. I then heat embossed it with some shimmery clear embossing powder. The stamp is one I got in the dollar bin at Michael's. I matted the sentiment with some dark brown cardstock and then some pink cardstock, both 1/8" larger than the previous layer. I finished off the card with three pale pink pearls.


I made this card for the following challenges:

Wednesday, December 28, 2011

Green Bay Footballer


Back in October I made a card with a football player on it. I used the colors of my state's football team, the Vikings. A friend of my mom's saw the card and wanted one in the colors of Wisconsin's football team, the Packers. You can see the original post here. I created teh exact same card, just using green where there was purple before. All the directions are in the origninal post if you want to see sizes and what exactly I did.


The Packers card is on the left and the original Vikings card is on the right.

Tuesday, December 27, 2011

Crabulous


Here is a fun birthday card I made. January is another month of birthdays. Aside from mine, I have a couple of cousins, a friend, my best friend's son, even my trainer's birthday is in January. There are probably more that I can't remember off the top of my head too. So, I think I will be making birthday cards like crazy, either that or seeing what I have sitting around. :)

This card is 4 1/2"x6 1/4." I used a striped cardstock, which is from the Mediterranean Stack by DCWV, for the card base. I used a Nestabilities label die for the red and cream labels. I adhered the red one down, then wrapped the card with some orange fiber. I embossed the cream layer with one of the animal print folders, to me it looks like zebra stripe. I adhered the cream layer over the fibers. The crab is from Life is a Beach, cut at 3." I gave him some google eyes and drew in his mouth. I used pop-dots to adhere him to the label. The candles are from Wrap It Up. They are cut at 2" and I added some yellow and orange Stickles to the flames. I adhered them so it looked like the craby was holding them. I stamped my sentiment on some cream cardstock, then matted it with red cardstock. I adhered it to the bottom and added two large red gems. For the inside of the card I cut some red cardstock 1/8" smaller than the card base, then some cream cardstock 1/4" smaller than the red. I used a computer to create the "hope it's" part of the sentiment. I then stamped the "crab-u-lous" part of the sentiment. Both the sentiment stamps are from My Pink Stamper. I trimmed it and matted it with some red cardstock. I also cut another candle out from Wrap It Up, this time at 3." I also used yellow and orange Stickles on the flame again. I just love terrible puns and I thought this one was too good to pass up! I made this card for the following challenges:


  • 365 Cards: "Day 301" - Signature Sentiment (I don't really have one, but if I did I know it would probably be some sort of terrible pun)

  • BBTB2: "Wrap It Up" - candle cut

  • The Friday Mashup: sketch


Sunday, December 25, 2011

Christmas Boxes

I had to wait to post these since they are gifts for my mom and brother. My mom checks my blog almost daily and didn't want to ruin the surprise. I used my Gypsy to size everything and all the patterned paper is from the Merry Christmas Stack by DCWV. The solid papers came from my stash.

These are three gift boxes I made for some small gifts that I gave to my mom and my brother. The pillow box is for a coffee gift card for my mom, as is the armadillo tree box. Inside, there is a small carved armadillo that I got her when I went to Belize, hence the armadillo on the front. The pillow box was cut from Wrap It Up at 6." I created a band to go around the box using a border from the Martha Stewart Seasonal Cake Art cartridge. It is cut at 1 1/4" and then wrapped around the box. My mug is cut from Everday Pop Up Cards at 3 1/2." The snowflake on the mug is from Winter Lace, cut at 1 1/4." I added some star dust Stickles on the steam and some lime green Stickles to the snowflake.


For the armadillo box I used the tree-shaped box on Tags, Bags, Boxes & More. The armadillo is from Birthday Bash, cut at 2." His eyes and nose are black pearls and I used a candy cane sticker to give him a little Christmas treat. I finished off the box with a shimmery red bow.

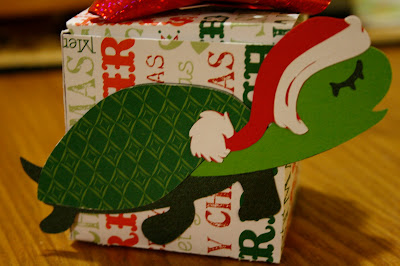
This little box is a gift for my brother. I got him a carved turtle when I was in Belize and this is the box I created for it. The box is from Wrap It Up. I cut the turtle at 2" from Four Legged Friends and his Santa hat is from Pooh and Friends, cut at 1."


Tuesday, December 20, 2011

Christmas Horse

I can't believe how long it has been since I posted something. And that is actually how long it has been since I have crafted as well. I got so busy with school. Both of my finals were last Friday and I spent so much time studying and preparing for them. I got only one wrong on my Medical Terminology final and 100% on my Biology final! How awesome is that?!! :)
This is some wall decor I made for my dad and his wife for Christmas. They have three horses and the horse on here looks a little like one of them. It is 12"x12." I used some snowflake patterned cardstock for the base of the decor, it came from the Winter Magic Stack by DCWV. I cut the hills and sun from Country Life. I used my Gypsy to make it as large as possible. All the hills are covered with different types of white glitter, which is hard to tell unless you see it in the light. The hills are all pop-dotted. The horse and fence are also cut from Country Life at 5 3/4." I pop-dotted the fence and the horse. I used some white ink on his leg and the stripe on his nose and gave him a black pearl for the eye. The Christmas lights are from Create a Critter, cut at 1." I used some x-mas red, green and gold Stickles on the lights. The wreath around the horse's neck is from Joys of the Season. I cut it twice, once with a dark green and once in a lighter green. I use glossy accents on the berries on the wreath. The "Merry Christmas" is from Blackletter. I used my Gypsy to weld and cut the letters. I also used glossy accents on the title.


I am entering this in the Die Cuttin' Divas "Holiday Decor" challenge.

Sunday, December 11, 2011

Merry Christmas

This card is 4 1/2"x6 1/4." I used red cardstock for the base, then cut some glittery green cardstock 1/8" smaller. My white layer is 4 1/2"x6" and embossed with the Large Snowflakes embossing folder. I cut five snowflakes from Winter Lace in a range of sizes from 1 1/2"-2 1/2." I adhered them to the card base, then covered them with star dust Stickles. The tree branch is cut from Jolly Holidays. I pop-dotted it to the card for some dimension and added glossy accents to the berries. I finished off the card with the stamped sentiment. The stamp is from Scrappy Moms Stamps and it is stamped in rocket red ink by Tsukineko.

I made this card for the following challenges:

Saturday, December 10, 2011

Mosaic Tree

I made this card for "Day 284" challenge at 365 Cards. The challenge was to create a mosaic on your card. I used the mosaic to create a Christmas tree. I cut all the tiles from George and Basic Shapes. They are all cut at 3/4" and there are 7 of each of the three patterns. The card base is 5"x5" and made of white cardstock. The dark green layer is 1/8" smaller and the next white layer is 4 3/4"x4 3/4," which I embossed with the Lare Snowflakes embossing folder. I adhered my tiles in a tree shape, there are 21 total. I then added some red gems and finished it off with holly Stickles around the edge of the tree. Enjoy!

Friday, December 09, 2011

Snowman with Felt Accents

This card is 4 1/2"x6 1/4." I used white cardstock for the card base, then added some dark red cardstock cut 1/8" smaller. I finished off the card base with some green snowflake patterned paper, it is cut at 4 1/4"x6." The snowman is cut from Winter Woodland at 6." I used the blackout feature to cut it, so that the inner cuts wouldn't show. I used a Peachy Keen face and colored in the carrot nose. I cut the hat, scarf and heart from regular cardstock, then used those pieces as templates to cut my felt. I used a Snow Writer to accent the hat. I stamped my sentiment and double matted it and finished off the card with some red and green bling.

I made this card for the following challenges:

Thursday, December 08, 2011

Two More Christmas Cards

I made a couple more Christmas today, not for any particular reason...just felt like it. Both of them are very simple and both are made using pre-made cards from DCWV.

This first card is 4 1/2"x5 1/4" and I used a pre-made card by DCWV. I cut the "J" and "Y" from Storybook at 2." I used Martha Stewart Seasonal Cake Art for the snowflake, it is also cut at 2." I used a shimmery dark blue cardstock and a glittery white cardstock for the cuts. I pop-dotted the snowflake and finished it off with some white pearls.
This second card is also 4 1/4"x5 1/2" and also uses a pre-made card by DCWV. This card actually has a large snowflake on the lower left, which I covered up with the ornament. All the ornaments are stickers, called "Dazzles." I picked them up at a local Ben Franklin when it was going out of business and this is the first time I have used them. I put them on shimmery dark blue cardstock, then cut them out. I mounted them on the card with some silver thread to "hang" them. I finished it off with a stamped sentiment.

Christmas Tree

This is a simple, small card, only 3 1/2"x5." I used white cardstock for the base, trimmed some shimmery green cardstock 1/8" smaller and some red houndstooth cardstock 1/8" smaller than the green. The tree is cut from Christmas Cheer at 5" (it actually comes out to about 4"). I used my Gypsy to cut it so that I could hide the interior cuts on it. I embossed it with my Cuttlebug and the Allegro embossing folder. I adhered it to the card and used some holly Stickles on the edges of the tree. I added some red gems as well. The sentiment is stamped on white cardstock, using pearlescent ivy ink by Tsukineko. I cut the sentiment into a strip, then adhered it to the card, using pop-dots in the middle to give it some lift. Super simple, but I think it turned out quite pretty.

I made this for the following challenges:


  • 365 Cards: "Day 283" - be inspired by your favorite store (mine is JoAnns, and not just because I work there...I used the color of their shirts/aprons, dark green and white, and I think most of the supplies I used on this card came from JoAnns)

  • Cooking with Cricut: "Sounds of the Season" - Christmas music as inspiration

  • Papercraft Star: Christmas tree

  • Whimsical Designs: Christmas/winter theme with some sparkle

Wednesday, December 07, 2011

Christmas Mouse Card & Tag

Here is a matching card and tag, featuring a Christmas mouse! The card is 5"x5" and I used white cardstock for the card base. I rounded the corners with a punch. The large green polka dots is cut at 4 3/4"x4 3/4" and I rounded its corners as well. I cut another piece of white cardstock at 4"x4" and some small green polka dotted paper at 3 3/4"x3 3/4" and rounded both of their corners. The mouse in the present was cut from Birthday Bash at 3." I used some white flocking on the mouse, candy apple glitter (Martha Stewart) on the package lid, diamond Stickles on the bow, x-mas red Stickles on his ear, black enamel on his nose and black pearls for his eyes. I used green microbeads for the dots on the present. After I had finished putting them on the present I was grabbing them to put away when I knocked the bottle of them over and my floor was covered in green microbeads!! I got them all cleaned up, but what mess it was! I don't tend to use microbead a lot and I think I may have figured out why. ;) The speech bubble was cut using George and Basic Shapes at 1 1/4." I stamped my sentiment, which is from Scrappy Moms Stamps, then pop-dotted it to the card.


I also made a matching tag for the card. It is cut from Winter Frolic. I used my Gypsy to hide the cuts on the inner part of the tag. I cut the tag from white cardstock and the large polka dotted green paper. The mouse is cut at 2 1/2." I flocked the mouse, added diamond Stickles to the bow, pearls for his eyes and black enamel for his nose. The tag is pretty simple, but I like how it complements the card.


I made these for the following challenges:

He's Making a List

This card is 5"x5." I used red cardstock for the base and trimmed some patterned paper 1/8" smaller. I used mystic green Stickles around the edge of the patterned paper. The list is cut from My World. I used my Gypsy to hide the writing on the scroll, it normally says "We the people." I then used a tan colored marker to draw in the details. I used a Scrappy Moms Stamp to create the "naughty" and "nice." I stamped them in pearlescent beige ink by Tsukineko. Santa is cut at 3" and I pop-dotted him to the card. I added some diamond Stickles to his beard and hat trim, I also flocked the red part of the hat. The sentiment is stamped in pearlescent ivy ink, by Tsuikeno. The sentiment is also from Scrappy Moms Stamps. I matted it and added some diamond Stickles around the edge of the white.


I made this card for the following challenges:

Tuesday, December 06, 2011

Sledding Penguins

This card is 4 1/4"x5 1/2." I used a pre-made card for the card base, then ran it through my Cuttlebug with the Snowflakes embossing folder. I hand cut my snowbanks and adhered them to the card base. The penguins are a Fiskars punch. I punched them each three times, from the glittery black, shimmery blue and white cardstocks. I then trimmed the blue and white ones to get the pieces I wanted and I pieced them together. I cut the sled from Jolly Holidays, cutting off the snowman that is supposed to be sitting on it. The penguin on the hill is adhered to the card with pop-dots for some dimension. I stamped my sentiment and used some shimmery blue embossing powder to heat emboss it. I used Accent Essentials to cut all the snowflakes, then covered them with waterfall Stickles to make them stand out a little more from the background.


I made this card for the following challenges:

Monday, December 05, 2011

Rinchie Wreath

This card is 5 1/2"x4 1/4." I used white cardstock for the base, then adhered some red cardstock which was cut 1/8" smaller. I cut some patterned paper at 4"x3 1/2" and adhered it on the bottom half of the card. I used a 1" circle punch to punch a bunch of rinchies (1" circles) from a patterned paper. I then adhered the rinchies to the card in the shape of a wreath. I pop-dotted some of the rinchies. I added some red bling and a glittery bow. I stamped my sentiment on smoe white cardstock and matted it with red. I then went over the stamped image with green and x-mas red Stickles. I finished off the card with more red bling.

I made this card for the following challenge: