Sunday, June 30, 2013

Silhouette Sunday - Strawberry Card

In showcasing different creations from my Cricut cartridges I feel that I am neglecting my Silhouette Cameo.  I have a lot of different images that I have purchased from the Silhouette Studio and I am doing nothing with them.  So, I figured I should start also trying to make something with my Silhouette at least once a week so that I don't completely neglect that machine as well.  So, this is my attempt to start making creations with it as well as my Cricut.
 
One of my co-workers is leaving for a new job and so I made a card for everyone to sign wishing her congratulations and good luck on her new job.  I used this strawberry-shaped card from the Silhouette Studio for the card.  I cut it at about 5 1/2" tall.

I covered the seeds in glossy accents.  I also tied some pink baker's twine around the stem.  My sentiment is from Scrappy Moms Stamps, the "Dancing in Circles" set, and I cut it using a metal die from My Craft Spot's "Tiny Doilies Metal Dies" set.  I finished it off with a button in the middle of the circle.

Thursday, June 27, 2013

Art Deco - Creation #7

This card is 5 1/2"x4 1/4."  I used a pre-made white card from DCWV for the card base.  The red mat is 5 3/8"x4 1/8" and the white mat is 5 1/8"x3 7/8."  I embossed the white mat with the clouds embossing folder by Darice.  I cut a strip of blue cardstock from Core'dinations at 3 7/8"x2."  I tore the top part of the strip to expose the lighter blue core for my water.
The ocean liner is cut from "Art Deco" at 4 1/2."  I used a stamp from Scrappy Moms Stamps for my sentiment, it is from the "Mini Messages" set.  I heat embossed it with some white embossing powder.  The ship is adhered to the card with foam tape.
I used "Life is a Beach" for the waves.  The larger strip of them is cut at 2" and the smaller strip is cut at 1 1/2."  I distressed the tops of the wave crests with some sandpaper.  I adhered the bottom parts of the strips of waves, leaving the top parts loose for even more dimension.


Wednesday, June 26, 2013

Art Deco - Creation #6

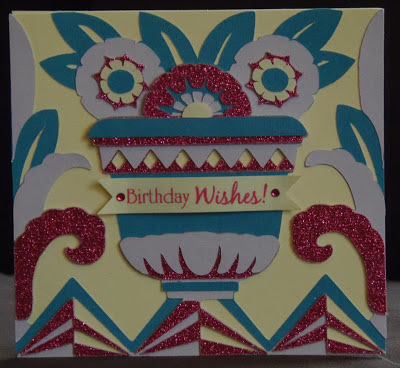
For the sixth creation using "Art Deco" I used the image.  I also cut the card base from this cartridge, it is the shadow/curtain call shadow feature.  It was cut at 5," which was the recommended size in the handbook.
 
The only part that isn't from the cartridge is the banner with the sentiment.  I used a stamp from the "Simple Sentiments" set by Scrappy Moms Stamps for the sentiment.  I trimmed the paper it is stamped on into a banner.  I adhered the banner with two different thicknesses of foam tape for some dimension.  I then added two pink gems to either side.
 
It is quite a simple one, but it looks very intricate.  I made this for the following challenges:
{Cupcake Inspirations} - lavender, pink, turquoise colors
My Sheri Crafts - birthday theme

Monday, June 24, 2013

Art Deco - Creation #5

The past couple of days have been a little busy.  We have had some severe weather roll through this area.  I spent all day Friday without power, which meant no crafting.  I spent Saturday and Sunday cleaning up our yard.  At least we didn't lose any trees, just some branches.  Now that things are better I have managed to make another creation featuring the "Art Deco" cartridge.
 
For this birthday card I used the curtain call font feature and the marquee image.  I used Cricut craft room to help me lay out the font and image to create my card.  The word "happy" is 3/4" tall and "birthday" is 1" tall.  The marquee is 3 1/2." 
 
I used a silver Cri-Kit pen to draw out the word "happy" on the black paper, then cut the image.  I covered "happy" with silver Stickles.  The word "birthday" is cut and adhered to the image.  I covered the little black diamond in black glitter and then some glossy accents.  I adhered it to the image with some pop-dots.
 
The actual card is 3 3/4"x9 1/4."  The dark red mat is 3 5/8"x9 1/8."  The white layer is 3 3/8"x8 7/8."

Friday, June 21, 2013

Art Deco - Creation #4

For this "Art Deco" creation I created a monogram canvas.
Love the little Mario and Luigi?  Because nothing just screams "art deco" like two Italian plumbers!  Really though, my husband is a Super Mario nut and I got those for him last Christmas. 
 
I used the stage left, center stage, and stage right monogram features for all my layers.  I also used Cricut Craft Room to help me lay it all out and create this canvas.  For the background I turned off the aspect ratio so that I could make it 10"x10," since the actual background is a rectangle.

The actual monogram is cut at 7" for all three pieces.  This is a pretty basic one, but I covered the letters with glossy accents to make them pop a little more. 
I painted the edges of the canvas black, then adhered all my layers to the canvas.  I adhered the letters with some foam tape for more dimension.

Thursday, June 20, 2013

Art Deco - Creation #3

For my third creation using "Art Deco" I decided to make a Christmas card.  I think it turned out quite well, if I do say so myself.
The card is 5 1/2"x4 1/4" and I used a pre-made card by DCWV for the card base.  I cut an ivory mat at 5 1/4"x4," then a gold mat at 5"x3 3/4," and finally another ivory mat at 4 7/8"x3 5/8."  I embossed the final ivory layer with the D'vine Swirls folder by ProvoCraft, leaving a 1/2" strip at the bottom un-embossed.
 
 
I wrapped the ivory layer with some ribbon and stamped my sentiment on it.  The sentiment is from My Craft Spot and is stamped in rich cocoa ink by Tsukineko.
 
I used the deer image from "Art Deco."  It is cut at 2 1/4," which makes it about 5" long.  I wrapped each deer with some twine to look like a scarf.  The buck is adhered with foam tape for some added dimension.  I finished it off with gold pearls in each corner.

Wednesday, June 19, 2013

Art Deco - Creation #2

Here is a fun take on the "Art Deco" cartridge.
The card is 5 1/2"x4 1/4" and the card base is a pre-made card from DCWV.  I cut a mat from black cardstock at 5 1/4"x4" and then a pink/black striped mat at 5 1/8"x3 7/8."
 
I used Elegant Edges to cut the label shape.  It was cut at 4," for the shadow, basic, and basic-shift layers.  I adhered it to the card with foam tape.
My fun little lady was cut from Art Deco at 4."  I used some liquid pearls on her necklace and glossy accents on her shoes.
 
I used a stamp from Scrappy Moms Stamps for my sentiment.  I thought it was the perfect fit for my fun dancer.  I finished off the front of the card with some pearls around the label.
 
I also finished off the inside of the card.  I cut some glittery pink cardstock at 5 3/8"x4 1/8."  I then cut a black mat at 5 1/8"x3 7/8" and a white mat at 5"x3 3/4."  I cut a strip of black cardstock at 5 1/4"x1 1/2" and a strip of striped paper at 5 1/4"x1 1/4."  The sentiment is also from Scrappy Moms Stamps.


Tuesday, June 18, 2013

Art Deco - Creation #1

I feel like I did a pretty good job showcasing the "All Mixed Up" cartridge with a variety of projects.  The only part of the cartridge I didn't use was the silhouette feature and the tag feature.  I wasn't a big fan of the tag and the silhouette feature is just the basic font in outline.  So, now it is time to showcase and explore another cartridge and this time I have chosen "Art Deco."
 
The first project I have made is a shaped card.
I cut two shadows of the car front at 4" and glued the top part together to create my shaped card.  All my layers are 4" as well.  I cut them all out of shimmery cardstock from DCWV.  I adhered the layers together and adhered them to the card base with foam tape.  I added some glossy accents to the headlights and some liquid pearl to the white piece on the hood.
 
The sentiment is from Scrappy Moms Stamps, the "Mini Messages" set.  I stamped it on white cardstock and cut it into a banner.  I then adhered the banner to the grill of the car.


Saturday, June 15, 2013

All Mixed Up - Creation #6


I used one of the very few shapes on the "All Mixed Up" cartridge to create this fun and whimsical wedding card.
 
 
I actually created an embossing folder using the heart shape.  I created it in Cricut Craft Room by placing two different sizes of hearts (1" and 3/4") all over the embossing sheet.  I embossed the purplish colored paper with my unique embossing folder. 

The card itself is 5 1/2"x4 1/4."  The card base is a pre-made white card by DCWV.  The purplish colored cardstock is 5 1/4"x4" and the pink patterned paper is 4"x2."  The pink patterned paper is from the Happy Day stack by My Mind's Eye.  I cut some olive colored cardstock at 3 1/4"x2 1/2" and some light green cardstock at 3 1/8"x2 3/8" as some mats.  I cut some white cardstock at 3"x2 1/4" and I stamped the sentiment at the bottom of the white cardstock.  The sentiment is from Paper Smooches and the ink is hint of pesto by Tsukineko. 


I used another of the heart images for my image.  I cut it at 2" for both the shadow and the regular feature.  I adhered the green mats and white piece to the card with foam tape for some dimension.  I finished off the front of the card with some buttons by Favorite Findings.  I ran some blossom twine by The Twinery through the dark green buttons and tied a bow with the twine through the light green one. 

I made this card for the following challenges:
365 Cards: "Day 162" - fun and funky heart shape
Color Throwdown: pear pizzazz, white, blushing bride, rich razzleberry, old olive
My Craft Spot: weddings
The Friday Mashup: sketch 


Friday, June 14, 2013

All Mixed Up - Creation #5

I figured I should make a baby card to got with the set of onesies I created.  I think it will be cute using the same font cartirdge for the card as well as the gift.  And I tried to match the colors to the iron-on vinyl I used on the onesies.

The card is 4 1/2"x6 1/4."  I used a pre-made lavender card by The Paper Company for the base.  The dark pink mat is 4 1/4"x6" and is from the Everyday Eclectic stack by Echo Park.  I cut a white mat at 4 1/8"x5 7/8" and the final pink patterned mat is 4"x5 3/4" and is also from the Everday Eclectic stack. 
I cut a strip of white cardstock at 1 5/8"x5 3/4."  I then embossed it with the Geometric Rings embossing folder.  Both "baby" and "girl" are from "All Mixed Up" and are phrases on the cartridge.  I cut them both at 1 1/2."  I covered them in cotton candy glitter by Martha Stewart and then covered them in glossy accents.  The little flower on the word "girl" is also from this cartridge and is cut at 3/4."  I added a pink pearl to the center.

Thursday, June 13, 2013

All Mixed Up - Creation #4

I made a Christmas card  for creation #4 with "All Mixed Up."
The card base is an ornament shape that came from "All Mixed Up."  I used the shadow feature and cut it at 3 1/4," it is actually about 5 3/4" tall.  I used the font feature for the letters "m" and "c."  I stamped the rest of the sentiment using some stamps that were in my stash. 
I heat embossed the stamped part of my sentiment with some shimmery green embossing powder.  The holly is also something I found in my stash.
 
I made this card to fit the challenge at 52 {Christmas} Card Throwdown, which is "shades of green."
 
 
I also have a few tips for you.  You can create a shaped card even without using a Gypsy or Cricut Craft room.  All you have to do is cut two of the same image and adhere the top part together.  I did that with this card.  I adhered the top part of the ornament together and created my fold just under the hanger part of the ornament.
 
 Also, if you create a card with a rounded base there is a way to make it stand upright, without falling over.  All you have to do is cut a straight line across the back part of the card.  You don't see the bottom part of the card cut off from the front and your card will stand upright and is better displayed.

Wednesday, June 12, 2013

All Mixed Up - Creation #3

For creation #3 with the "All Mixed Up" cartridge I made a Father's Day card.  I needed three this year: one for my dad, one for my father-in-law, and one for my grandfather.  I had two in my stash, so this is the third.
 
The card is 5 1/2"x4 1/4."  I used a white pre-made card by DCWV for the card base.  I cut some argyle cardstock at 5 3/8"x4 1/8."  The argyle cardstock is from The  Kidlet Stack by DCWV. 
 
I stamped my image on a piece of white cardstock, cut at 3"x2 3/4."  I cut a red mat at 3 1/8"x2 7/8" and covered the edges with red glitter.  I cut a second mat from tan cardstock, cut at 3 1/4"x3" and inked the edges with Vintage Photo Distress Ink by Ranger.  I then added the sentiment, which is from Scrappy Moms Stamps.  The dog is stamped in sahara sand ink and the sentiment in pearlescent poppy ink, both by Tsukineko.
 
The blocks that spell out "dad" were cut from "All Mixed Up."  They were cut at 3/4" using the square feature.  I added white brads to the corners and adhered them to the card with foam tape.  I then filled in the letters with x-mas red Stickles.
 
I made this card to enter in these challenges:
365 Cards: "Day 160" - sketch
Fantabulous Cricut: Father's Day
The Perfect Sentiment: create a card with a masculine theme

Tuesday, June 11, 2013

All Mixed Up - Creation #2

I have been wanting to do this project for a while now and it is part of the reason I selected this cartridge to showcase.  I knew it had a circle font feature and I liked the playful feel to the actual font.  I got the idea for this project on Pinterest, and you can see the pin here.
Here are the onesies I created:


I used Cricut Craft Room to help me create this one.  I used the circle font for all the numbers.  I had to create the 10, 11, and 12 myself.  I did this by taking one of the circle fonts and hiding all the contours within.  I then selected the numbers I needed for each one and placed them in the circle and sized them to fit.  I typed out the word month(s) and placed them below each number.  I then selected the whole thing and sized it to 3 3/4" tall.  It made each of them about 5" wide.  I used three colors of iron-on vinyl to create my onesies.

This one took me a while, but not because it was really all that difficult.  Sizing everything in CCR took a little while, but once it was done the cutting and ironing took relatively little time.  I got most of this put together on Monday.  The only reason it took me a couple of days to make was because I didn't have enough onesies!  I had to pick up some more in order to finish this project.
This is going to be a gift for friends of my husband's and mine.  They are pregnant with their third child, but their first girl.  I thought this would be a great gift for them and I hope they like it.