Thursday, January 23, 2014

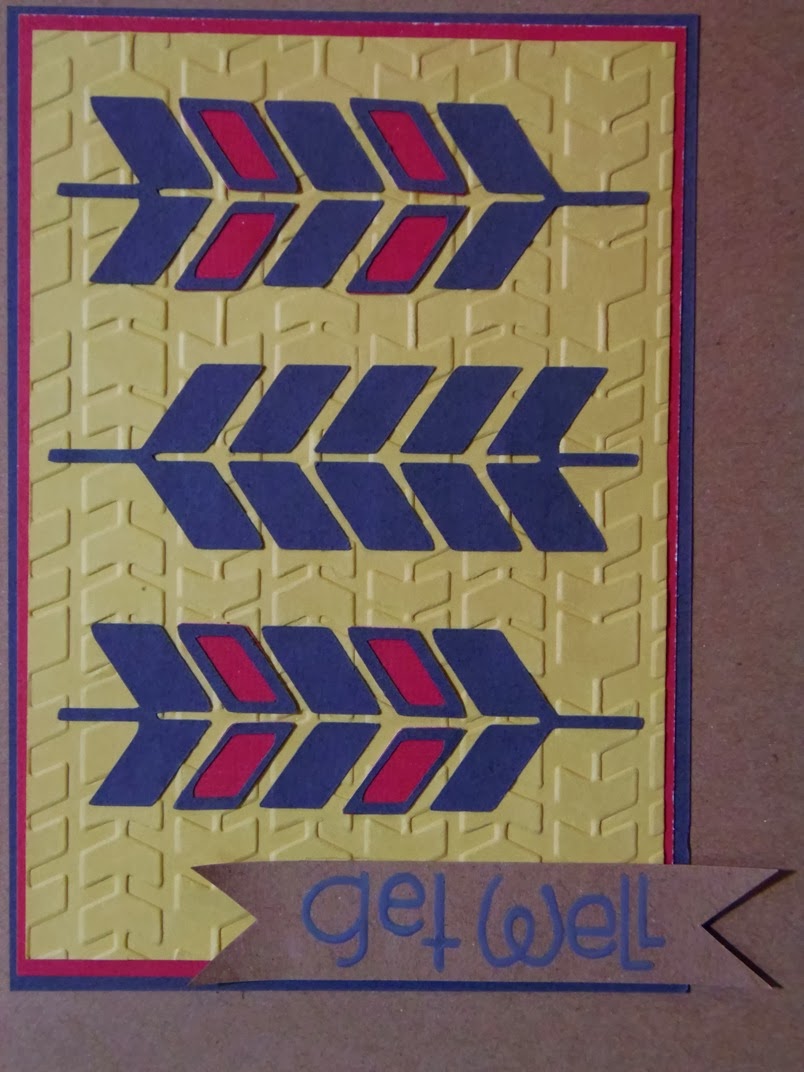
Get Well Chevron Card


The card is 6 1/4"x4 1/2."  I used kraft card stock for the card base.  I then cut my mats: grey- 5"x3 1/2," red- 4 7/8"x3 3/8," and yellow- 4 3/4"x3 1/4."  I embossed the yellow mat with one of the Cuttlebug embossing folders from James' Set.  The chevrons were cut from the "Boho Graphics Iron-On" cartridge.  I sized them at 3," but turned them sideways to put them on my card.  I used Cricut Craft Room to hide the contours on the open pieces, then cut them again in red.  I cut a piece of kraft card stock at 5/8"x3" and trimmed it into a banner shape.  I used a stamp from Paper Smooches for my sentiment.  I then drew it over it again with a grey gel pen.


I made this for the following challenges:

BBTB2: get well card
Color Throwdown: basic grey, riding hood red, crumb cake, daffodil delight
Scrappy Moms Stamps: use red and yellow
My Craft Spot: sketch

Monday, January 20, 2014

Countdown to Baby - Maternity Photo Props

My friend is having her maternity photos taken this weekend.  She wanted a few things for the photo shoot and asked me if I could make them.  So I did.


The tag is from the Silhouette store.  They are called "tags" and are by Michelle Renee (#43062).  I just added a second layer, by re-sizing the inner layer.  The tag is about 6" tall.  The sentiment on the tag is from the "Birthday Cakes" Cricut cartridge.  Most of the sentiment is 0.9" tall, but "April 1" is 1" tall.  The "st" is about 1/2" tall.  I added them to the tag, then covered "April 1st" with midnight blue Stickles.


The sign is 8 1/2"x11."  The shimmery coral layer is 8 1/4"x10 3/4" and the white layer is 8"x10 1/2."  I cut both the coral and white layers in the Silhouette, using a font from the computer.  I then layered the mats on the navy blue card stock so that negative parts of the cuts would show the navy blue and show the sentiment.

Thursday, January 16, 2014

He Reminds Me of Watson

I made a masculine birthday card today:


The card is 7"x5."  I used the "Birthday Bash" cartridge to create my postage stamp shape, with the help of Cricut Craft Room.  The shape is actually supposed to be square, but I needed it to be a rectangle to fit my image.  I turned off the aspect ration in CCR and sized the card to 7"x10" so that it would be 5" when folded.  The card shape can be found on page 31 of the "Birthday Bash" handbook, it is the card/tag feature.  The embossed glittery layer is the shift function of this image.  I sized it at 6"x4" (making sure the aspect ratio was still off).  It was embossed with the Cuttlebug folder called "Clockwork."


The image is a Tim Holtz stamp.  I bought it just a few days ago, it is part of a set called "Time Travelers."  I pretty much bought this set because the images of the two men on it reminded me of Sherlock Holmes and Dr. John Watson, of the classic Victorian style created by Sir Arthur Conan Doyle.  This particular image is the one that makes me think of Watson.  I stamped it with walnut stain Distress Ink.  The paper was trimmed to 4 5/8"x3."  The shimmery brown layer behind the image is 4 3/4"x3 1/8."  I distressed the edges of all the layers except the card base.  I then inked them all, including the card base, with more walnut stain Distress Ink.  The "HB" sentiment is from the Scrappy Moms Stamps set "Hooray for Birthdays."  It is also stamped in the walnut stain Distress Ink.


For the inside I cut two mats.  The glittery brown one is 6"x4" and the ivory one is 5 3/4"x3 3/4."  I distressed the edges of both mats and inked them with the walnut stain Distress Ink.  The sentiment is form Fiskars.  It was stamped with the walnut stain Distress Ink.

I made this card for the following challenges:
{PIN}spirational Challenges: photo inspiration (below)
Die Cuttin' Divas: use something old (Birthday Bash cartridge) and something new (image stamp)

Monday, January 13, 2014

Birthday Wishes

Here is today's card:


The card is 5 1/2"x4 1/4" and made from white card stock.  The teal mat is 5 3/8"x4 1/8."  The white rectangles are 5 1/8"x1 3/8."  The corners were rounded on all these pieces with a 1/4" corner rounder.


The white number strips are from "Graphically Speaking."  The two strip is on page 69 and the one strip is on page 68.  They were cut at 1 1/4" (real dial size).  I added star dust Stickles to some of the twos and ones for a little more sparkle.


The ovals were also cut using "Graphically Speaking."  It is on page 35.  I used Cricut Craft Room to hide all the cuts on the white oval and all but the small holes on the sides of the teal oval.  The teal oval was cut at 2" and the white oval was cut at 1 5/8."


I stamped the image in turquoise gem ink by Tsukineko and heat embossed it with holographic embossing powder.  I then added some white brads to the holes in the sides and adhered it to the card with foam tape.


The sentiment is from Scrappy Moms Stamps, the "Mini Messages" set.  I stamped it in more of the turquoise gem ink.  I cut the strip into a banner and adhered it to the card with more foam tape.  I then tied three pieces of caribbean twine, by The Twinery, into a bow and added them to the side of the sentiment.

I think this makes a pretty, and subtle, 21st birthday card.

I made this for the following challenges:
BBTB2: birthday card with a number
The Friday Mashup: birthday project with twine
{PIN}spirational: photo inspiration below (colors)
Die Cuttin' Divas: sketch (below)

Thursday, January 09, 2014

CAS

Here is today's clean and simple card:


The card is 5 1/2"x4 1/4."  The actual width and height of the card is slightly larger since the white layer actually goes beyond the top and right edges of the card.  I used kraft card stock for the base.  I created the white layer in Cricut Craft Room and the Cricut Craft Room Basics cartridge.  I sized a rectangle to 5 1/4"x4" and then added the circles where I wanted them on the right edge.  I welded it all together then cut it out.  I used the same sized circles for my "bubbles" or "rings" on the edge, just adding another circle, 1/4" smaller, in the middle to create the ring.  I sponged some tangelo ink, by Tsukineko, on the bottom and added my sentiment, stamped in danube blue ink, also by Tsukineko.

I made this for the following challenges:
BBTB2: create a craft surrounding your hobby (my hobby is card crafting)
Color Throwdown: baja breeze, crumb cake, island indigo, white, peach parfait
Fantabulous Cricut: use a sentiment
CASology: "bubbly"

Monday, January 06, 2014

It's a Birthday!

This is my first post for the new year.  Hope everyone is having a good 2014 so far, all six days!  I made a birthday card for my first project of the new year.  I initially wasn't sure what to create, but then I remembered what day it is and came up with the idea of a birthday card.  For those that don't know, it is the, widely accepted, birthday of Sherlock Holmes.  Although Sir Arthur Conan Doyle never actually revealed a birthday for Mr. Holmes many people have theorized this was the date and it was reinforced by Christopher Morley, the founder of the Baker Street Irregulars.  That being said, here is my Sherlock Holmes inspired birthday card:


The card is 5 1/2"x4 1/4" and is made from white card stock.  I cut a piece of dark grey card stock at 5 3/8"x4 1/8" and then some blue patterned card stock at 5 1/4"x4."  I then cut another strip of dark grey card stock at 5 3/8"x1 1/2."  I ran the strip of card stock through the Cuttlebug in the Herringbone embossing folder.  The pale grey patterned card stock is 3"x3 7/8" and the white card stock is 2 3/4"x3 5/8."  I added grey brads to each corner, then adhered it all to the card with foam tape.


The image if from the Silhouette Store.  It is called "Sherlock hat" and is by Ginny Nilson (#11593).  When it is all assembled it is about 2 1/2" tall and about 3 1/2" wide.

I made this for the following challenge: