Wednesday, July 20, 2016

Parrot Shaped Card

How about a shaped card for you today!


The card is from the "Wild Card 2" Cricut cartridge.  It is 6 1/4" tall.  I used flocking on the wing and breast of the parrot.  The beak is covered in glitter, then glossy accents.  I also used glossy accents on the eye.  I finished it off with some Wink of Stella on the tail and crest.  The sentiment is from Jaded Blossom, the Birds of a Feather stamp set.


I made this for the following challenges: 
Color Throwdown: color combo
Fantabulous Cricut: anything goes

Tuesday, July 19, 2016

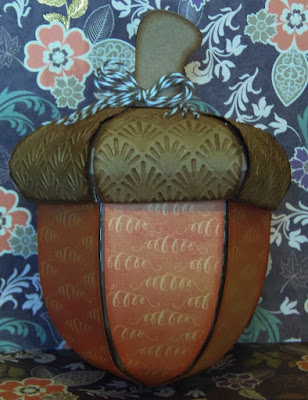
A Taste of Fall

Since the temperature is basically the lowest it is going to be all week, and it is in the 80's, I thought I would think of future days that will promise to be cooler.  So, here is a taste of autumn, an acorn shaped box.


The box is from SVG Cuts, part of the Acorn Autumn set.  I didn't change the size and the box is about 6 1/4" tall from stem to tip.  I used the Palm Leaves Cuttlebug embossing folder for the top of my acorn.  I inked the edges of the bottom of the acorn with pearlescent rust ink by Tsukineko and the top of the acorn with vintage photo Distress Inks by Tim Holtz.  I then finished it off with a twine bow.


Tuesday, July 12, 2016

Some Days You're the Hydrant

Today I made a card of encouragement to send to my uncle, who recently had a stroke.  He is undergoing rehab, but still has a ways to go.  He has a great sense of humor, so I think this will make him smile (which is what I am going for).


The card is 5 1/2"x4 1/4."  I used brown card stock with a thin light brown stripe from The Great Outdoors stack by The Paper Studio for the card base.  The rest of the patterned card stocks came from the 6"x6" Happy Camper stack by Echo Park.  The chevron mat is cut using the Card Mat Dies from Jaded Blossom.


The image is a stamp from Penny Black.  I colored it with Distress Markers.  It is on a circle that was cut with the Stitched Circle Dies by Jaded Blossom.  I then cut some plaid card stock with the Scallop Circle Dies.  I used glossy accents on the puddle, his noes, and his eyes.


The sentiment is from Dog-gone Awesome.  I stamped it on white card stock cut with the Ticket Book Die, the brown mat was also cut with the same die.  I added some sequins to finish off the card.

I made this for the following challenges:
Jaded Blossom: customer choice
Crazy 4 Challenges: cards of encouragement
Cut It Up: anything goes

Thursday, July 07, 2016

Bar Gift Set

This is the final post for all the wedding related stuff that I have made.  This post is of the gift I made my brother and sister-in-law for their wedding.  I made a bar gift set with a lighted wine bottle, wine glass holder, two wine glasses, and two low ball tumblers.


My husband used a drill with a glass drill bit to cut the hole most of the way through, then used a Dremel to finish off the hole.  It also helped polish the edges so it wasn't sharp.  We then strung a strand of 35 lights into the bottle and finished it off by corking it.


My husband also put a nice finish on the wine glass holder, it was unfinished when I got it.


My brother had t-shirts made for them when they were still just dating and on the front it had a picture of the two otters holding hands and on the back it said #teamawesome.  So, I used the otters for the glasses and also used a lemur (which is an inside thing for his wife).  I found a cute lemur, uploaded it into Cricut Design Space, then copied and flipped it.  I moved them close together and welded them together so it looks like they are kissing.  I also used their hashtag on the back of the tumblers and on the base of the wine glasses.  I then made stencils from vinyl for all of these, placed them on my glasses and used etching cream to create them.


Their wedding was in Colorado, so we brought their gift so that they could open it in front of us, although we will wind up shipping it to them (they live in Virginia).  They were blown away by it! 

Tuesday, July 05, 2016

Wedding Cards

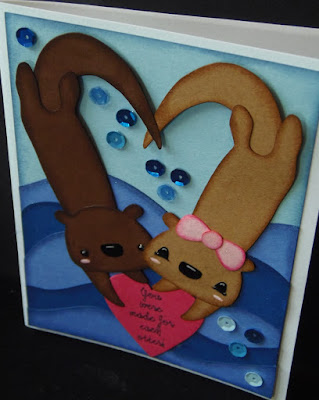
My brother got married yesterday, so I thought I would post the two wedding cards I made for him and his new bride.  The first is the one my husband and I gave him with their gift, the other I made for my mother to give to them.


The card is 5 1/2"x 4 1/4."  I used the image from the Otter Handled Bag from SVG Cutting Files for the background and the otters.  I inked around the edges of everything with various Distress Inks.  I also used the writing feature in Cricut Design Space to write within the heart.  It says "you were made for each otter!"  One of the hashtags they use is #loveotters, so this little image was perfect.  I finished off the card with some white gel pen detail, glossy accents on the noses and eyes, and some blue sequins.


This second card is the one my mother gave them.  My new sister-in-law loves shoes, so that is why I went with the shoe theme.  I used the Cricut "Photo Fun - Celebrations" digital cartridge for the Mr & Mrs frame.  Both shoes are from the "Tie the Knot" cartridge.  I tied some beading cord through the man's shoe for a little realism.  I added pearls to the woman's shoe and popped up the heel to make it seem like it was a high heel.

Saturday, July 02, 2016

Patriotic T-Shirts

My brother's wedding is on the Fourth of July.  The day before, they are having their rehearsal dinner and it is a red, white, and blue theme.  I made my husband and I some t-shirts to wear for the fun times: 


I cut the striped United States, using the "Stand and Salute" cartridge, from freezer paper and ironed on the image.  I then painted in the stripes red.  Once they were dry I ironed on the negative of the image and the stripes that had been removed from the image.  I then painted it blue.  Once it was all dry I ironed on the sentiment, which was cut with silver glitter iron-on vinyl.  I used the "Holidays Through the Year Iron-On" cartridge for the sentiment.


I tie-dyed my husband's shirt.  I did the bulls-eye technique where you gather it up in the middle and put your rubber bands or zip ties (which is what I used) where you want them.  You then add the color to each section.  So, in my case the outer section was blue, the next red, the next was left white, then red again, and I did the rest of the shirt in blue.  Once it was all dried and cleaned, I cut a star from the "Hannah Montana" cartridge, sized to fit in my blue circle, from freezer paper and ironed on the negative.  I then painted the star with white fabric paint.  Voila!  Captain America tie dye t-shirt!