Friday, September 07, 2012

Monogrammed Hard Drives

My husband and I have external hard drives for backing up our computers and he thought it would be a good idea to create something to personalize them. I came up with the monogram idea and used some vinyl to make them. I used Fontopia to cut the "S" and "P" out of vinyl. The "S" is cut at 3" and the "P" is cut at 2 3/4." I think they turned out quite well and my husband thinks they look really cool! Yeah! Always a win when I can impress my husband. :)

Thursday, September 06, 2012

Family & Friends

Here is another double layout for the wedding album I am making for my friends. I am finally done scrapping the ceremony and am now working on the other pictures. The ones with the family, friends and of the bride and groom. Here is a double layout of pictures of the bride and groom with family and friends who came to the ceremony.
Each page of the double layout is 12"x12" and I used the sketch from Stuck On U Sketches to create this layout. I rotated the sketch to work with my horizontal pictures and made it a double layout from a single page sketch. I used an off-white cardstock for the base layer. I then cut some teal cardstock at 11"x10" and some polka dotted cardstock at 9 3/4"x10 1/2." I added a strip of coral cardstock that is punched with an EK Success border punch to the far left side. The two larger photos are 4"x6" and the smaller photos are 4"x4." All the photos are matted, with each layer 1/8" larger than the previous layer. The title is from Life's a Party, cut at 3 1/2." The mat under the title and the journaling area are from Elegant Edges, each cut at 4." I adhered them to the pages using foam tape for some dimension. I added some flowers that I had in my stash and some seashells from Tattered Angels. I sprayed the shells with some Tattered Angels glimmer mist and then followed the outlines on the sand dollars with liquid pearls on the tan shells and Stickles on the coral shell.

Wednesday, September 05, 2012

A Little Someone New

This shaped card turned out really cute! I used Baby Steps to cut the little toy, twice, at 6." I then adhered the heads together and folded it at the neck. I cut it again in the dark green and cut off just the antennae. I adhered all the layers down and gave it a Peachy Keen face. I added some freckles and chalked the cheeks for some "blush." I also covered the eyes in glossy accents for some shine. I tied two pieces of floss into bows and adhered them to the base of the antennae. I used Stickles on the bulbs of the antennae and the dots on the base of the toy. The antennae have mystic green Stickles and I used pink and cotton candy Stickles on the dots of the toy base. I used a Scrappy Moms stamp for the sentiment, then finished off the card with strings of pearls between each layer of the toy.
I made this for the following challenges:

White Snowflakes

For my Perfect Sentiments Design Team project, click here.
I created another Christmas card for my stash and here it is:
The card is 4 1/2"x6 1/4." I used white cardstock for the card base. I then cut some textured cardstock at 4 1/4"x6" and embossed it with the Large Snowflakes embossing folder. I wrapped the embossed cardstock with some white and silver ribbon that I got at JoAnns last Christmas. I then adhered it to the card base with foam tape. I cut three snowflakes at 1 3/4" using Accent Essentials. I adhered them to the ribbon with pop-dots and covered them in star dust Stickles. I finished off the card with a small stamped sentiment.
I made this for the following challenges:

Perfect Sentiments: "All Creatures Great & Small"

This is my first post as a member of the Perfect Sentiments Design Team!
The challenge this week is "All Creatures Great & Small." The challenge: create a card with a sentiment for the season or occasion of your choice. The twist: incorporate a critter somewhere on your card.
My card is 4"x9." I used black cardstock for the base. I trimmed two pieces of polka dotted cardstock at 2"x8 7/8." Both pieces of the polka dotted cardstock are from the Midnight Spell Stack by DCWV. I wrapped some plaid ribbon around the middle of the card to cover up the seam created by the two pieces of polka dotted cardstock. I found a white circle that was 3 1/2" around in my stash and cut a piece of orange glitter cardstock 1/4." I embossed the white circle with a Tim Holtz folder called Bubble Wrap and lightly inked it with midnight black in by Tsukineko. I used Happy Hauntings to cut the cat at 3 1/2." I covered it in black flock and used limeade glitter on his bat tie, I also gave him orange gems for eyes. I adhered it to the card using pop-dots. I finished off the card with my sentiment. It is a stamp I found in my stash, so I don't know the manufacturer.
I hope you enjoyed my creation and I hope you decide to play along with our challenge at Perfect Sentiments!

Thursday, August 30, 2012

Perfect Sentiments Design Team

I just have a quick little announcement! I have been asked to become part of the Perfect Sentiments Design Team and I have accepted. I will start designing for their challenges in September, so be on the lookout for my first post on September 5th. I hope you decide to play along with out challenges as well. :)

Wednesday, August 29, 2012

Fuzzy Purple Spider

I just had to play with Create a Critter 2 again tonight! I made another Halloween card, this time using this cute little spider.
The card is 5 1/2"x4 1/4." I used a black cardstock for the base, then cut some orange glitter cardstock 1/8" smaller and the spider web cardstock 1/8" smaller than the orange. I cut a strip of black carsdstock 1/8" larger than the spider web ribbon I found in my stash. I covered the cardstock with black glitter, wrapped it with the ribbon and adhered it to the card. The spider was cut at 3." I used some purple flock on the body, purple glitter on the hat band, and glossy accents on the buckle and his mouth. I adhered him to the card with pop-dots and then gave him some oversize googly eyes. The sentiment is from Scrappy Moms Stamps. I stamped it on orange cardstock and trimmed it to fit. I then matted it with purple (covered in purple glitter) and black, both 1/8" larger than the previous layer. Pretty simple, but also pretty cute! Enjoy!!

Tuesday, August 28, 2012

Spook-tacular Vampire Bee

A vampire bee?! Weird, I know, but oh so adorable!! :) I just got the Create a Critter 2 cartridge and just had to make something with it. I chose this cute little vampire bee!
Cute right? ;) The card is 4 1/2"x6 1/4." I used a striped purple and black cardstock from the Bewitched Stack by DCWV. I cut the tree cardstock at 3 1/2"x5 1/2." It is also from DCWV, the Midnight Spell Stack. It is matted with black cardstock cut 1/8" wider. I then covered the small part showing with black diamond Stickles. I cut a strip of black cardstock 1 1/2"x4 1/2" and more striped cardstock 1/8" smaller. I wrapped it with black and white twine and added it to the card. I used a button to gather the twine together. The sentiment is from Scrappy Moms Stamps and cut into a banner, with one edge placed under the button. The bee is cut from Create a Critter 2 at 4." I used a Peachy Keen face on it and then hand drew in the fangs with a white gel pen. I added a button where his cape would be tied. I also covered the black parts of his body and head in black diamond Stickles. I used pop-dots to adhere him to the card for some dimension. I then finsihed off the card with two purple buttons in the top corners of the mat the bee is on.
I made this for the following challenges:

Monday, August 27, 2012

Christmas Hedgies

I think I may get a good portion of my Christmas cards done early this year if I keep doing about one a week! Thank goodness for the Christmas Card Challenge blog...great incentive! This week's challenge is to use the sketch to create a Christmas card and here is my interpretation:
I used a premade 5 1/2"x4 1/4" card from DCWV for my card base. I cut some red cardstock at 3 5/8"x1 5/8" and then covered it in red glitter. The striped paper is cut at 3 1/2"x1 1/2." I used a Penny Black stamp for my image and colored it in with Prismacolor colored pencils. I trimmed it down and matted it with some red cardstock, again covered in glitter, that is 1/8" larger than the image. I added some red, green, and yellow glitter to the lights on the image. I then used a Fiskars stamp to stamp the sentiment. I finished it off with two red buttons tied with red/white twine from Martha Stewart. Too cute!! :)
I made this for the following challenges:

Sunday, August 26, 2012

Butterflies

This pretty little card is 4 1/2"x4 1/2." I used a navy blue cardstock for the base. I then cut some patterned yellow cardstock, from the Lemon Flower Stack by DCWV, 1/8" smaller and adhered it on. The next navy blue square is 3 1/2"x3 1/2." I cut some tan cardstock 1/8" smaller and adhered them to the card base. I cut three strips of cardstock and trimmed them all with a scalloped scallop punch by EK Success. I used the navy blue, tan, and a turquoise patterned cardstock, which is from the Citrus Stack by DCWV, for my strips. I cut three navy blue butterflies from Tablescapes - Spring & Summer at 1" and three from the patterned turquoise. I adhered all the navy blue butterflies and one of the turquoise butterflies above the strips. I then used some pop-dots to adhere the second turquoise butterfly. I added some yellow and dark blue gems to the centers of the butterflies. I finished off the front of the card with the sentiment, which is from Fiskars and stamped in night sky ink by Tsukineko.
I also finished the inside of the card. I cut the patterned yellow cardstock at 3 5/8"x3 5/8," the navy blue at 3 1/4"x3 1/4," and the tan cardstock at 3 1/8"x3 1/8" and adhered them all down to the inside of the card. I then adhered the third turquoise butterfly on the lower right hand corner of those mats.
I made this for the following challenges:

Friday, August 24, 2012

Bee Day Card

I finally made the birthday card for my cousin's daughter. :) I made it quick tonight since the birthday party is tomorrow and I have a three hour drive to get there. I used the same layout on my card that I used for my two Halloween cards I made yesterday since I knew all the cut sizes and figured it would go quick. I also used Trick or Treat again.
The card is 5 1/2"x4 1/4" and is folded at the top. The black cardstock is 1/8" smaller than the card base and the yellow polka dotted cardstock is 1/8" smaller than the black. I used Elegant Edges to cut the mat at 4." I embossed the white layer of the mat with a Tim Holtz Sizzix embossing folder called honeycomb. I used Trick or Treat for my little bee girl and cut her at 3 1/2." I flocked her hair, added glossy accents to her tongue, yellow Stickles to the antennae and stripes, and gave her pearls for eyes. I stamped a sentiment from Scrappy Moms Stamps on a white banner that I hand cut and used some pop-dots in the center to lift it up. I finished it off with some black pearls on the edges of the banner. Quick and easy!

Thursday, August 23, 2012

Spooky Day Duo

I just picked up the new Cricut Lite cartridge, Trick or Treat. It is so adorable with all kinds of kids in Halloween costumes. I just had to play with it and made a couple of cards. I also used Day 176's challenge at 365 Cards to create these cards. The challenge is to use at least four techniques to add texture to the card.
Both are 5 1/2"x4 1/4" and fold at the top. I used white cardstock for the base of both of them. I then cut some patterned cardstock at 5 1/4"x4." Both patterned cardstocks are from DCWV. I used Elegant Edges to create the mats for both cards. They are cut at 4." I embossed the white layer on both. The spider web one was done with a Fiskars embossing plate and the other one was done with the Polka Dots Cuttlebug embossing folder. I cut each little cutie at 3 1/2." I used pop-dots to adhere them to the card. I stamped my sentiment on white cardstock that I cut into a banner shape. The sentiment is from Scrappy Moms. I used pop-dots in the center of the sentiment and adhered the ends down to the card for a little dimension. I added flocking to the hair of both cuties, Stickles to the eyes of the spider girl and the pants of little Frankie, gems to the banners and also the eyes of the spider, pearls to the eyes of Frankie, and glossy accents to the spider fangs and treat bucket of the spider girl.

Wednesday, August 22, 2012

Bee-Day Party Goodies

I have already posted the invitations and the banner for my cousin's daughter's birthday party. Well, here is the rest of the stuff I have made.
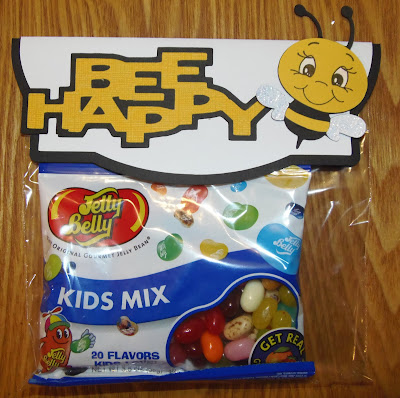
I made some cupcake toppers. I used Live Simply and cut the bee/daisy at 3." I gave them a cute Peachy Keen face, since I used faces on all the bees and then adhered them to popsicle sticks. I created some treat bags. I used a sandwich sized bag and some jelly beans that I got for a steal! I used Elegant Edges to create the bag topper. It is cut at 7 1/4." I then used Sentimentals for the "bee happy" phrase, cut at 1 1/2" and the bee from Create a Critter, cut at 3," with the Peachy Keen face of course. I stapled on the black label, then glued on the white layer. I used pop-dots to adhere the bee for a little dimension.
I also created the thank you cards. They are 5 1/2"x 4 1/4." I used the honeycomb Tim Holtz embossing folder by Sizzix with my Cuttlebug and the yellow cardstock. I used a Scrappy Moms stamp for the sentiment on the front of the card and a Paper Smooches stamp for the inside. I then colored the "thanks" part of the sentiment with a yellow marker. The bee is again Create a Critter, cut at 3 1/2," and give a Peachy Keen face.
The rest of the small bees are leftovers from the treat bags. I didn't know how many I would need when I started working on them and wound up with too many!

Tuesday, August 21, 2012

Ornate Gold Angel

This card is 5 1/2"x4 1/4" and I made it with the fold at the top. The red and gold polka dotted patterned cardstock that I used for the card base is from the Gilded Orchard Stack by DCWV. I wrapped the card with some shimmery gold ribbon. I stamped my ornate angel on white cardstock and heat embossed it with gold embossing powder. I matted it with some gilded cardstock, also from the Gilded Orchard Stack, then adhered it to the card. I stamped my sentiment on white cardstock and heat embossed it with gold powder. I then matted it with some gilded cardstock and adhered it to the card with pop-dots. I finished off the card with some gold pearls on the angel. I rounded the corners of all the elements as well, using a corner rounder from Fiskars.
I made this for the following challenges:

Sunday, August 19, 2012

Bee Gift Box

Here is the gift box I made to wrap up the t-shirt I made for my cousin's daughter. I used Sweet Tooth Boxes to cut the box. It was cut at 11." I used Cricut Craft Room to hide the circle in the scalloped lid. I liked the scallop, but didn't want a hole in it. I used the digital cartridge, Banners, to create the banner. It is cut at 2 1/2" and I inked the edges with pink chalk ink. I used Cricut American Alphabet to cut her name at 3/4." I covered them with glam pink Stickles. I adhered the banner to the box with pop-dots in the middle and glue dots on the sides. I used Mother's Day Boquet to create the daisy. The largest layer of the flower is cut at 5" and the smallest is cut at 3." I gave it a cute little Peachy Keen face. The bee is from Create a Critter, cut at 3 1/2." I also gave it a Peachy Keen face and adhered it to the box with two layers of pop-dots. Her bows are covered in glam pink Stickles and her wings are covered in diamond Stickles.
I made this for the challenge at Peachy Keen.