Wednesday, October 29, 2014

Graveyard Box

I was feeling crafty today!  Ever since I have started school I have not been crafting as much as I used to, but I made the time today.  Here is the Halloween box I made this evening:


I used the "Wrap It Up" Cricut cartridge to create the base of this box, it is on page 62 of the handbook.  It was cut at 10" out of dark grey card stock, using the box feature.  I also cut it again from green, then just trimmed it to keep the grass.  The black piece, that highlights the grass, and the gravestone are the box feature on shift.  I used Cricut Craft Room to hide parts of those cuts so that I could cut them in different colors.


I used some stamps from Scrappy Moms Stamps to accent and provide a sentiment on the gravestone.  The spiderweb and bat are from the Bewitched set and the sentiment is from the A Haunting We Will Go set.  I also inked around the edges of the gravestone with pumice stone Distress Ink.


The zombie hands reaching up from the earth are from the Silhouette Store.  They are by Rivka Wilkins (#48133).  I cut them at about 2" from varying shades of grey and green.  I adhered them to the box with foam tape.

I put the box together, but left one side unadhered so that I could put something inside, then seal it up later.

I made this for the following challenges:
BBTB2: gift box
Fantabulous Cricut: Halloween project
Scrappy Moms Stamps: Happy Halloween
{PIN}spirational Challenges: spooky Halloween picture
Die Cuttin' Divas: Happy Halloween

Wedding Card

My step sister is getting married this weekend.  Well, actually she already got married in October, but it was in India.  Her husband is from India, so they had the wedding there.  This weekend is for those people who couldn't or didn't want to go to India.  I couldn't go due to school and work, but I will be able to make it to her wedding this weekend.  So, this is the card I made for her:


It was super quick and easy to make.  The card base is 5"x5" and made from white card stock.  The purple mat is 4 5/8'x4 5/8" and the white mat is 4 1/2"x4 1/2."  I used a stencil to create my image.  I used perfect plumeria ink by Tsukineko and a makeup sponge to stencil my image on the white mat.  It is actually only part of the whole image, I liked the off-center look.  The sentiment is stamped with a wood stamp I found in my stash.


For the inside I cut a piece of the purple card stock at 4 3/4"x4 3/4" and then a piece of white card stock at 4 1/2"x4 1/2."  I used another wood stamp from my stash for the sentiment on the interior as well.  Both sentiments are stamped in just plain black ink.

Sunday, October 26, 2014

Peeking Monster

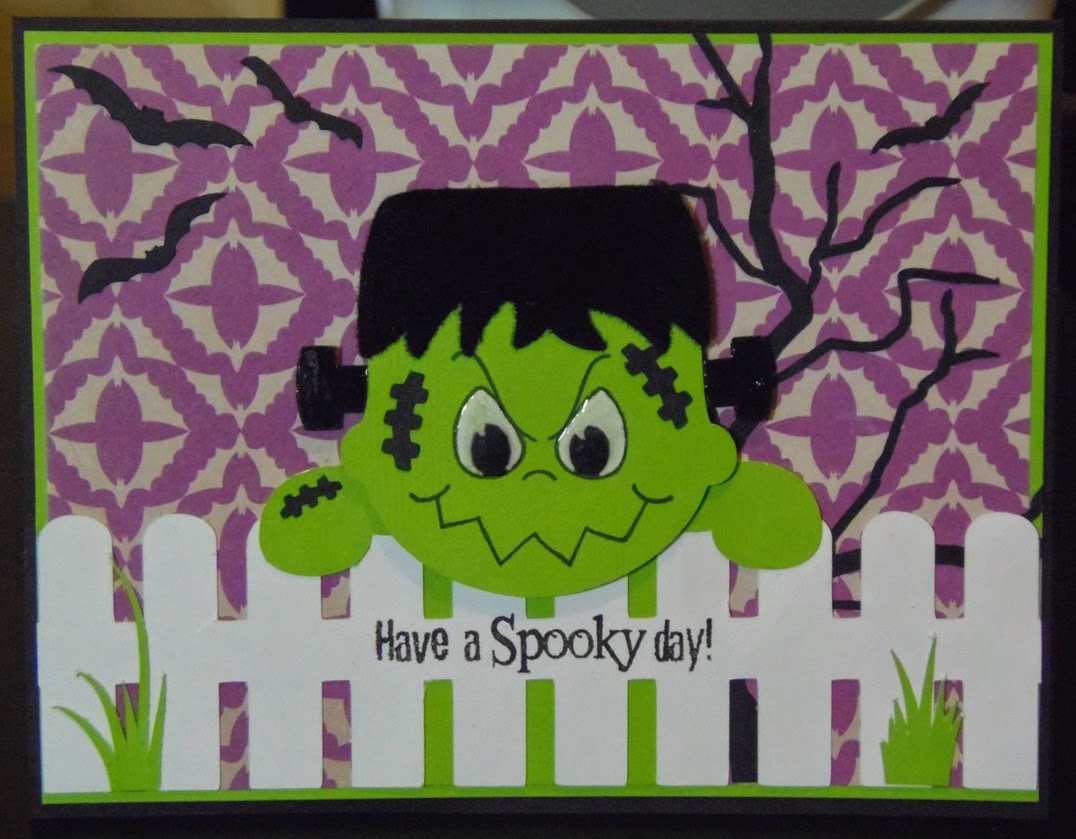
Tomorrow, (Monday, 27 October) I will be seeing National Theatre Live's Frankenstein.  It was performed on stage (and filmed), in the United Kingdom, and this is a limited release of the performance in a cinema.  I am extremely excited that it is actually playing in a cinema in my city and I will be able to see it!  In honor of this I have made a card featuring Frankenstein's monster.


The card is 5 1/2"x4 1/4."  I used black card stock for the card base.  The green mat is 5 3/8"x4 1/8," and the purple mat is 5 1/4"x4."  The purple bat paper is from the Halloween & Fall Stack (2013) by DCWV.


All the cuts are from the Silhouette Store.  The tree and bats are by Patty Young Designs/MODKID (#32601).  It was cut at 4.64," I used some of the bats and trimmed the tree to fit on the card.

The fence is from Sophie Gallo (#19663).  It was cut at 1.523" and I trimmed the sides of it to fit on the card.


Frankenstein's monster is from Michelle Renee (#47757).  I only used the Frankenstein's monster and not the bride part of this set.  It was cut at 2.196" and I didn't cut the eyes.  I used a Peachy Keen face instead.  It is from the Make a Monster Face Assortment.  I colored the white part of the eyes, then added some glossy accents to the eyes.  I also added glossy accents to the bolts and flocked the hair.  The face is adhered with foam tape for a little added dimension.


The sentiment is from Scrappy Moms Stamps, the Bewitched set.

I made this for the following challenges:
My Sheri Crafts: Halloween theme
Cardz TV: Halloween scene card
Tuesday Throwdown: Halloween colors

Thursday, October 16, 2014

A Halloween Getup

My latest Halloween craft isn't really a costume, more just some wearable art with a Halloween theme.

I made a t-shirt, a bow tie, and a hat (which can only be worn when attached to a headband).


First the t-shirt:

I used a black t-shirt and some white iron-on vinyl.  I used the "skeleton rib cage" cut file (#14073), by Silhouette, from the Silhouette store for my image.  I cut it at about 11" tall and ironed it on to the t-shirt.


Now the bow tie:

The bow tie was created with some felt and card stock.  The Silhouette store cut file for the bow tie is "3d blood drips with hand bow" and is by Jamie Cripps (#67647).  I cut it without the tails to make it a bow tie.
  The hand in the center of the bow is 3."  The largest part of the bow is about 2" tall and was cut from felt.  The cut file shows the drippy part of the bow cut in red to look like blood, but I went with green to look like slime.
  I covered the green drippy slime with glossy accents and the white part of the skeleton hand with crackle accents.


Finally, the hat:

The hat is made from card stock and a few embellishments I had on hand.  The cut file for this one is called "mourner's 3d top hat," and is by Snapdragon Snippets (#67665).  I re-sized the file a little so the hat wouldn't be quite as large.  This one is about 6" tall when assembled, the original cut file makes the hat about 8" tall.
I made it out of black card stock.  The hat band is from the Bewitched Stack by DCWV.  Both the lime and fuchsia card stock came from the Halloween Countdown Stack, also by DCWV,  I inked up the edges of the hat with some cloud white ink by Tsukineko.

The felt flowers are from Jolee's Boutique and the white brads are from Spare Parts.  I also covered the skull in crackle accents.  There is also a bow for this hat, but I decided not to use it with all the other embellishments I had added.  Now, I just have to attach it to head band so that it can be worn with the rest of the outfit.

I am entering this in the current Stuck On U Sketches die cut challenge, which is to use a top hat, tea cup, tea pot, or an "Alice in Wonderland" theme.  I obviously wen with the top hat.

Monday, October 13, 2014

It's Udder-ly Cute!

Here is a cute little card I made today, using my Cricut.


The card is 5 1/2"x4 1/4."  The card base is a pre-made one from DCWV.  The brown patterned card stock is cut at 5 1/4"x4" and the blue patterned paper is 4 1/2"x3 1/4."


The cow is from "County Fair," cut at 3," and can be found on page 45 of the handbook.  The eyes are from Peachy Keen Stamps, they are from The Cornies Assortment.  The sentiment is from Scrappy Moms Stamps, it is from the Little Critters set.  I stamped it on one line, rather than two, then cut the card stock into a long banner.  I added some metal button brads by Spare Parts to the banner and the top corners of the blue patterned paper.  The sentiment banner is adhered with foam tape.


I made this card for the following challenges:
BBTB2: use a cow cut
Fantabulous Cricut: make a project using a pun
Peachy Keen: sketch


Thursday, October 09, 2014

More Halloween Houses

The haunted house that I brought to work has been a HUGE hit!  Everyone loves it.  Customers have been asking where they can get the kit to make it for themselves.  Well, two of my coworkers have asked if I would be willing to make them each a house.  I told them that if they got all the supplies, then I would make them each one on one of my days off.  So, they got all the paper and stuff I needed and I spent all day in my craft room yesterday making two more houses.


Again, both these houses are the "Bewitched Cabin" from the Haunted Forest cut file from SVG Cuts.  One is actually flipped from the other because when I assembled the base the house sits on, I accidentally put it together upside down, so I had to flip one of the houses.  It still worked out quite well though.  All the patterned card stock is from DCWV's "Eek-a-Boo" stack.  The felt bats on the second house are also from DCWV, they are actually a garland that I cut apart.


I did a lot of embossing and inking.  The window frames are embossed with the Forest Branches folder and the arches are embossed with the Distress Stripes folder.  The panels at the bottom of the house are embossed with the Sweet as Honey embossing folder (this one is 5 1/2"x12.")  All of those embossing folders are by Cuttlebug.  The chimney was embossed with the Bricked folder by Sizzix.  I inked all the embossed pieces and the base with white chalk ink.  All the patterned pieces were inked with black soot Distress Ink by Tim Holtz.


I am entering these in the following challenges:
Cardz TV: candy wrapper or holder for Halloween treats (the roof comes off and you can fill it with candy, as my husband is doing with his house)
My Craft Spot: "Trick or Treat"


Friday, October 03, 2014

Rustic Wedding Card

My cousin is getting married on Saturday and this is the wedding card I made for her.


The card base is 5 1/2"x4 1/4" and is made from brown card stock.  I then cut some shimmery green card stock at 5 1/4"x4" and the patterned card stock at 5"x3 3/4."  The patterned card stock is actually from their wedding invitation.  The invite was inside a pocket style envelope that was made with this card stock, I took it apart and used it as the background paper.


The hearts are from the "Wedding" Cricut cartridge.  They are both using the blackout feature, the layer is the blackout-shift feature.  They were cut at 3 1/2" from a wood patterned card stock.  I inked the edges with walnut stain Distress Ink by Tim Holtz.  I used an alphabet stamp set called Chunky Alphabet from My Craft Spot for the sentiment.  It was heat embossed with ivory colored embossing powder.  The heart with the sentiment is adhered with foam tape.


I used the same sizes for the mats on the inside of the card as on the outside.  However, instead of the patterned card stock, I used ivory.  I then stamped my sentiment using stamps from Paper Smooches.  The "congratulations" and "best wishes" sentiments are from the Simply Said set.  The "ampersand" is from the Chit Chat set.


I also used more of the envelope card stock to create a pocket for a gift card.  I also cut more hearts for the inside.  These are the same ones as on the outside, from the "Wedding" cartridge.  These ones are all the blackout-shift feature.  The one on the pocket is 1," the one with the K is 1 1/4" and the one with the G is 1 1/2."  The G and K are also from the Chunky Alphabet set by My Craft Spot, and again they are heat embossed with ivory embossing powder.

Thursday, October 02, 2014

I Built Two Houses

I built two houses in the last week...paper houses that is.  I created a couple of haunted houses for Halloween.


Both are made from the same cut file from SVG Cuts.  It is also part of the Haunted Forest set, of which I have already made the witch hat box.  I made one initially for my husband to put on display at work.  He likes being able to dress up his desk a bit, so I have started making things for him to put on it and the house is what I made for Halloween.  First, though, I brought it to work to show off a little.  Since I work in a craft store I knew it would be appreciated.  Well, everyone there liked it so much that I had to make one to put on display at my work.

This is the first house I made.  The papers are all from The Bewitched Stack by DCWV.  This was either last year's Halloween stack or from the year before.


I inked the edges of pretty much all the pieces except the solid black ones.  The orange house panels were inked with spiced marmalade, the plaid house panels were inked with black soot, the green polka dot house panels and the green hounds-tooth roof panels were inked with peeled paint, and the purple door, mat, and roof panels were inked with weathered wood.  The embossed window frames were covered with a light grey ink.

I embossed the shutters and window frames with Cuttlebug embossing folders.  The shutters were embossed with the Spider Stew folder and the window frames were embossed with the Distress Stripes folder.


This is the second one I made.  I used this year's Halloween stack by DCWV, it is called the Eek-a-Boo Stack.


I did a lot of embossing and inking on this one as well.  The chimney was embossed with a Sizzix folder called brick, then inked with white ink.

The window frames and arch details were embossed with the Forest Branches Cuttlebug folder, then inked with white ink.  The base was also inked with white ink.  All the patterned paper was inked with black soot Distress Ink.


The roof comes off of both of the houses and you can use them as gift boxes or to hold candy, or you can put in tea lights.  The windows are made of vellum, so the light shines through.