The card on the left is made with Learning Curve. The card is a pre-made A2 card, with the pattern already on it. I cut the letters from Learning Curve in dark green paper, using the shadow feature. I then cut them again, regularly, with gold paper. I don't remember at what size they were cut. I then adhered them on, using pop dots on some of them for a variety of texture. The card on the right is from My Community, and is a 5"x5" square card. The background papers are from Me & My Big Idea. The green tree paper is a flocked paper. The gingerbread house is from My Community, cut at 4 1/2." I cut out all the pieces multiple times, in multiple colors. I then adhered them all down on the house, I used some pop dots on the gumdrops and truffle. I used a lot of Stickes and glitter on this one. The gumdrops are covered in glitter, from Martha Stewart. The roof and snow on the chimney are icicle Stickles, I also used Stickles on the candy canes and dots on the house. I used a white gel pen for the swirl on the truffle and the salt on the pretzel.
Thursday, September 30, 2010
More Classmates Cards
Okay, so I have more cards made with the classmates cartirdges than I realized. See what happens when I am not sitting in my craft room with my cartridges in front of me? ;) I keep forgetting that My World and My Community are classmates cartridges, I just lump them with the shape cartridges, and for some reason I just skipped over Learning Curve. So here are the cards made with those cartridges. :) 
The card on the left is made with Learning Curve. The card is a pre-made A2 card, with the pattern already on it. I cut the letters from Learning Curve in dark green paper, using the shadow feature. I then cut them again, regularly, with gold paper. I don't remember at what size they were cut. I then adhered them on, using pop dots on some of them for a variety of texture. The card on the right is from My Community, and is a 5"x5" square card. The background papers are from Me & My Big Idea. The green tree paper is a flocked paper. The gingerbread house is from My Community, cut at 4 1/2." I cut out all the pieces multiple times, in multiple colors. I then adhered them all down on the house, I used some pop dots on the gumdrops and truffle. I used a lot of Stickes and glitter on this one. The gumdrops are covered in glitter, from Martha Stewart. The roof and snow on the chimney are icicle Stickles, I also used Stickles on the candy canes and dots on the house. I used a white gel pen for the swirl on the truffle and the salt on the pretzel.
This last card, and I promise it is the last classmates cartridge card, is from My World. I used another pre-made A2 card. The car is from My World. I cut it using the shadow feature in white, then the regular cut in red and the wheels in black. I placed some vellum behind the windows for a litte more realism. The sentiment is computer generated and cut with my scalloped circle Nestabilities.
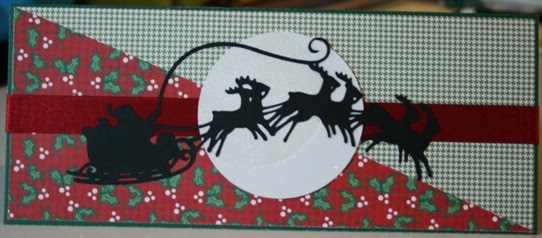
The card on the left is made with Learning Curve. The card is a pre-made A2 card, with the pattern already on it. I cut the letters from Learning Curve in dark green paper, using the shadow feature. I then cut them again, regularly, with gold paper. I don't remember at what size they were cut. I then adhered them on, using pop dots on some of them for a variety of texture. The card on the right is from My Community, and is a 5"x5" square card. The background papers are from Me & My Big Idea. The green tree paper is a flocked paper. The gingerbread house is from My Community, cut at 4 1/2." I cut out all the pieces multiple times, in multiple colors. I then adhered them all down on the house, I used some pop dots on the gumdrops and truffle. I used a lot of Stickes and glitter on this one. The gumdrops are covered in glitter, from Martha Stewart. The roof and snow on the chimney are icicle Stickles, I also used Stickles on the candy canes and dots on the house. I used a white gel pen for the swirl on the truffle and the salt on the pretzel.
Wednesday, September 29, 2010
Classmate Christmas Cards
Holy alliteration Batman!! I didn't really intend to go for the all "c" title, but I think it works. ;) Since my first Christmas card in my personal challenge was from a classmates cartridge I thought I would show off the the rest of the cards I made using the other classmates cartridges I own. 
I don't own too many classmates cartridges, mostly because I'm not a teacher, so I don't really need them. I do, however, have a few because they are good fonts. The card on the left is using Speaking of Winter. I made it a 5"x7" card, but I don't remember what size I cut the letters. The snowflake in the corner is a dimesional sticker. The paper is all Debbie Mumm and the ribbon is from my stash. I added some Stickles to each letter for some glitter. The card on the top right is using Printing 101. This card is 4 1/2x6 1/4." I used a green cardstock for the base card, then covered it with the patterned papers. I folded down the top right corner so you could see a glimpse of the double sided paper. I added some buttons tied with fiber to help hold down the folded corner and a ribbon from my stash. The "JOY" is cut from Printing 101 at 1" (I believe). The last card, on the bottom right, was made using Cursive 101. The card is a pre-made A2 card. I used a Cuttlebug embossing folder and then sanded the top of the embossing to expose the white core. I then used my Gypsy to weld the letters from Cursive 101 for my sentiment. This was a super simple one, but I liked the embossing so much I didn't want to detract from that. Hope you enjoy these and stay tuned for more!!
Tuesday, September 28, 2010
Sad Day
Well, I have packed up my Cricut and all my crafting supplies. :( That means I won't be able to do any crafting for a while. My husband has said that I will not be fun to live with for a while since I won't be able to create. ;) I think I will be a litte busy though...we have a heck of a drive coming up, then I have a wedding in Washington, then we are visiting family in Minnesota, and finally we have to find a place to live at our final destination. I will miss not being able to do any crafting for a few weeks. I will, however, be able to post older projects that I did this summer.
This is a pre-made A2 card. I cut the circles and the star from George and Basic Shapes, I couldn't tell you what size anymore. The state of Alaska came from 50 States. I cut it regular in silver cardstock, then with the shadow feature in white cardstock. I used a pencil to draw in the lines and then colored the red pieces with a marker. I used some striped cardstock for the pole and gold cardstock for the ball on top. I think I will probably wind up sending this to the North Pole Fire Department for their Christmas card...it seems fitting.
Earlier this summer I challenged myself to make a Christmas card with every cartridge I own. I have not been posting them because I wanted to wait until I was done. Well, I finished not too long ago, so I think this would be a good time to post them, since I won't be able to make anything new for a while. I do own more cartridges than when I started this challenge, but I only did the challenge for the ones I owned when I started, otherwise it would be neverending!!
So, for today I will post the card that started it all for me. I have been living in North Pole, Alaska (for 6 more days) and my husband is on the volunteer fire department up here. I was looking at the patch they wear and came up with a Christmas card that was inspired by it. 
This is a pre-made A2 card. I cut the circles and the star from George and Basic Shapes, I couldn't tell you what size anymore. The state of Alaska came from 50 States. I cut it regular in silver cardstock, then with the shadow feature in white cardstock. I used a pencil to draw in the lines and then colored the red pieces with a marker. I used some striped cardstock for the pole and gold cardstock for the ball on top. I think I will probably wind up sending this to the North Pole Fire Department for their Christmas card...it seems fitting.
Saturday, September 25, 2010
Creepy Candle
I came up with this 5"x7" card. The patterned papers are from the DCWV Midnight Spell stack. I used an EK Success border punch on the black spider web paper. The purple spider cardstock is cut at 3"x6." I used a piece of ribbon and wrapped it around the purple cardstock twice. The sentiment is computer generated using a font called "chiller." I matted it with some black cardstock. I used my Gypsy to cut out the candle four times at 3 1/2." I cut it out in black twice, once using the hide contour feature to hide all the cuts in the candle and again with all the cuts in place. I cut it out of a light yellow cardstock, again hiding all the middle cuts. Finally I cut it out of a dark yellow cardstock normally. I cut off just the flame of the yellow candles and used some yellow Stickles on the light yellow flame and layered on the dark yellow flame. I layered the blacked out candle with the cut candle. I then used Glossy Accents on the top layer. I used two layers of Glossy Accents for a really shiny look on the candle. I really like how it all tu
rned out. Enjoy!!
Friday, September 24, 2010
Being Sick Stinks
I made this card for the challenge at 365 Cards. The challenge today was "quite a pair." The rules were to use one blossom and one brad, and they must be used together; they must be in the center of your card; and anything else goes as long as you meet those requirements. I am also making this for the challenge at Paper Cutz. Their challenge this week is to make a card, layout or craft project with a digital, hand stamped, or Cricut image of a critter.
Pilgrim Birdie
Thursday, September 23, 2010
I'm Moving!
A few months ago my husband applied for a job in Minnesota. We just found out today that he received the job! We have been waiting two weeks to hear the official answer, which has been rough. Mostly because we will be moving out of here on October 4th. That doesn't give us much time, but since his interview we have been planning like we were going to be moving. That means we have some stuff packed up, basically stuff that we don't really need on a regular basis. Now, though, we can start really packing. It is good timing to be leaving Alaska, since it is starting to really get cold out, but we should be able to beat any snow. Soon we will be off on another adventure!
No Cricut?!
I made this card 5 1/2"x4 1/4," using patterned paper from the DCWV Midnight Spell stack, the glittery green paper is also from that stack. I cut a piece of green cardstock, K&Company, at 5"x3 1/4." I then punched it with a web punch around the page from Martha Stewart. I layered plain purple cardstock and the glittery green cardstock to make a frame. I had this stamp in my stash, I think it is Fiskars, and I stamped it with black i
Wednesday, September 22, 2010
Bundle of Joy
Dam Good Birthday!
I made this card following the sketch from Peachy Keen. They also added a twist, you had to use kraft cardstock on your creation. I also used the Simon Says recipe from Papercraft Star. Their recipe was: make a card, base-5 1/2"x5 1/2," mat-5"x5," score mat 5 times at 1/4," 3 flowers from a die cut or punch, 3 buttons and twine. Enjoy!!
Tuesday, September 21, 2010
Wedding Dress
Monday, September 20, 2010
Cornucopia
This card is being entered into the following challenges:
Paper Playtime: autumn
Paper Sundaes: fall/halloween colors
My Sheri Crafts: autumn
Fantabulous Cricut: in my garden harvest time
Pile It On: red, brown, green, yellow
Sunday, September 19, 2010
Santa's Sleigh
I used the sketch from 365 Cards' Super Sketchy Sunday. The colors are this week's Just Us Girls challenge: green, red and black. Over at Um Buggin's Cricut Cuts & Stamps she is asking to see your favorite cut from the Christmas solutions cartridge. I love this cut, I just don't use it as often as I would like. This one is nothing fancy, but I love how it turned out...very Christmasy!
Green Floral Card
Crafty Hos' Challenge Blog: sketch #62
Picture Perfect Creations: colors-bashful blue, early espresso, pear pizzazz
Alphabet Challenge Blog: U is for Unused Stash-the flower stamp, the butterfly stickers and the embossing folder
The card is 5 1/2"x4 1/4." I used some dark brown cardstock for the base. All the papers used are from my stash and are actually scraps. I was more than happy to use some of those up. :) The patterned green mat is cut at 3 1/2"x4" and the blue embossed mat is cut at 3 1/4"x3 3/4." I embossed it with the Birds and Swirls folder. I have had this embossing folder for well over a year and I have never used it! Can you believe th
at? I'm not sure why, because I really like it, so I'm glad to finally use it. The patterned blue paper is cut at 3 3/4"x2." The green paper on the bottom is 4"x1 1/2." I stamped the flower on some green cardstock in a dark brown ink. I cut around the edge of the flower, and pop-dotted it onto the front of the card. I have had this stamp for a while too, I don't even remember when I got it. I stamped both the outside and inside sentiments in the same brown ink. I added the butterfly stickers, which is another think I have had in my stash for a while. I can't even remember why I bought them, but I thought they fit quite well with this card.
Saturday, September 18, 2010
An Apple a Day
This a 5"x5" card. I used a dark green glittery cardstock. I then used a pale yellow and embossed it with an embossing folder from the Preserves companion set, it was cut at 4 3/4"x4 3/4." The red square is cut at 3 11/16"x 3 11/16" and is made using a shimmery red cardstock. I used a pale yellow cardstock for the next square, which is cut at 3 1/2"x3 1/2." I did some doodling on the square with a black pen. The red circle is cut at 3 1/4" from George and Basic Shapes. I cut the other circle at 3" from George as well and then did some more doodling on it. The apple is cut at 2 1/2" from Home Accents. The apple blossoms are from 50 States and cut at 2." Once the card was assembled I used some black Stickles for the seeds in the apple and some black flat-backed pearls around the circle.
The Song in My Heart
I used sketch #82 from Card Patterns for the layout of the card. I rotated the sketch for my card. The colors are from this week's Color Throwdown: pink pirouette, basic gray & rich razzleberry. The theme comes from Crafty Creations Challenge, which is a music and/or dance theme.
Friday, September 17, 2010
Halloween Treat Bags
Peachy Keen is starting a new challenge on Fridays, called "Let's Face it Friday." The rule for this challenge is to use Peachy Keen face stamps on your project. For their first challenge they ask that you make Halloween Treat containers, and of course to use a Peachy Keen face stamp on it somewhere.
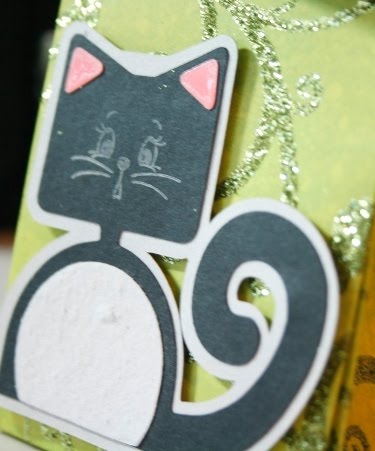
I made these little treat containers using a K&Company Halloween paper pack. I started off with a 8 1/2"x11" piece of cardstock and after it is all folded the container is 3 1/2"x4 1/2." I used Mini Monsters (I am really lovin' this cart) for all the characters on the containers. The Frankenstein character and the candy corn girl are both cut at 4." The cat is cut at 3." I used the shadow feature for all of them so they would stand out on the patterned containers. I used pop-dots to adhere them to the containers. I also used glossy accents on the hair and boots of Frankenstein, the boots of the candy corn girl and the pink part of the ears on the cat. I used some Stickles on the white part of the candy corn and I flocked the stomach of the cat. I finished off the bags with some eyelets and ribbon to close them. The faces on Frankenstein and the candy corn girl are from the Critter faces set and the face on the cat is one of the stamps that came with the Cottage Cutz dies, it is for the Tear Kitty. These are the only Peachy Keen stamps I currently have, so I made them work for me. I think they all turned out really cute though. Enjoy!
Fang-tastic Halloween
Subscribe to:
Posts (Atom)