Monday, January 31, 2011

Just Because

Another card with no Cricut, just Cuttlebug. This is a 6 1/4"x4 1/2" card. I used white cardstock for the base. I then cut some pink cardstock 1/4" smaller and ran it through the Cuttlebug, using the Polka Dots embossing folder. I cut a strip of dark brown cardstock at 6"x2 1/2" and used my white gel pen to add some faux stitching around the edge. I cut another piece of dark brown cardstock at 3"x4 1/4" and also embossed it with the Polka Dots folder. I cut a piece of white cardstock at 2 3/4"x4" and layered it on top of the embossed brown cardstock. I printed a digi stamp from Some Odd Girl and colored it with Prismacolor pencils. I then cut her out and adhered her to the white rectangle. I added some glam pink and diamond Stickles to her wand, shoes, bow and wings for some sparkle. I wrapped the card with some pink ribbon. I then used some 2"x2" Cuttlebug flower dies to cut out the pieces for the flower. I curled up the sides and used pop-dots to layer them for a 3-D effect. I added a brown gem to the middle. I stamped the sentiment on the side of the white rectangle, using jumbo java ink by Tsukineko.


I made this card for the following challenges:


Button Love

A quick and simple 4 1/2"x4 1/2" card. I didn't use any Cricut on this one, just my Cuttlebug. I used teal cardstock for the card base. I then cut some pink cardstock 1/4" smaller than the card base. I embossed it with the Seeing Spots embossing folder. I then trimmed the bottom edge into a curve and adhered buttons, following the curve I cut. The heart is a Fiskar's punch. I adhered it to the card using pop-dots. I used some pink Stickles on the edge of the heart and the embossed pink piece. I finished it all off with a sentiment stamp. I stamped it with pink petunia ink by Tsukineko.


I made this card for the following challenges:

Saturday, January 29, 2011

Card Creations & More Challenge #2

It is time for another challenge at Card Creations & More by C! This week's challenge is to make something Valentine's related. I decided to make a Valentine's Day centerpiece.
I used a hurricane vase that I had on had. I also had the filler on hand. I had bought these pink and red gems about 5 years ago and I have never used them. I thought this was the perfect opportunity. I wrapped the vase with some white & silver ribbon. I then cut the heart at 2" from Sweethearts. I pieced it all together and then attached it to the vase with pop-dots. I used Sweethearts for all the cuts. The cupid is cut at 3," the "Hugs & Kisses" sentiment is cut at 2 1/2" and the swirly heart is cut at 2." I used the shadow feature on all the cuts and I also ran the cupid through the Cuttlebug with the D'vine Swirls folder. I attached all of the cuts to sticks and then stuck them in my vase, using the filler to hold them up.


Thanks for checking out my project! Come on over to Card Creations & More by C and join us with our Valentine's Day project challenge. I can't wait to see what you come up with!

Friday, January 28, 2011

Friends are Like Stars...

I made this card using sketch #125 at Clean & Simple. I used the colors from Color Throwdown, which are early espresso, kiwi kiss, marina mist & old olive. I used the "Friendship Challenge" theme at The Paper Variety, they had a quote to inspire you, which I used on the inside of my card.
The card is 4"x6" and made of a shimmery dark brown cardstock. I cut some white cardstock at 5 1/2"x2 1/2." I then cut some light green cardstock at 2 1/4"x1 1/2," some dark green cardstock at 2 1/4"x1 3/4" and the blue cardstock at 2 1/4"x2." I adhered them to the white rectangle and then embossed the whole piece with the Stars embossing folder and my Cuttlebug. I stamped the sentiment on the front using key lime ink and the sentiment on the inside using pearlescent sky blue ink, both from Tsukineko.

Butterfly Smile!

I used some yellow glitter cardstock to make this 5"x5" card. I cut four pieces of striped cardstock into 2 1/4" squares. The circles are from George and Basic Shapes. The larger yellow one is cut at 3 1/4" and the smaller glittery yellow one is cut at 3." I cut the "Smile" sentiment from Gypsy Wanderings at 1." The butterfly is from Once Upon a Princess, cut at 2 3/4." I mounted to the card with pop-dots. I finished it off with some yellow, orange and crystal Stickles. I made this card for the following challenges:
  • 365 Cards: "This & That" - make a card using "this" color and for "that" theme, in this case, yellow and to cheer someone up
  • BBTB2: Once Upon a Princess butterfly cut
  • Jitterbuggin': sketch, yellow, stripes
  • Crafty Creations: "Let's Heat It Up"

My Lil' Cupcake


This is a 4 1/2"x6 1/4" card. I made the card base from red cardstock. I then cut some white cardstock at 4 1/4." I cut it in three pieces: 3," 1" and 1 3/4." The piece that is 1 3/4" is cut in half. I embossed all the white pieces with the D'vine Swirls embossing folder. I used Mini Monograms to cut the scalloped pink circle and the white circle, both at 3." I then stamped a cupcake image onto the white circle and mounted it to the card with pop-dots. I added two heart shaped buttons to the top left corner and the sentiment is a sticker I had in my stash. I finished it off with bow, attached to the scalloped circle.


I made this card for the following challenges:


Flaunt It Fridays Challenge #9

The challenge this week at Flaunt It Fridays is to use Paper Pups. The specific cut is to use the cat & dog and use the border feature. This cut can be found on page 104 of the handbook.
I made a card, again, for this challenge. The card is 5 1/2"x4 1/4." I used some pink polka dotted paper for my card base. I then used a black and white houndstooth pattern as the next layer, I cut it at 5"x3 3/4." The dog and cat are cut at 5" using the fit to length feature out of a bright pink cardstock. It means it is just a little smaller than 1 3/4." I then used my Gypsy to hide all the cuts and cut it again out of black cardstock. I then embossed the black cardstock using the Tiny Bubbles embossing folder. I used some pink bling for their eyes. I cut the heart from Paper Pups as well, at 1 1/2," and the same bright pink cardstock. I then cut the heart again, using the shadow feature, from a shimmery white cardstock. I pop-dotted the heart to the card. I finished it all off with some pink bling in the top two corners. Enjoy!!

I can't wait to see what everyone else comes up with! Come flaunt your Cricut cuts along with us at Flaunt It Fridays.

Thursday, January 27, 2011

Blog Award!!

I was awarded the Stylish Blogger Award by Angie at Luvs2Scrapbook!! Thank you so much Angie! The rules of this award are to list 8 things about yourself and 8 other bloggers you would like to award it to. Well, here are 8 things about me:


  1. I LOVE movies....I always have something on in the background and own over 500 movies!
  2. I also love music. If I don't have a movie on there is music in the background. I wish I had my own soundtrack.
  3. My favorite food is spaghetti a la carbonara.
  4. I am a second degree black belt in Tae Kwon Do.
  5. I love soccer and have been playing since I was in third grade. I am a goalie!
  6. I've never broken a bone.
  7. I've been a volunteer fire fighter and EMT since 2005.
  8. I used to be a cop in Montana.

It is hard to chose just 8 bloggers to give this award to. There are so many great blogs out there, but here is what I managed to come up with:

Head Over Heels

This card is 4 1/2"x6 1/4" spinner card. I made the card base from cream colored cardstock and layered it with some patterned brown paper, cut at 4 1/4"x6." I cut two strips of light brown cardstock at 6 1/4"x1 1/2." I adhered one to the card base. In the other strip I cut a slit at 4 1/4"x1/4" and then embossed with the Polka Dots embossing folder. I put a brad through the slit and then an eyelet over the brad. I opend the prongs so that I had a place to put the monkey. The monkey is cut from Sweethearts at 2 1/2." I then mounted him to the brad/eyelet fixture. I adhered the strip to the card with foam tape so that the monkey would spin and slide across the card. The sentiment is computer generated and layered on two mats. All the hearts are from Sweethearts as well, cut at 1." The large heart on the bottom was my original cut and the other hearts are the pieces left over from its layers. The largest heart has five layers, the other heart has four, with the top two pop-dotted. I used a marker to highlight the monkey's mouth and eyes and I inked his face for some texture.
I made this for the Tuesday challenge at Peachy Keen. Their challenge was a sketch, with a twist. The twist was to create a monochromatic card. I also made this for the Terrific Tuesday Challenge at Scrappy Moms Stamps. Their challenge was to use the Sweethearts cartridge. Finally, I am entering this in Thursday's challenge at 365 Cards, which is "Lovely Layers." You must layer at least two different things and have at least three layers for each thing.

Tuesday, January 25, 2011

Cake Coma

How cute is this Penny Black image? Those little hedgies look like they are in a cake coma. :) This card is 5"x7" and made of a light blue cardstock. I cut some patterned paper at 6 1/2"x3 1/2." I cut a red diamond at 3 1/2" and adhered that down to the card. I stamped the image on white cardstock and colored it using my Prismacolor colored pencils. I trimmed it to fit, then cut a piece of grey-blue cardstock to a 3 1/2" square. I mounted them all to the card. I cut three ovals from George and Basic Shapes. The grey-blue oval is 3," the red oval is 2 3/4" and the white oval is 2 1/2." I then stamped my sentiment to the oval. I adhered the red and grey-blue oval to the card and then pop-dotted the white oval.

I made this card for the following challenges:

Monday, January 24, 2011

Dino-mite!

This is a quick and simple 5"x5" card that I made today. I used some yellow cardstock for the card base. I then layered it with some patterned olive green paper, cut 1/8" smaller than the card base. I cut a strip of striped red carstock at 4 7/8"x1 3/4" and then used an EK Success border punch on the bottom edge. I cut some dark green polka dotted paper at 4 3/4"x1"and layered it on the striped red cardstock. The dinosaur is cut from Dinosaur tracks. I stamed the sentiment, which is from Scrappy Mom's, on some yellow cardstock and matted it with some red cardstock. I used pearlescent ivy ink by Tsukineko. Perfect birthday card for a little boy.

I made this for the following challenges:

Sunday, January 23, 2011

Word of the Day Cards Part 2

I got my final three word of the day cards done for last week's 365 Cards challenge. So, without further ado here they are:


Thursday's word was "Peace." I used sketch #202 from CPS for the layout of this card. I also used the challenge at Paper Sundaes, which was "distressing." I also used the photo inspiration from Crafty Hos for the idea of this card. The card is 3 3/4"x9." I sanded the edges and inked the edges for the distressing. I also used some alcohol ink and rubbed it on the card to add to the look. I cut some blue patterned paper at 4"x3 3/4" and adhered it to the card. I then edged the paper with some dark blue ribbon and layered that with the patterned blue ribbon. I cut the three peace symbols from Cars. The largest is cut at 2" and the smaller two are cut at 1 1/2." The sentiments are from a stamp in my stash.


Friday's word was "Love." For this challenge I made a matching card and treat box set. I used Laura's sketch at 2S4Y for the card and I also made this for the 3-D/template challenge at Just Us Girls. I used Tags, Bags, Boxes & More for the heart box. I then wrapped a ribbon around the box. I cut the cupid from Sweethearts at 2 1/4." I embossed the white layer with Swiss Dots. The "for you" is also from Sweethearts, cut at 1 3/4." I used some xmas red Stickles around the heart at the top of the box. The card is 5 1/2"x4 1/4" and I used the same paper that I used for the box. I cut some shimmery red cardstock at 5 1/2"x2 1/2." I then cut some white cardstock 1/4" smaller and embossed it with the Swiss Dots folder. The cupid is cut at 2 1/2" and the "love" is cut at 1 3/4."
Saturday's word was "Happiness." I used the sketch by Kazan on 2S4Y for this card. The card is 5 1/2"x4 1/4" and made of white cardstock. I cut some floral patterned paper at 5 1/4"x4" and adhered it to the card base. I wrapped some blue ribbon around the card and tied it off. I then stamped the sentiment on some white cardstock and then trimmed it to fit. I cut some glittery blue cardstock 1/4" larger and adhered it all to the card. The vase and flowers is from Country Life and cut 2." I finished it off with some flat-backed pearls in the center of the flowers.

Saturday, January 22, 2011

Word of the Day Cards Part 1

This whole week at 365 Cards they are doing a word of the day challenge. Each day they have a new word and you have to make a card using that word. I'm not sure why, but I wound up waiting until the end of the week to work on my cards for them, but here they are, at least the first three. I will have the final three tomorrow. I also combined them with other challenges, I will let you know by each card what other challenge is represented. :) And, like always, I will let you know how I made them.

Monday's word of the day was "Wisdom." I made this card using the sketch from Clean & Simple and I also used the challenge at My Sheri Crafts, which was "organic." She asked for your interpretation of the theme. To me it was a natural feeling card, so I used greens, browns and creams for my colors and a tree as my image. The card is 5 1/2"x3 5/8." I used a shimmery green cardstock for the card base. I cut the cream cardstock using Pagoda and the Kanji Word feature at 5." I then embossed the top part of the cut with the Japanese Scales embossing folder. I wrapped a ribbon around the card and then added my image. I used one of the bonsai trees from Pagoda, cut at 2 1/2." I used my computer to write the sentiment for the inside (which I don't have a picture of). It says, "Wisdom is not attained by years, but by ability." -Plautus

Tuesday's word of the day was "Believe." I used sketch #174 at Mojo Monday for this one and the color combo at Crafting with Cristina. Her color challenge was black, white and grey or silver. This is a 5"x5" card. I used white cardstock for the base. I then cut some black cardstock using Paper Lace at 4 3/4." I then glittered the cut out pieces of the lace with some silver glitter. The two small, white butterflies are from a Martha Stewart punch. The large, silver butterfly is from Picturesque and is cut at 1." The sentiment, "Believe," is from Gypsy Wanderings and cut at 2." I left the inside blank on this card.
Wednesday's word was "Bliss." I made this card using sketch #99 from Card Patterns. I made this a 4 1/2"x6 1/4" card. I used a light green cardstock for the base. I then cut a piece of floral patterned paper 1/8" smaller than the card base. I cut some more of the light green cardstock at 4"x5" and then used an EK Succes border punch at the top of the piece. The green patterned paper is cut at 3 3/4"x4." I then wrapped a ribbon around the piece and tied a knot with a small piece of the ribbon and attached it with a glue dot. I didn't have enough ribbon to actually tie it around the piece, so I improvised. The label with the sentiment on it is from Lacy Labels, cut at 2 1/2."

Friday, January 21, 2011

Get Your Bark On!

This is my last card for the day. I think it will work quite well as a masculine birthday card. This is a 4 1/2"x6 1/4" card. I used cream cardstock for the base of the card, then cut some patterned brown paper 1/8" smaller and mounted that on the card base. I then used some patterned orange cardstock for the next layer, cut at 4"x5 3/4." I tied a bow with some brown ribbon around the orange cardstock and then mounted that to the card. I cut a brown square at 3 1/2," an orange square at 3 3/8," then a cream square at 3 1/4." I embossed the cream cardstock with the Argyle folder. The dog is cut from Four Legged Friends at 2 3/4." All the cardstock is from TPC Studios, except the cream cardstock and the patterned brown paper. I stamped the sentiment, from Scrappy Mom's Stamps, on some orange cardstock. I used jumbo java ink from Tsukineko. The eyes of the dog are gems and I also added some gems in the four corners of the square.
I made this for the Jitterbuggin' challenge. The challenge this week is to make something using brown and one other color and to add a bow somewhere on your creation. I am also entering this into the Paper Cutz challenge. Their challenge is to make a project using any theme and any colors you like.

Valentine's Day Pixie

The challenge at My Creative Time is to use Paper Doll Dress Up or Everday Paper Dolls and add some embossing. I chose to use the pixie on Paper Doll Dress Up. I thought she would make a cute little Valentine's Day card for a little girl. I used the sketch and theme of "M is for Magical" at ABC Challenge. I also am entering this in Alphabet Challenge, which is "L is for Ladies;" they want to see ladies on your projects. This week's Let's Face It Friday at Peachy Keen is to use their face stamps and also use X's and O's on your project. Finally, I also made this for Papercraft Star. Their challenge is to use some or all of the colors (magenta, orange, teal, aqua) and to use two or more of the following elements: ribbon, embossing, stamped image and die cut.

The card is 5"x5" and made of a shimmery white cardstock. I cut a piece of magenta cardstock at 4 3/4"x4 3/4." I then embossed the cardstock with one of the Once Upon a Princess companion folders. The aqua strip is cut at 5"x1 1/2" and embossed with the Swiss Dots embossing folder. I wrapped some ribbon around it and adhered that to the card. I cut a piece of white cardstock at 4"x4 1/2" and punched it with a Martha Stewart border punch. I cut some aqua cardstock at 3 1/4"x4 1/4" and some shimmery white cardstock at 3"x4." I used the Stamping cartridge to cut out the XOXO that is in the background, they are cut at 3/4." I then glittered it with some white glitter. The little pixie is cut from Paper Doll Dress Up and cut at 3 1/2." I inked her hair a little and added some gems to the flowers on the belt and wand. I used a Peachy Keen stamp for the face and colored in her mouth. She is pop-dotted to the card for some added dimension.

Flaunt It Fridays Challenge #8

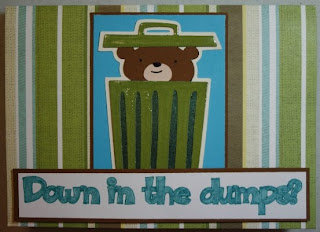
The challenge this week at Flaunt It Fridays is to use the bear in the trash can cut from Give a Hoot. This cut can be found on page 61 of the handbook.
I decided to make a pop-up card for this challenge. I used paper from the Flower Shower Stack from DCWV for the background on both the front and inside of the card. I cut the bear in the can at 3 3/4." I used some glossy accents on the trash can and lid. I cut some cream cardstock using the shadow feature, then mounted the bear on some teal cardstock, which I trimmed to fit. I then cut some brown cardstock 1/8" larger than the teal. I used my Cricut markers to write out the sentiment, using Cuttin' Up for the font (the cartoon feature). The brown cardstock is 1/4" larger than the white cardstock the sentiment is written on. I used pop-dots to adhere the sentiment to the card. The bear on the inside is cut at 2 3/4" from ZooBalloo. I cut another trash can lid from Give a Hoot that fit the bear. I used glossy accents on this lid as well. The sentiment on the inside is cut using Cuttin' Up (regular feature) at 1." I then glittered the whole phrase.
Hope you come on over to Flaunt It Fridays and flaunt your bear in a trash can. If you don't have the Give a Hoot cartridge, then find a similar cut or image and use that. Can't wait to see what everyone comes up with!! Enjoy!!

Thursday, January 20, 2011

Sweet as Sugar

I seem to be on a layout making kick. I don't even know what I am going to use half of them for, but I am really getting into making these layouts. I used the sketch from The Paper Variety for this layout. The challenge at Made By Momo is to create something with a princess theme. This paired really well with the challenge at The Cuttlebug Spot, which was to be inspired by a children's game. Between the sketch and the princess theme all I could think of was Candy Land and Princess Lolly, so this layout is inspired by Princess Lolly. :)

The layout is 12"x12." I used some pink cardstock for the background. I then adhered a large piece of paper shaped like a candy mint onto the pink cardstock. I can't remember the brand of the paper, but I got it at JoAnn's a year or so ago when it was on clearance. I cut two mats for each photo. The smaller mat is for a 3"x5" photo and the larger is for a 4"x6" photo. I stamped around the edge of the page with a sentiment stamp from My Pink Stamper. I used pink grapefruit ink by Tsukineko. My version of Princess Lolly is cut from Once Upon a Princess at 4 1/2." The crown she is wearing is also from Once Upon a Princess and cut at 1." I added some Stickles and jewels to the crown and her dress. The lollipops are cut from Paisley and Mickey and Friends. The three largest lollipops (glittery yellow and magenta) are from Mickey and Friends. They are cut at 2 1/2." I then embossed the lollipop with the D'vine Swirls embossing folder. The rest of the lollipopos are from Paisley. I cut three at 2" and three at 2 1/2." I embossed them with Swiss Dots. I added Stickles to the three smallest lollipops. The title is a sticker that I found in my stash and thought fit the page perfectly. I adhered it to some shimmery white cardstock and then matted it with some pink and used pop-dots to adhere it to the page.

Wednesday, January 19, 2011

Daddy's Girl

This is a two page layout I did for a few challenges. Cooking With Cricut's challenge is to have at least three flowers on your project. They have a twist though, you can use either of the sketches they have, one for a two page layout and one for a card. The sketches are optional, but I decided to give the layout one a try. I've never used a sketch to create a layout before, so this was fun. I also made this using the color combo provided by Color Throwdown: pear pizzazz, kraft & blushing bride. The challenge at Crafty Creations Challenge is to include birds, polka dots and the color green on your project.

The pages are 12"x12." I used kraft cardstock for the background. The large oval that is split between the two pages is from George and Basic Shapes and is cut at 10" from a green polka dot cardstock. The pink strips are 12"x2 1/2." The birds are both from Home Decor. The one on the left page is cut at 5." I used green cardstock and cut the bird using the shadow feature. I then cut the bird normally from a pale pink polka dot paper. The bird on the right page is cut at 3 1/2" with the green cardstock and the shadow feature, then regularly with the pink polka dot paper. I cut the legs off this bird though. I used eucalyptus Stickles to fill in all the green cardstock on the bird. The flowers are from Shall We Dance. The flower on the left is cut at 3 1/2" and the bunch on the right are cut at 5 1/2." I ran the leaves of the bunch through the Cuttlebug using the Polka Dot embossing folder. The title is from Hannah Montana, cut at 2 1/2." I used cotton candy Stickles on the "girl." The picture mats are cut at 1/4" larger than the previous layer. On the left page: the top mat is for a 4"x6" picture, the bottom left mat is for a 4"x4" picture and the bottom right mat is for a 3"x5" picture. On the right page: the top mat is for a 4"x6" picture and the bottom three are for 3"x3" pictures. Everything is adhered down to the background with my ATG gun, except the birds, which are pop-dotted.

Feeling Lucky

I thought this turned out to be a pretty fun card. I wasn't sure of it at first, but I kept going and I like the end result. The card is 4 1/2"x6 1/4" and made of black cardstock. I trimmed some shimmery white cardstock at 4 1/4"x6" and then embossed it with the Polka Dots embossing folder. I cut a strip of pink cardstock at 2 1/2"x6 1/4" and used an EK Success border punch on each side. I then added some black gems on every other scallop. I wrapped some ribbon around the strip and then adhered it to the card. I cut the corset from Tie the Knot at 3 1/2." I used some black pearls for the buttons on it and then added some diamon Stickles to the edges for some shimmer. I adhered it to the middle of the card with some pop-dots. I used Blackletter for the "feeling," cut at 1," and used my Gypsy to weld the letters together. "Lucky" is cut from Indie ar at 1." I used some black glitter on both parts of the sentiment. I left the inside blank because I still don't quite know what to put on the inside...I'm hoping I can come up with something good, but until then, it stays blank. :)
I made this card for the following challenges:

Tuesday, January 18, 2011

Love You


I made this card using sketch #201 from CPS. I used the color combo from Cricut Cardz; which is black, white and red. I also made this for the challenge at Paper Playtime. Their challenge is to use the word "love" on your project.
The card is 5 1/2"x4 1/4." I made it out of white cardstock and then cut some black cardstock 1/4" smaller. I mounted that on the card and then used my white gel pen for some faux stitching around the card. I cut a white strip at 5"x1 1/2" and then used a Martha Stewart border punch on the bottome. I cut a strip of red cardstock at 4 3/4"x3/4" and ran it through the Cuttlebug with the Swiss Dots embossing folder. I then mounted that to the card. I used Lacy Labels to cut the label out at 3 1/4." I used the shadow feature for the white layer. The red hearts were then glittered. "Love You" is from Lyrical Letters, using the connected feature. I then glittered the heart for it as well. I adhered the sentiment to the label and then used foam adhesive to mount it to the card. Enjoy!!

Happy Happy Joy Joy

This card is 5"x5." I used white cardstock and then cut some glittery blue paper to 4 7/8" square and mounted it on the card base. I cut some pale orange cardstock at 1"x3 1/4" and at 1 1/4"x3." The pale green cardstock on both of those strips are cut 1/8" smaller than the orange. They were then mounted near the bottom of the card. I used Birthday Bash for the ice cream sundae and the bird. The sundae is cut at 3 1/2." I embossed the shimmery white cardstock with the D'vine Swirls folder. I inked the edge of the dish and spoon and the leaf of the cherry. I then used my iRock to add bling to the sundae as sprinkles. The bird is cut at 2" and I added bling to the hat and Stickles to the hat and legs. I used two different thicknesses of pop-dots to mount the sundae and the bird. I used a stamp and some turquoise gem ink to stamp the "happy happy" sentiment. I used Opposites Attract to cut the orange "joy" at 1 1/4" and then embossed with the Tiny Bubbles embossing folder. The second "joy" is cut from Joys of the Season out of a blue foiled cardstock. I used a gem for the dot on the j. I then finished it all off with four pale green star shaped brads in the corners of the card.

I made this card for the following challenges: