Thursday, January 31, 2013

Christmas Wreath

I think this card is perfect for today since our temperatures are well below zero and the wind chill is making it even colder!  So, I made another Christmas card.
The card is 5 1/2"x4 1/4" and made from red cardstock.  I also cut two red mats, one at 4 3/4"x3 1/2" and the second one at 4"x2 3/4."  I cut three white mats.  The first one at 5 3/8"x4 1/8," the second one at 4 5/8"x3 3/8," and the third one at 3 7/8"x2 5/8."  I temorarily adhered the three white pieces togethter and stamped some snowflakes on them, with some of the snowflakes overlapping all three layers.  It is a technique that I learned called Triple Time Stamping.  You can see a video tutorial here.

After stamping all my images I heat embossed them with a glittery white embossing powder.  I then adhered my white layers to the red mats and adhered them all to the card base.  I used Joys of the Season to cut my wreath.  I cut three of the same wreath in three different sizes.  The largest size is 4," the middle size is 3 1/2" and the smallest one is 3 1/4."  I layered them together and covered their berries with x-mas red Stickles.  I ran some brown and white twine through three buttons and used it to tie a bow in the fourth.  I then adhered the buttons to the corners of the middle mat.  The sentiment is stamped in jumbo java ink on a banner that was die cut from a Spellbinders die called "Ribbon Banners."  I adhered the banner with two different thicknesses of foam tape so that it was lower on the sides and higher in the middle.
 
I made this card for the following challenges:

Wednesday, January 30, 2013

Perfect Sentiments: "Anything Goes with a Die Cut and a Sentiment"

It's Wednesday and that means it's time for another Perfect Sentmients challenge!
 
"Anything Goes with a Die Cut and a Sentiment"
 
The challenge: create a card for the occasion of your choice
The twist: you must include a die cut and sentiment
 
Our challenge this week is sponsored by Bugaboo Digi Stamps.  The winner will recieve 7 free digis!

For this challenge I created a thank you card.  The card is 5 1/2"x4 1/4" and made from white cardstock.  I cut some black cardstock at 5 1/4"x4" and some yellow floral paper at 5 1/8"x3 7/8."  I stamped the "thank you" phrase multiple times across the left side of the yellow floral paper.  The stamp is from Fiskars.  And I adhered three black pearls on the lower right hand side. 
I used a Spellbinders Nestabilities die for the black and yellow labels. I embossed the yellow layer with the Baby's Breath embossing folder.  The bee is from Home Decor and is cut at 3."  I sprayed the black layer with some sparkle Shimmer Mist.  I adhered the bee to the card with foam tape.
 
I finished the inside of the card in a similar fashion to the outside.  I cut some black cardstock at 5 1/4"x4" and some yellow floral paper at 5"x3 3/4."  I cut another piece of black cardstock at 4"x2 3/4" and finally some white cardstock at 3 7/8"x2 5/8."
 
Now that you've seen my inspiration head on over to The Perfect Sentiment and check out what the rest of the design team has for their inspiration.  Then be sure to link up your card.  I can't wait to see what you create!

Tuesday, January 29, 2013

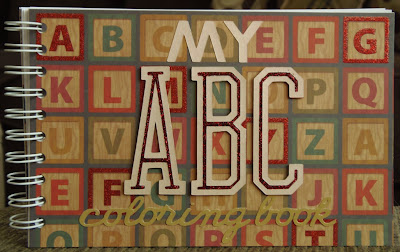
ABC Coloring Book

This was a pretty big project!  It took a while to create, but it wasn't really all that hard.  It was just time consuming.  What is this project you ask?  It is a coloring book of the alphabet!
I used my Cricut and a whole LOT of cartridges to create this book.  I will take you through what I did and then let you know all the cartridges I used on this project.
 
I used Cricut Craft Room to create all of this.  First I created a template of the page size so that I would be able to lay out my letters and images in a way that fit on the page.  My book is 5 1/2"x8 1/2."  I sized a rectangle in Cricut Craft Room and then made sure I never actually cut it out or drew it when creating the book.  I simply used it to position all my elements.
 
I used the sneak peek of Extreme Fonts for my letters.  They are all sized at 4 1/2."  I used a variety of cartridges for my images.  I selected an image that started with each letter of the alphabet and added any layers that were necessary.  I then used the template I created to position the letters and the images on the page. 
 
I placed my cardstock on the cutting mat, using the position of my template as my guide.  I then replaced the cutting blade with a black Cricut marker.  I then drew out all my letters and images. 
 
I created a front and back cover using some cardstock from the Kidlet Stack by DCWV.  I adhered two pieces together for both covers.  I cut a title using my Cricut.  I named my book "My ABC Coloring Book."  Once all the pages and covers were done I used my Cinch to bind the book together.  See, it really isn't all that hard.  It just takes quite a bit of time to select, position, and draw your images. 


Now, here are all the pages and the cartridges I used for the images.  As a reminder, all the letters are from Extreme Fonts, these are the Big League feature.
 Alligator - Animal Kingdom (head feature)

Balloons - Celebrations

Cupcake - Doodlecharms
 
Dog - Doodlecharms
 
Elephant - Animal Kingdom (head feature)

Fire - Create a Critter
 
Guitar - Indie Art
 
House - Handy Man
 
Ice Cream - Birthday Bash

Jacks - Sugar and Spice

Key - Going Places
 

Ladybug - Doodlecharms
 
Moose - Animal Kingdom
 
Necklace - Forever Young

Ostrich - Everyday Paper Dolls

Parrot - Ole
 
Quail - Noah's ABC Animals
 
Rainbow - Noah's ABC Animals

Snail - Live Simply

Television - Nifty Fifties

Umbrella - Everyday Pop-Up Cards
 
Vulture - ZooBalloo
 
Whale - B is for Boy
 
Xylophone - B is for Boy

Yo-Yo - B is for Boy

Zebra - Everyday Paper Dolls


Saturday, January 26, 2013

Hearts

Here is a quick and cute Valentine's Day card for you today!
 
The card is 5 1/2"x4 1/4."  I used black cardstock for the card base.  I cut some red and white houndstooth paper at 5 3/8"x4 1/8."  I then cut a strip of black cardstock at 4 1/8"x1 1/2" and a strip of white cardstock at 4 1/8"x1 3/8."  I added my sentiment, which is a stamp from Scrappy Moms Stamps and some black pearls and adhered it to the card. 
 
I used Gypsy Wanderings for the hearts.  I cut the red ones at 2," 1 1/2," and 1 1/4."  I cut the black ones at 2 1/4," 1 3/4," and 1 1/2."  I covered the black hearts with black glitter by Martha Stewart.  The faces are all from Peachy Keen Stamps.  I used a white gel pen to add some accents to the faces as well as some glossy accents to give the tongue on the one heart a little shine.  All the hearts are adhered with different thicknesses of foam tape.
 
On the inside of the card I cut more of the houndstooth paper, this time at 5 1/4"x4."  I cut some black cardstock at 4 1/2"x3 1/4" and some white cardstock at 4 3/8"x3 1/8."  I cut a strip of black cardstock at 3 1/8"x1 1/4" and a strip of white cardstock at 3 1/8"x1 1/8."  I used another stamp from Scrappy Moms Stamps for the inside sentiment as well.


I made this card for the following challenges:

Wednesday, January 23, 2013

Perfect Sentiments: "Blue, Silver, & White"

Time for another challenge, brought to you by The Perfect Sentiment!  Our challenge this week:
 
"Blue, Silver, & White"
 
The challenge: create a card with a sentiment for the occasion of your choice
The twist: incorporate the colors blue, silver, & white into your card design
 
Here is the card I made:
This is the perfect challenge for me to make an anniversary card for my husband, even though our anniversary isn't until November.  Our wedding colors were blue, silver, and white!  I used white cardstock for my card base, it is 5 1/2"x4 1/4."  I cut a piece of silver cardstock at 5 3/8"x4 1/8" so that it would show through.  I used Cricut Craft Room Basics to create the rectangles and hearts.  The blue layer is cut at 5 1/4"x4" and the white layer is cut at 5"x3 3/4."  The heart cut from the blue layer is 1 3/4" and the one cut from the white layer is 2."  I used a stamp from Scrappy Moms for my sentiment.  I then embossed the white layer with one of the folders from James' Set.  I adhered the white and blue layers together and adhered them to the card base with foam tape.  It is super simple, but I really love how it turned out and I think my husband will love it as well.
 
Now head on over to The Perfect Sentiment and check out what the rest of the DT has created to inspire you.  Then, create your own card for the challenge and link it up.  I can't wait to see what you create!

Tuesday, January 22, 2013

Floral Birthday

Just a quick and simple one for you this morning. 
This card is 5 1/2"x4 1/4."  I used a patterned yellow cardstock for the base.  It came from a stack by Recollections called Everyday Moments.  I cut a piece of glittery blue cardstock at 4 1/2"x3 1/4" and some white cardstock at 4 1/4"x3."  I adhered them together and put three brads in the top right corner.  I added the sentiment, which is a stamp from Scrappy Moms Stamps.  It was stamped in dandelion ink by Tsukineko.  The flower is from Easter 2010 and cut at 2."  The actual size of the flower is about 4" though.  I adhered the blue rectangle to the card with foam tape.  And that's all there is to it!
 I made this for the following challenges:


"Movies" Wall Art

I made this wall art to put in our family room, when we finally finish remodeling our basement.  Our family room is where we have set up our big TV for watching movies, playing video games and where we play board games and stuff like that.
I think I might have to make another piece of wall art for games.  Hmm....something to think about.  Anyways herer is my wall art:
I used the sneak peek that is free to cut this week in Cricut Craft Room of the new font called Extreme Fonts for the word "Movies."  The letters are 6" and I welded them together in Cricut Craft Room and cut it out of gold vinyl.  The film reel is cut from Movie Night at 10."  I cut the film part from black vinyl and the reels in dark grey vinyl and silver vinyl.  I adhered the film reels to the back piece of glass of a float frame.  I then adhered the word "Movies" to the front piece of glass of the float frame.

I put it up on a wall for the picture, but that isn't where it will go in the end.  I have to wait until our remodel is done for that.  :)
I am entering this in BBTB2's. current challenge which is to use a Cricut font.

Monday, January 21, 2013

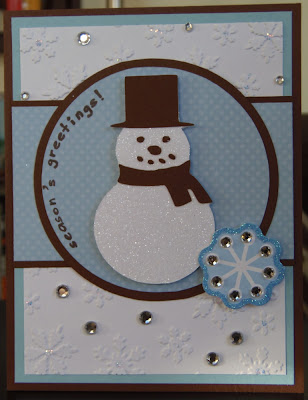
Glittery Snowman

I am going to be SO ready for Christmas this year.  If I can keep making Christmas cards, even once a month I will be all set!  Thank goodness for challenge blogs that feature Christmas challenges year round, too bad I just didn't notice them before.  ;)
This card is 5 1/2"x4 1/4" and is made from brown cardstock.  I cut some baby blue cardstock at 5 1/4"x4" and some white cardstock at 5"x 3 3/4" for my mats.  I embossed the white cardstock with a Darice snowflakes embossing folder.  I cut a brown strip of cardstock at 2 3/8"x4" and some blue polka dotted cardstock at 2 1/4"x4."  I adhered the strip to the card and added some clear gems to the embossed circles on the card (you can no longer see them since I coverd them up).  I also put some icicle Stickles in the middle of all the snowflakes. 


I used Martha Stewart Seasonal Cake Art to cut the circles and the snowman.  The brown circle is cut at 3 1/2" and the blue polka dotted circle is cut at 3 1/4."  The snowman is cut at 3."  I covered the snowman in crystal fine glitter by Martha Stewart.  I adhered the snowman to the card with foam tape.  The sentiment was stamped using jumbo java ink by Tsukineko and the snowflake sticker is from my stash (I have absolutely no idea where I got it).

For the inside of this card I cut more of the blue polka dotted cardstock, which I should mention is from the Arctic Wishes Stack by DCWV, at 5 1/4"x4."  I cut some brown cardstock at 4 3/4"x3 1/2" to mat a piece of 4 5/8"x3 3/8" white cardstock.  I used a light blue ink from ColorBox to stamp a snowflake, which is from Fiskars.  I used another stamp for the sentiment; it is stamped using rich cocoa ink by Tsukineko.

I made this card for the following challenges: